Contents
SAML Single Sign-On (SSO) into Drupal using ADFS as IdP
The Drupal SAML integration using the miniOrange SAML SP module establishes seamless SSO between ADFS and the Drupal site. The users will be able to log in to the Drupal site using their ADFS credentials. This document will walk you through the steps to configure Single Sign-On - SSO between Drupal as a Service Provider (SP) and ADFS as an Identity Provider (IdP). The module is compatible with Drupal 7, Drupal 8, Drupal 9, and Drupal 10.
Installation Steps
- Download the module:
Composer require 'drupal/miniorange_saml'
- Navigate to Extend menu on your Drupal admin console and search for miniOrange SAML Service Provider using the search box.
- Enable the module by checking the checkbox and click on install button.
- Configure the module at
{BaseURL}/admin/config/people/miniorange_saml/idp_setup
- Install the module:
drush en drupal/miniorange_saml
- Clear the cache:
drush cr
- Configure the module at
{BaseURL}/admin/config/people/miniorange_saml/idp_setup
- Navigate to Extend menu on your Drupal admin console and click on Install new module button.
- Install the Drupal SAML SP 2.0 Single Sign On (SSO) - SAML Service Provider module either by downloading the zip or from the URL of the package (tar/zip).
- Click on Enable newly added modules.
- Enable this module by checking the checkbox and click on install button.
- Configure the module at
{BaseURL}/admin/config/people/miniorange_saml/idp_setup
Drupal SAML SP Metadata
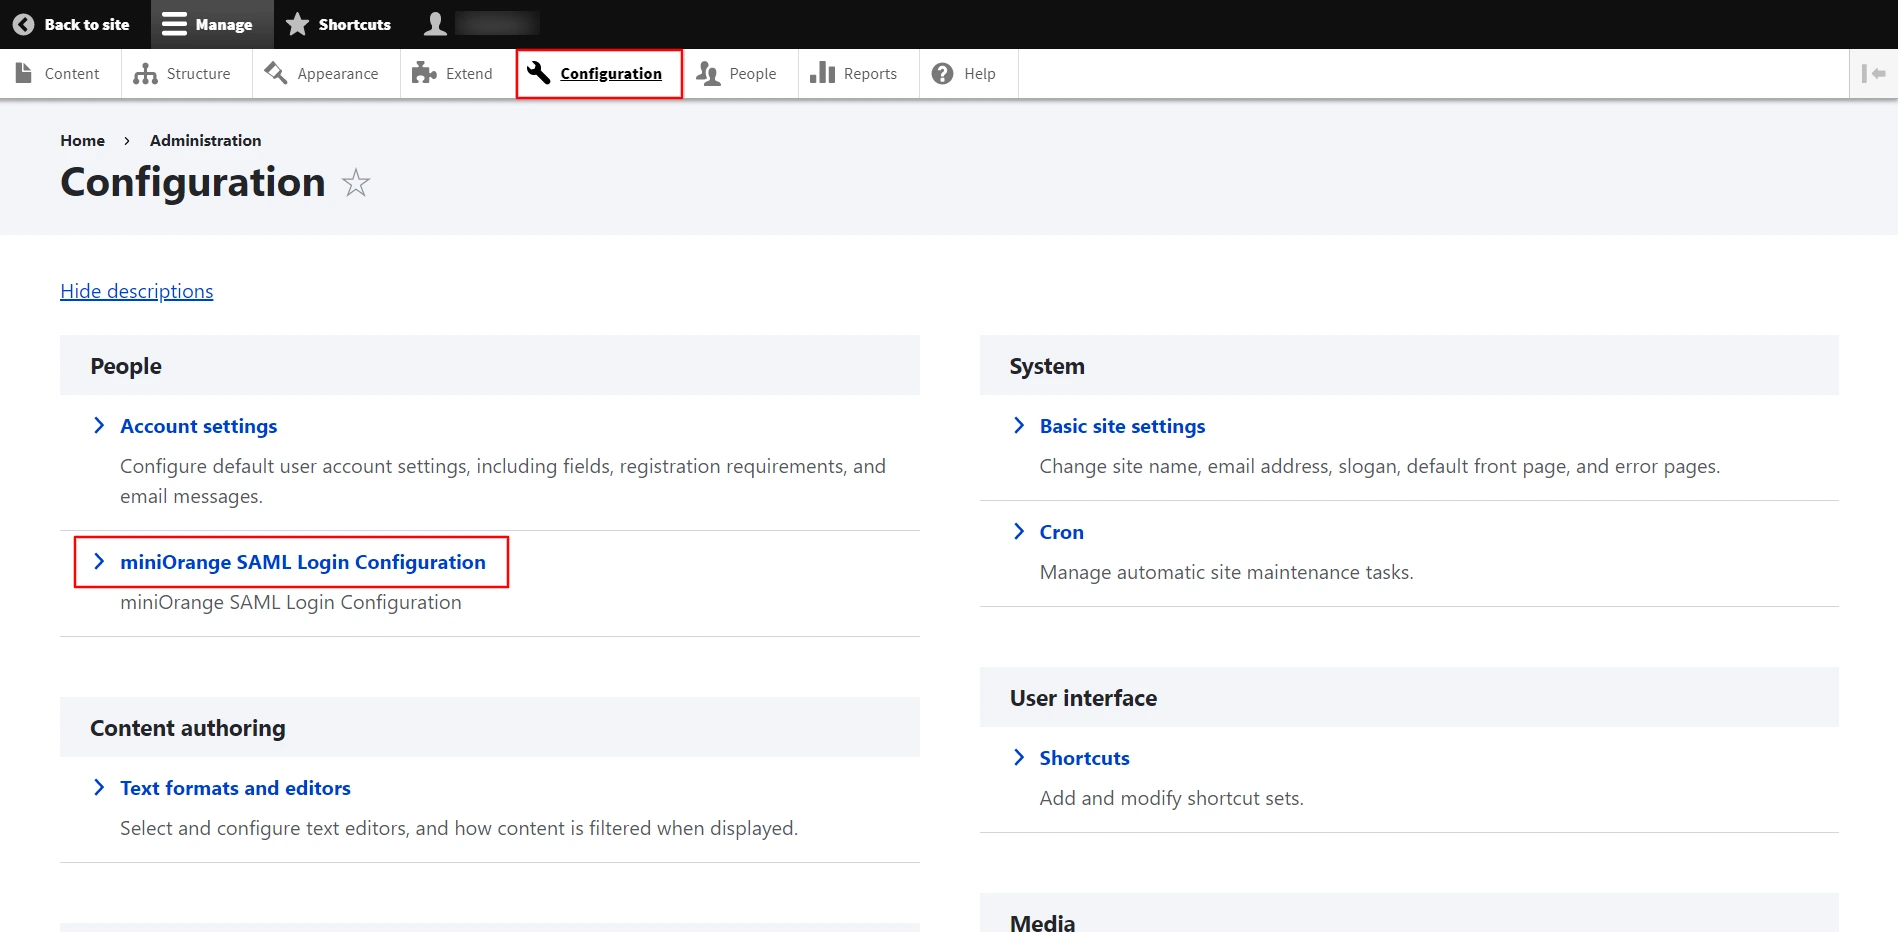
- After installing the module on the Drupal site, in the Administration menu, navigate to Configuration → People → miniOrange SAML Login Configuration. (/admin/config/people/miniorange_saml/idp_setup)
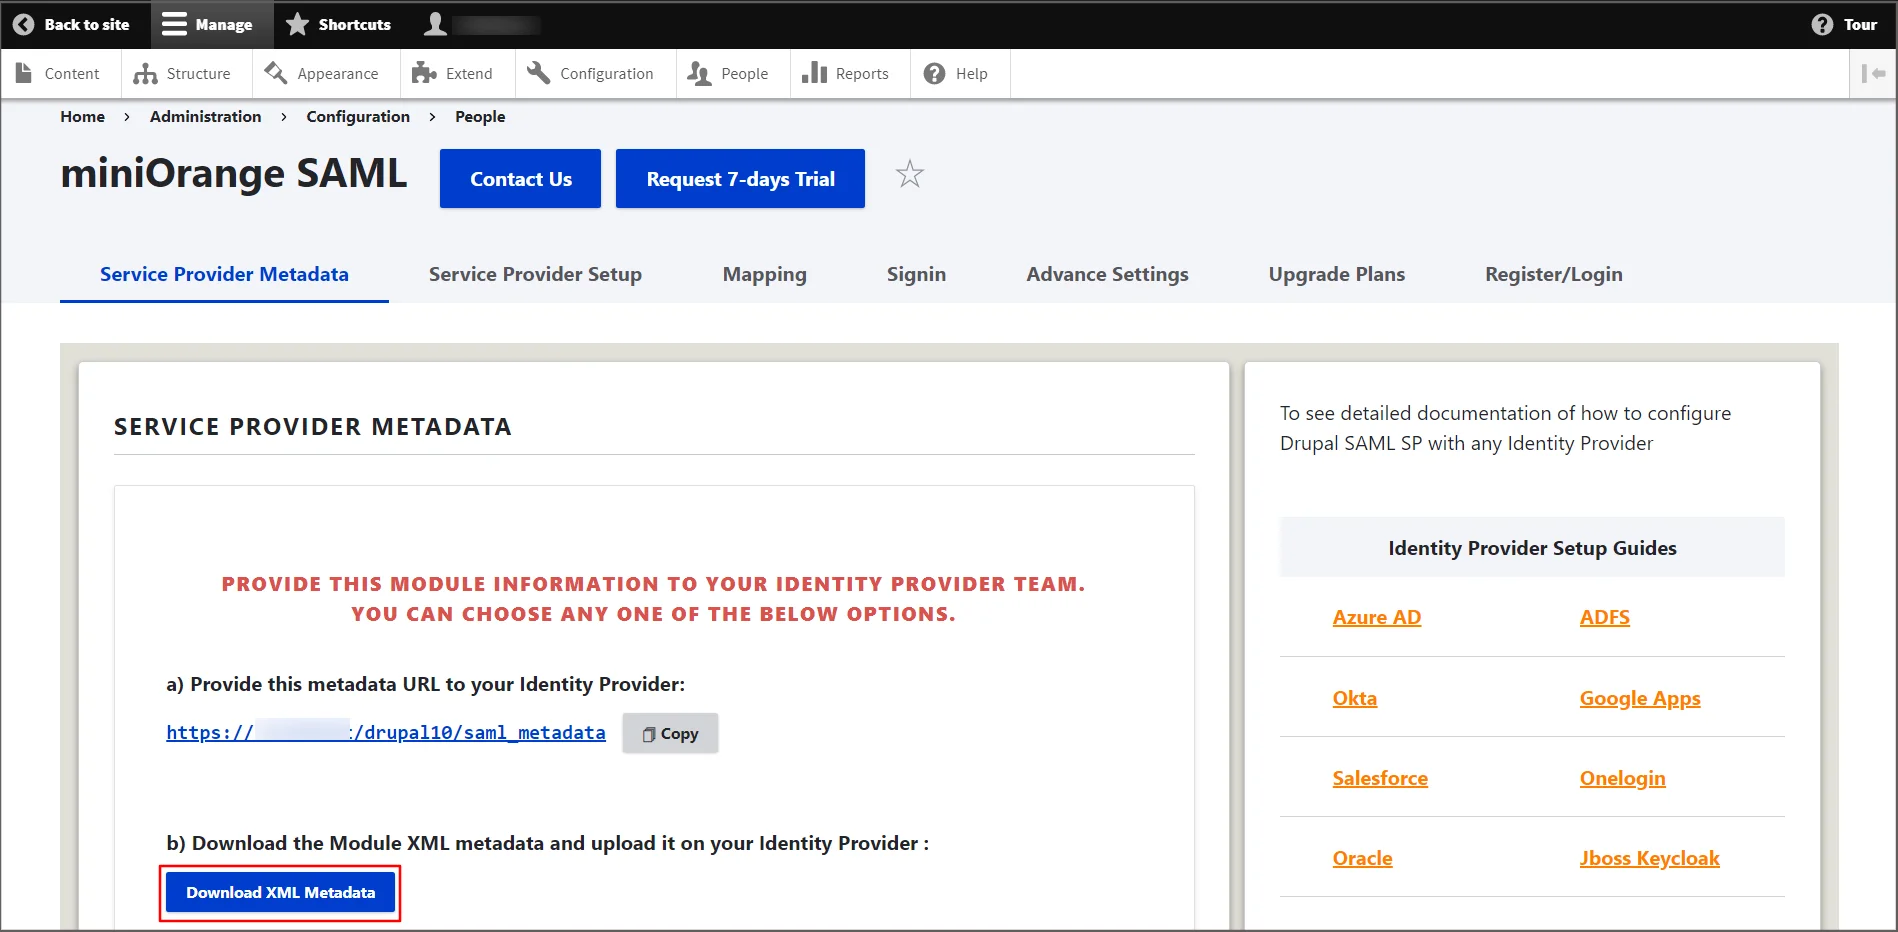
- Navigate to the Service Provider Metadata and download the metadata. (This is required in configuring the ADFS as a SAML IdP)
Configure SAML Single Sign-On Application
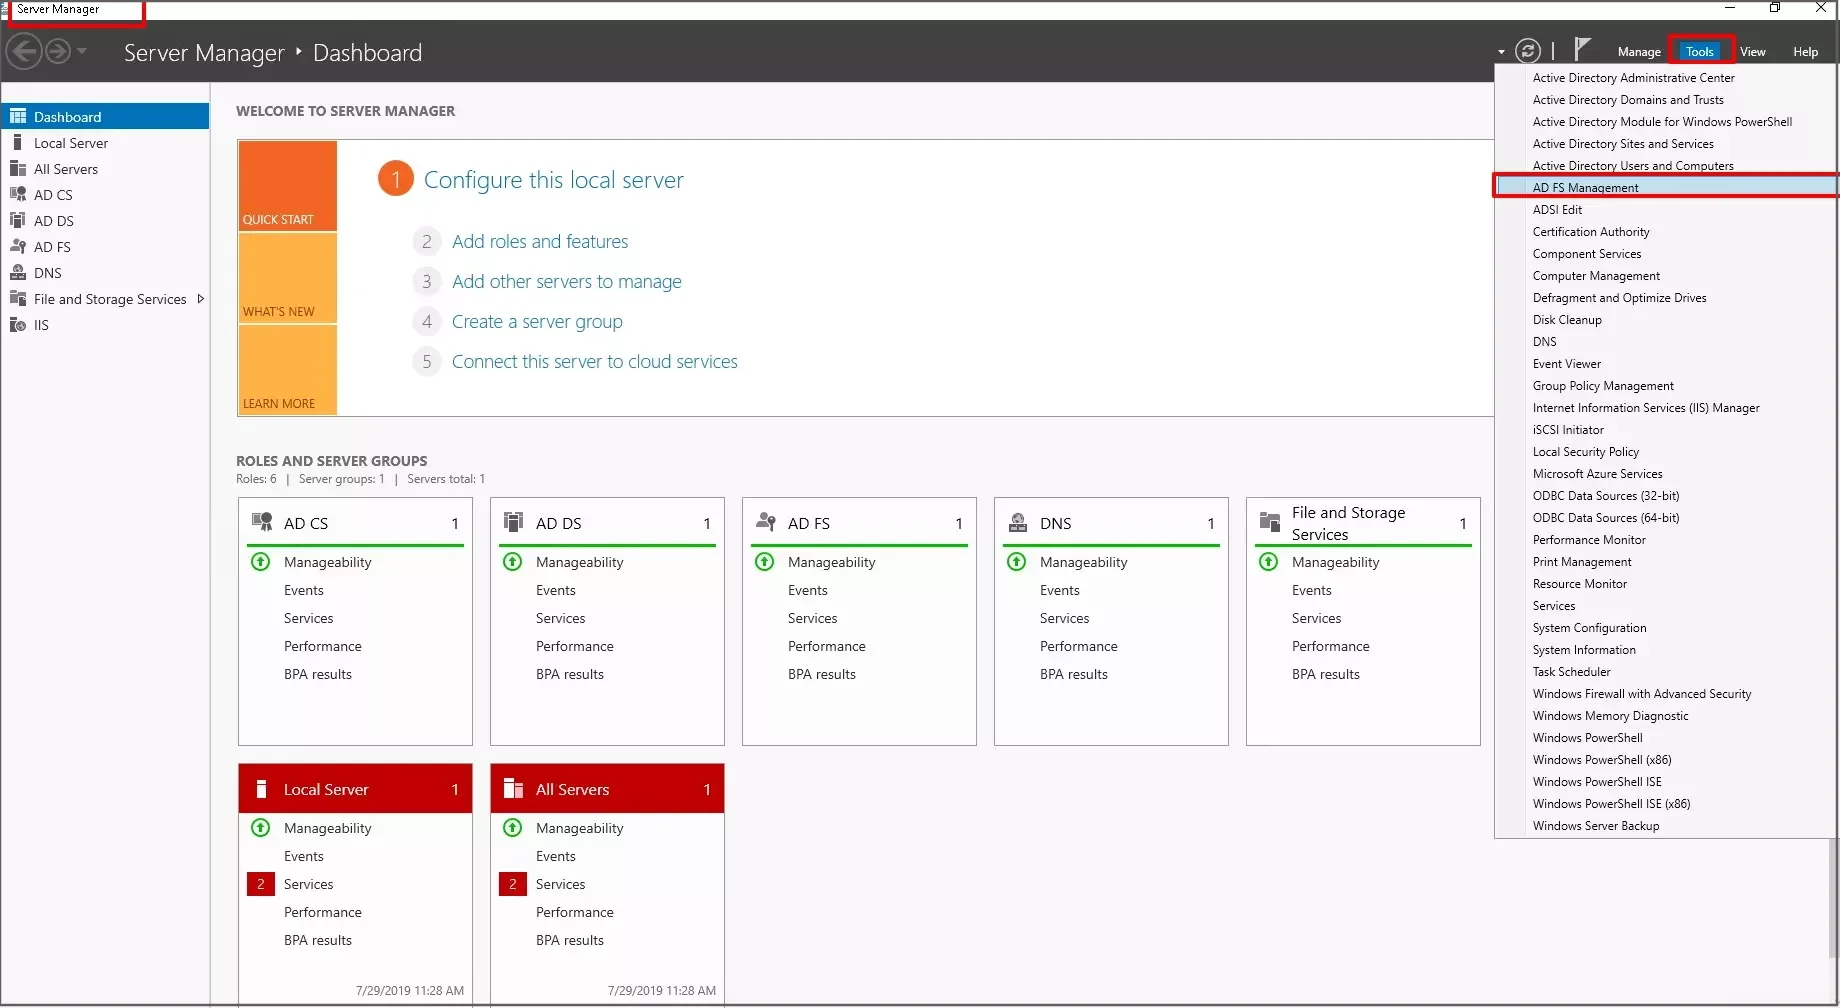
- In Server Manager, click on Tools and then select ADFS Management.
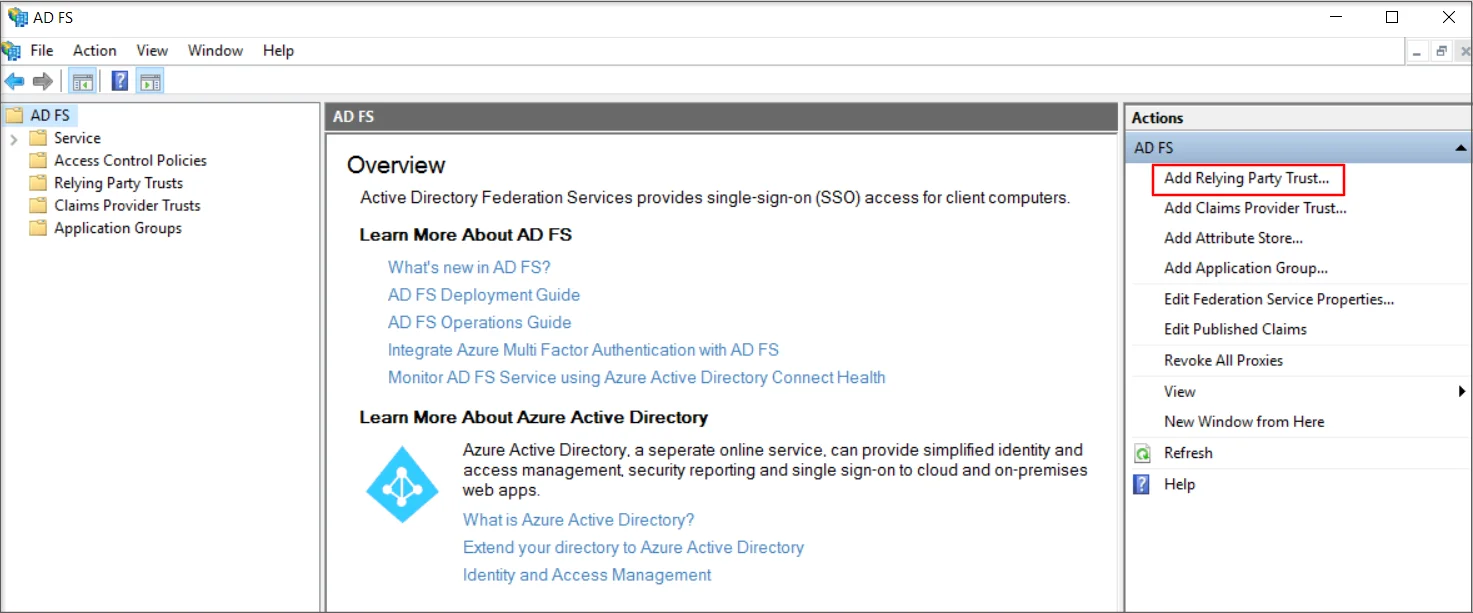
- From the right side panel select Add Relying Party Trust under the ADFS section
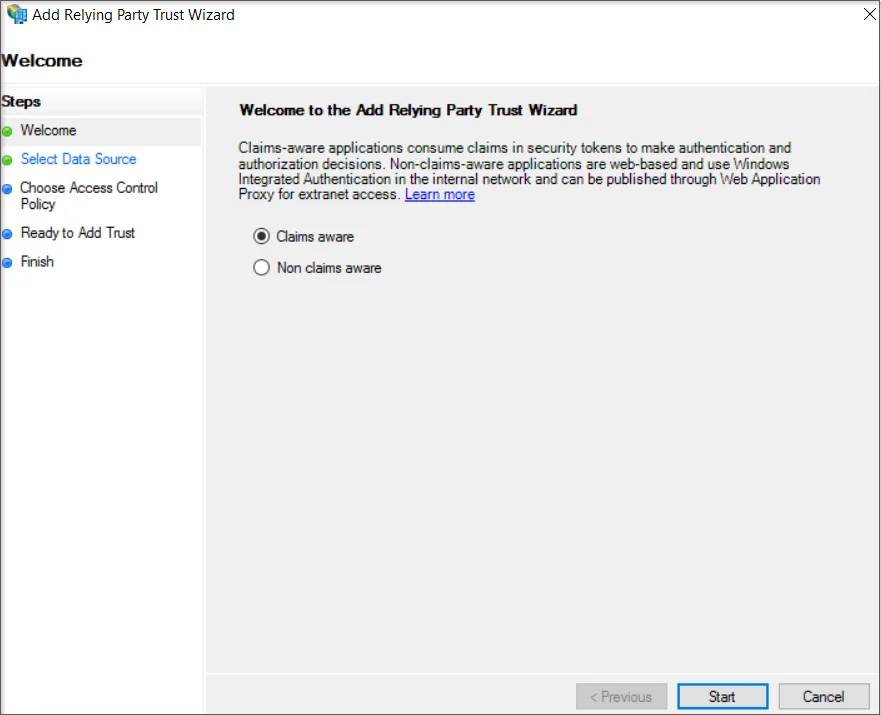
- To proceed, click the Start button on the Welcome screen.
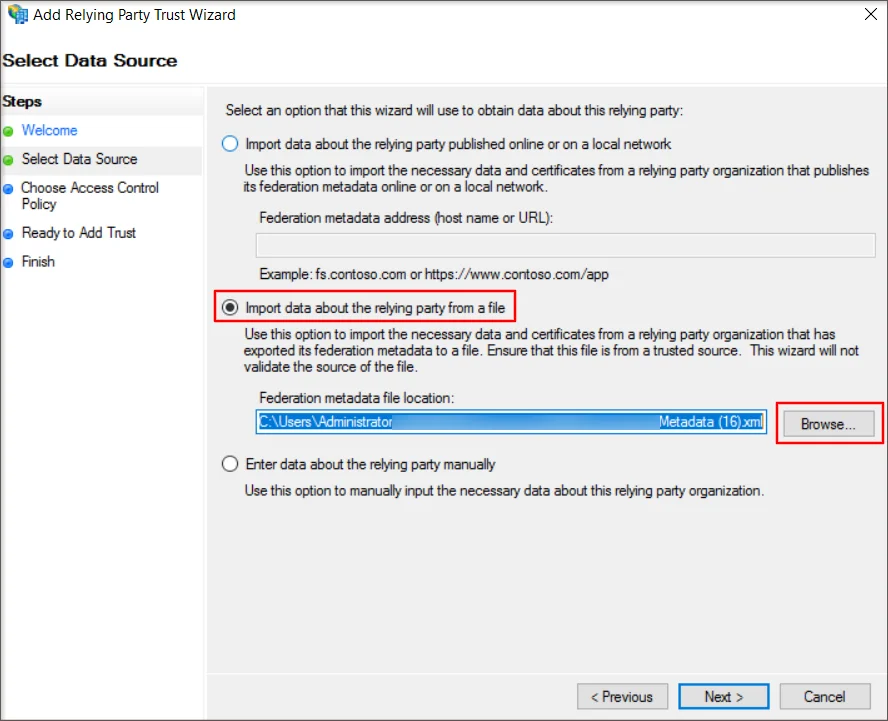
- Select the Import data about the relying party from a file option. Upload the SP metadata file from Drupal. Click on the Next button to continue.
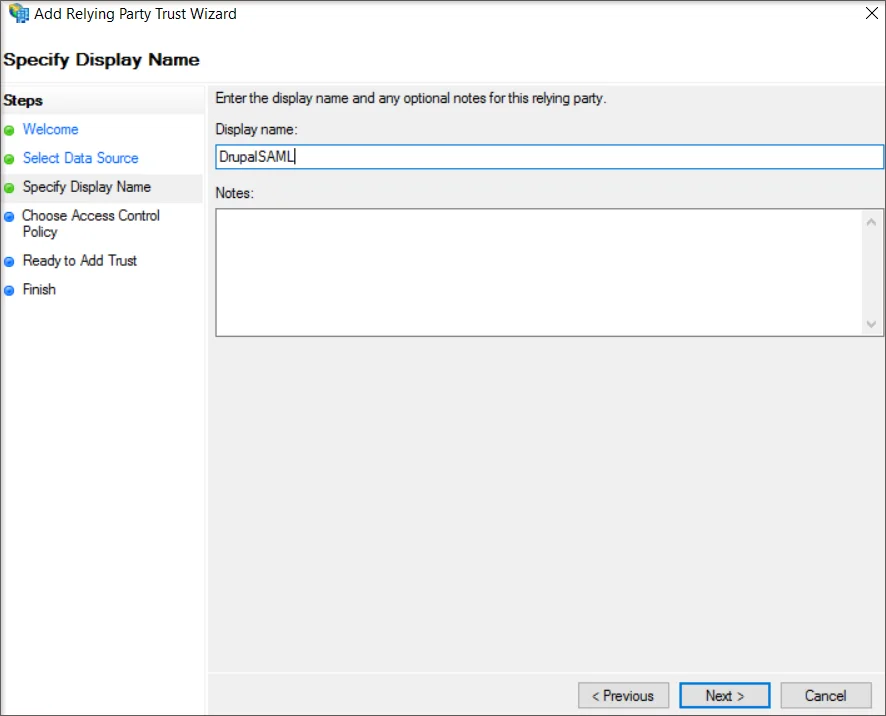
- In the Display Name, enter the name of the application and then click the Next button.
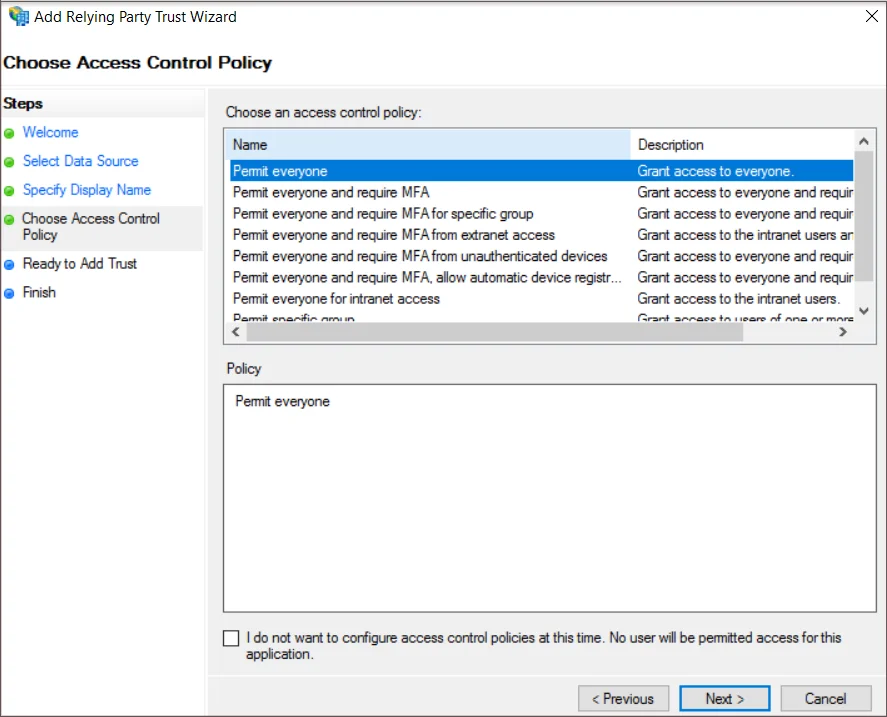
- Select Permit everyone on the Choose Access Control Policy page, then click on the Next button.
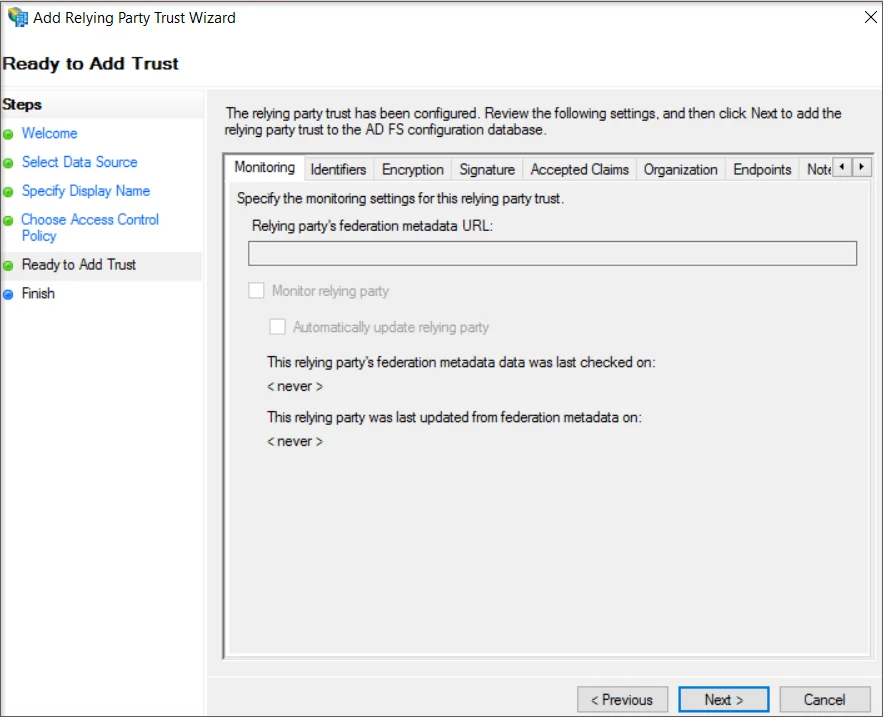
- From the Ready to Add Trust page click on the Next button.
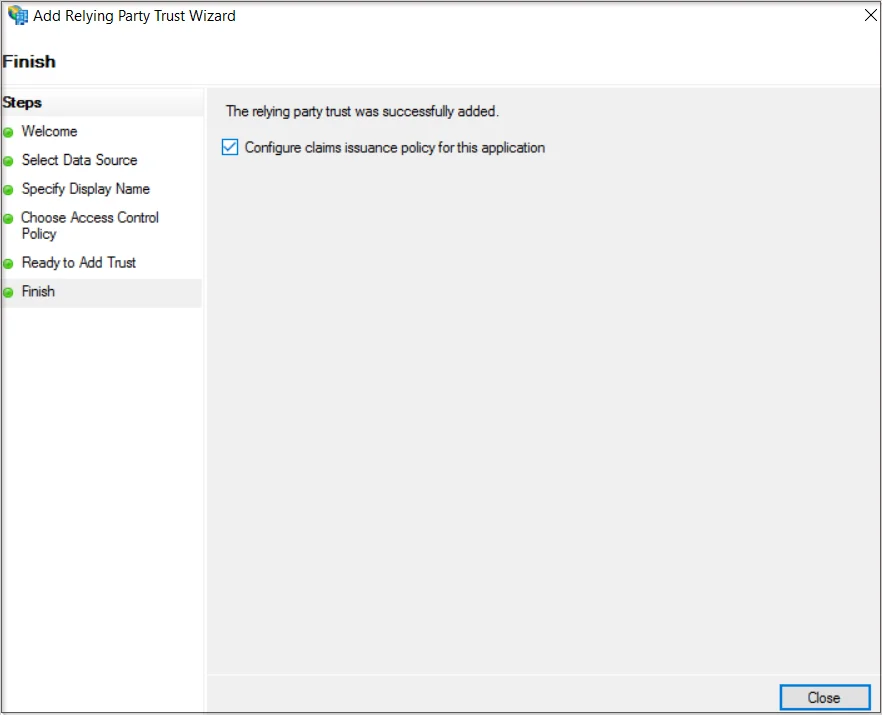
- From the Finish page verify that the checkbox next to Configure claims issuance policy for this application is selected, then click Close.
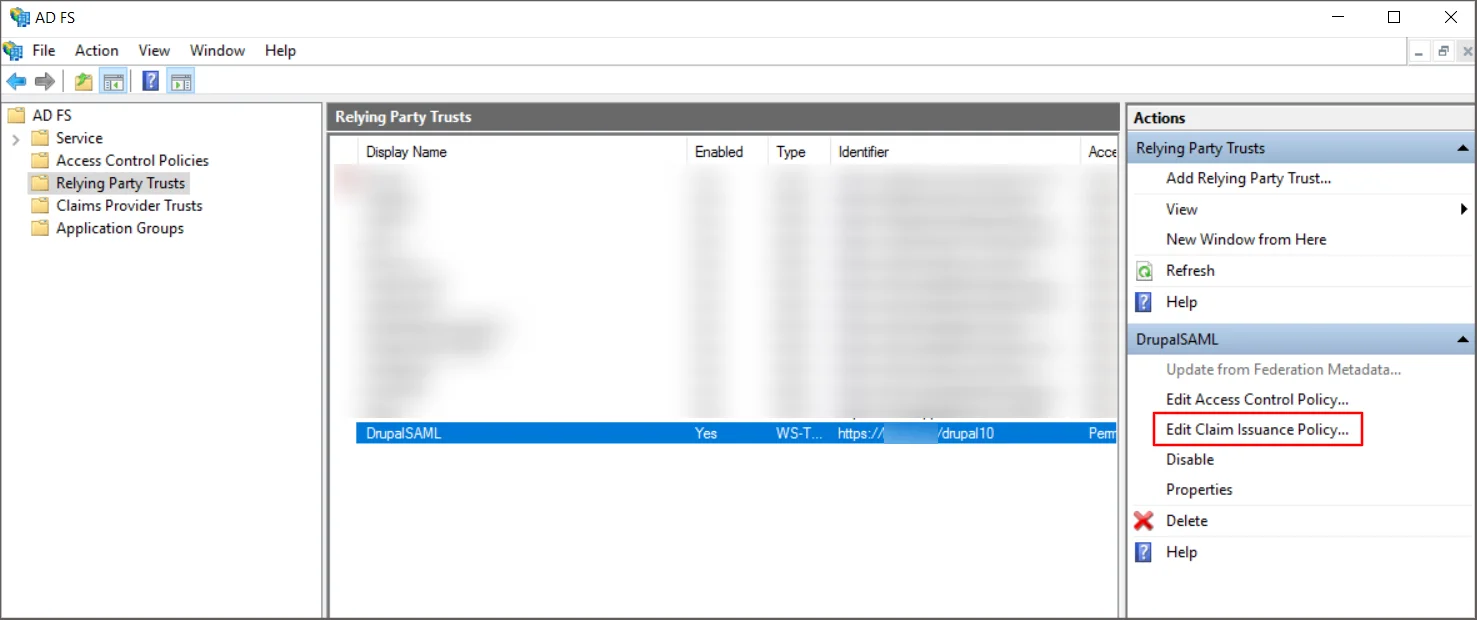
- You can find the application under Relay Party Trust in ADFS once it's been created.
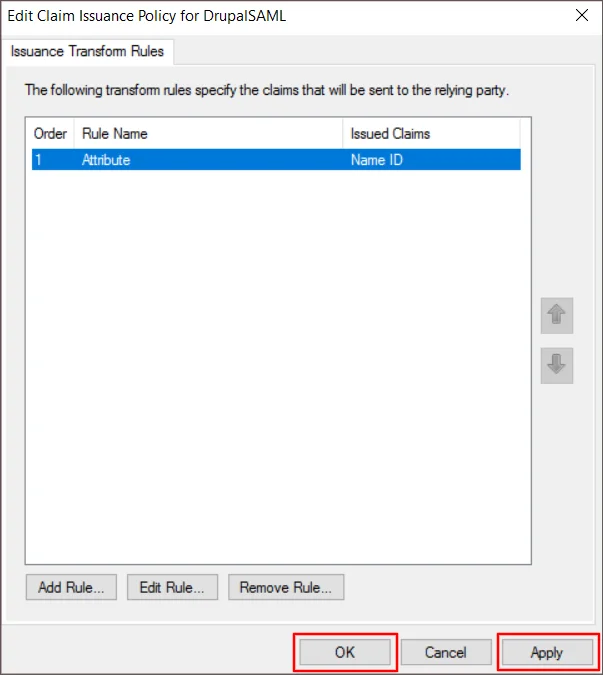
- On the right-side panel, click Edit Claim Issuance Policy from the dropdown menu of the application you created in ADFS (In this case, DrupalSAML).
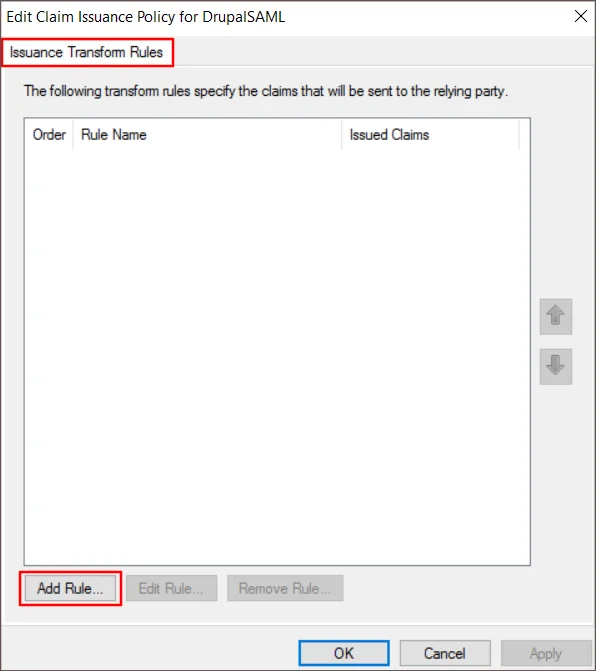
- Click the Add Rule button on the Issuance Transform Rules tab.
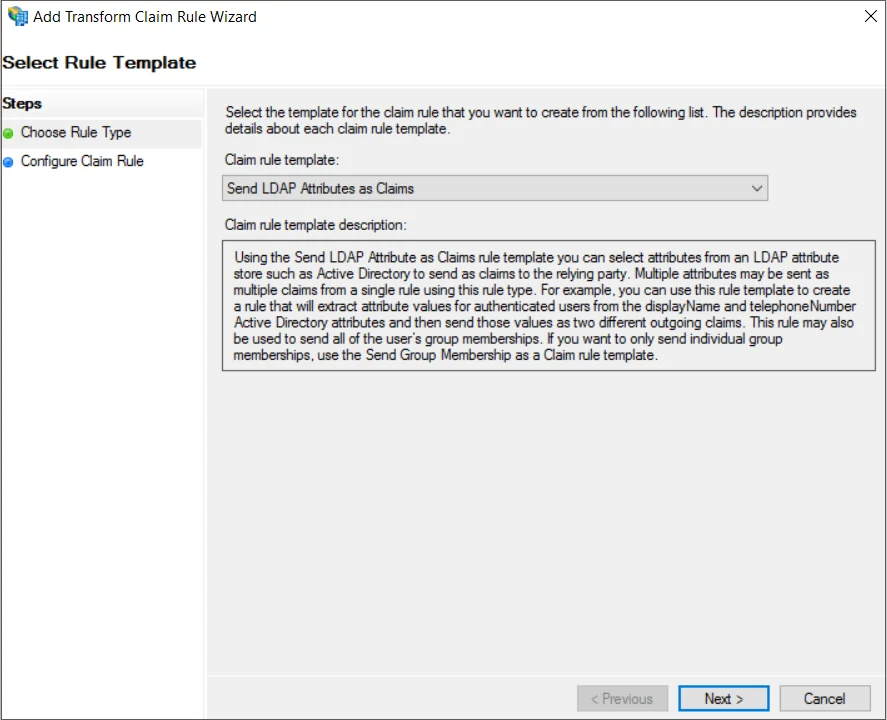
- On the Select Rule Template page click on the Next button.
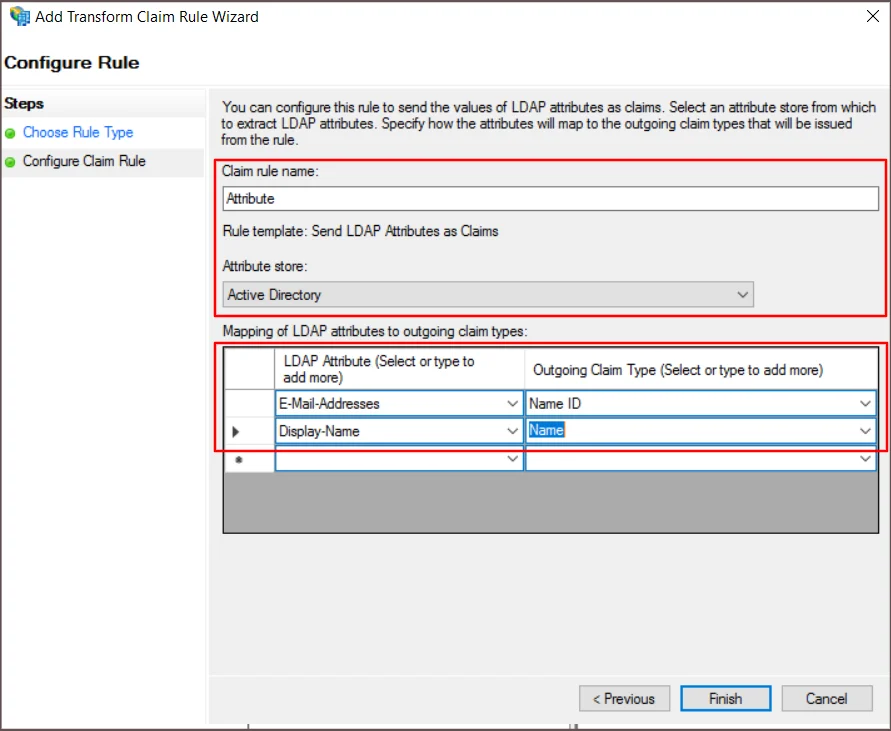
- Enter the given information on the Configure Rule page:
Claim rule name Enter the Claim rule name (any), for example, Attribute Attribute store Active Directory from dropdown - Map the outgoing LDAP attribute as follows:
LDAP Attribute (Select or type to add more) Outgoing Claim Type (Select or type to add more) E-Mail-Addresses Name ID Display-Name Name - To continue, click the Finish button.
- On the Issuance Transform Rules tab, click Apply, and then click OK to continue.
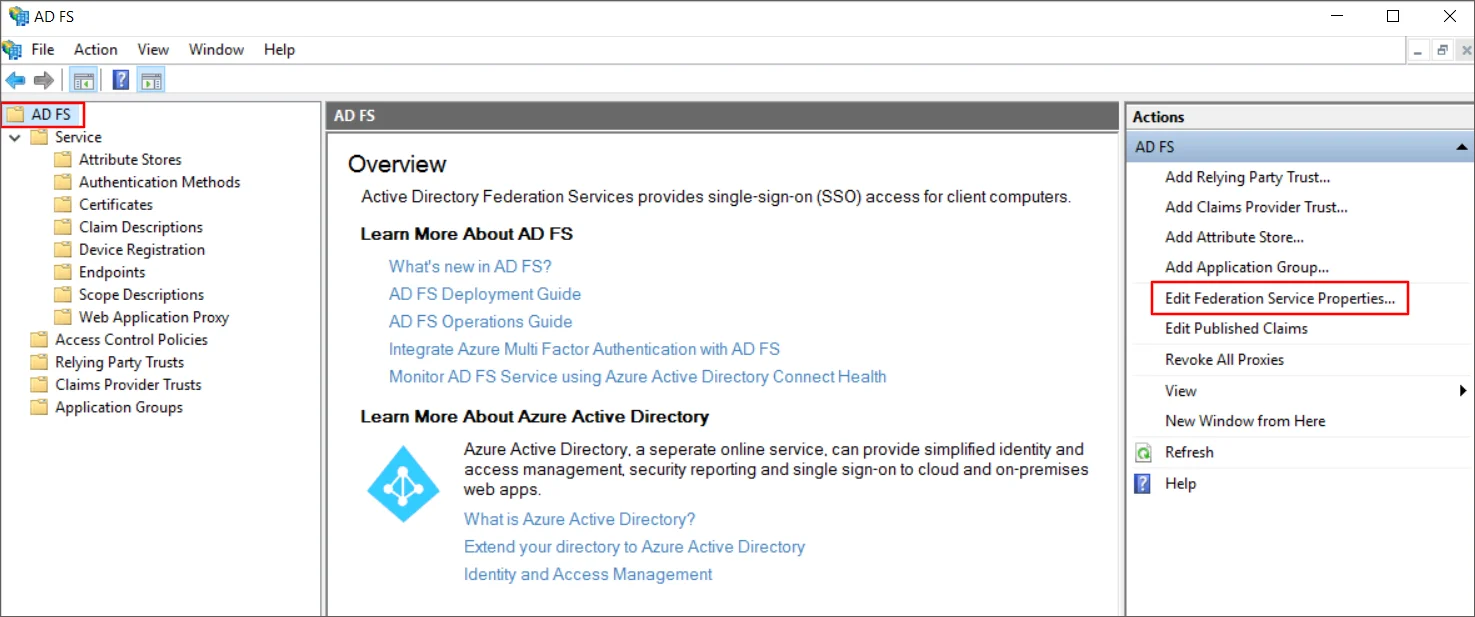
- As shown in the below image, select Edit Federation Service Properties from the AD FS dropdown.
Get the metadata of ADFS:
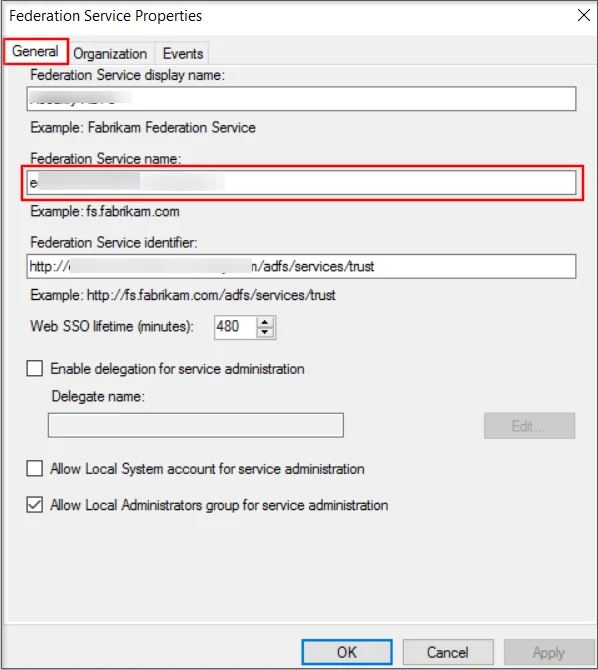
- On the Federation Service Properties window, go to the General tab and copy the Federation Service name.
- Replace "<your_ADFS_domain>" in the URL https://<your_ADFS_domain>/federationmetadata/2007-06/federationmetadata.xm> with your actual "Federation Service name." For instance, if your Federation Service name is "example.com," the updated metadata URL should be https://<your_ADFS_domain>/federationmetadata/2007-06/federationmetadata.xml.
- Next, simply copy the "ADFS IdP metadata URL," which is in the form - https://<your_ADFS_domain>/federationmetadata/2007-06/federationmetadata.xml. (This will be required for further configuration of Drupal)
Configure Drupal as SAML Service Provider:
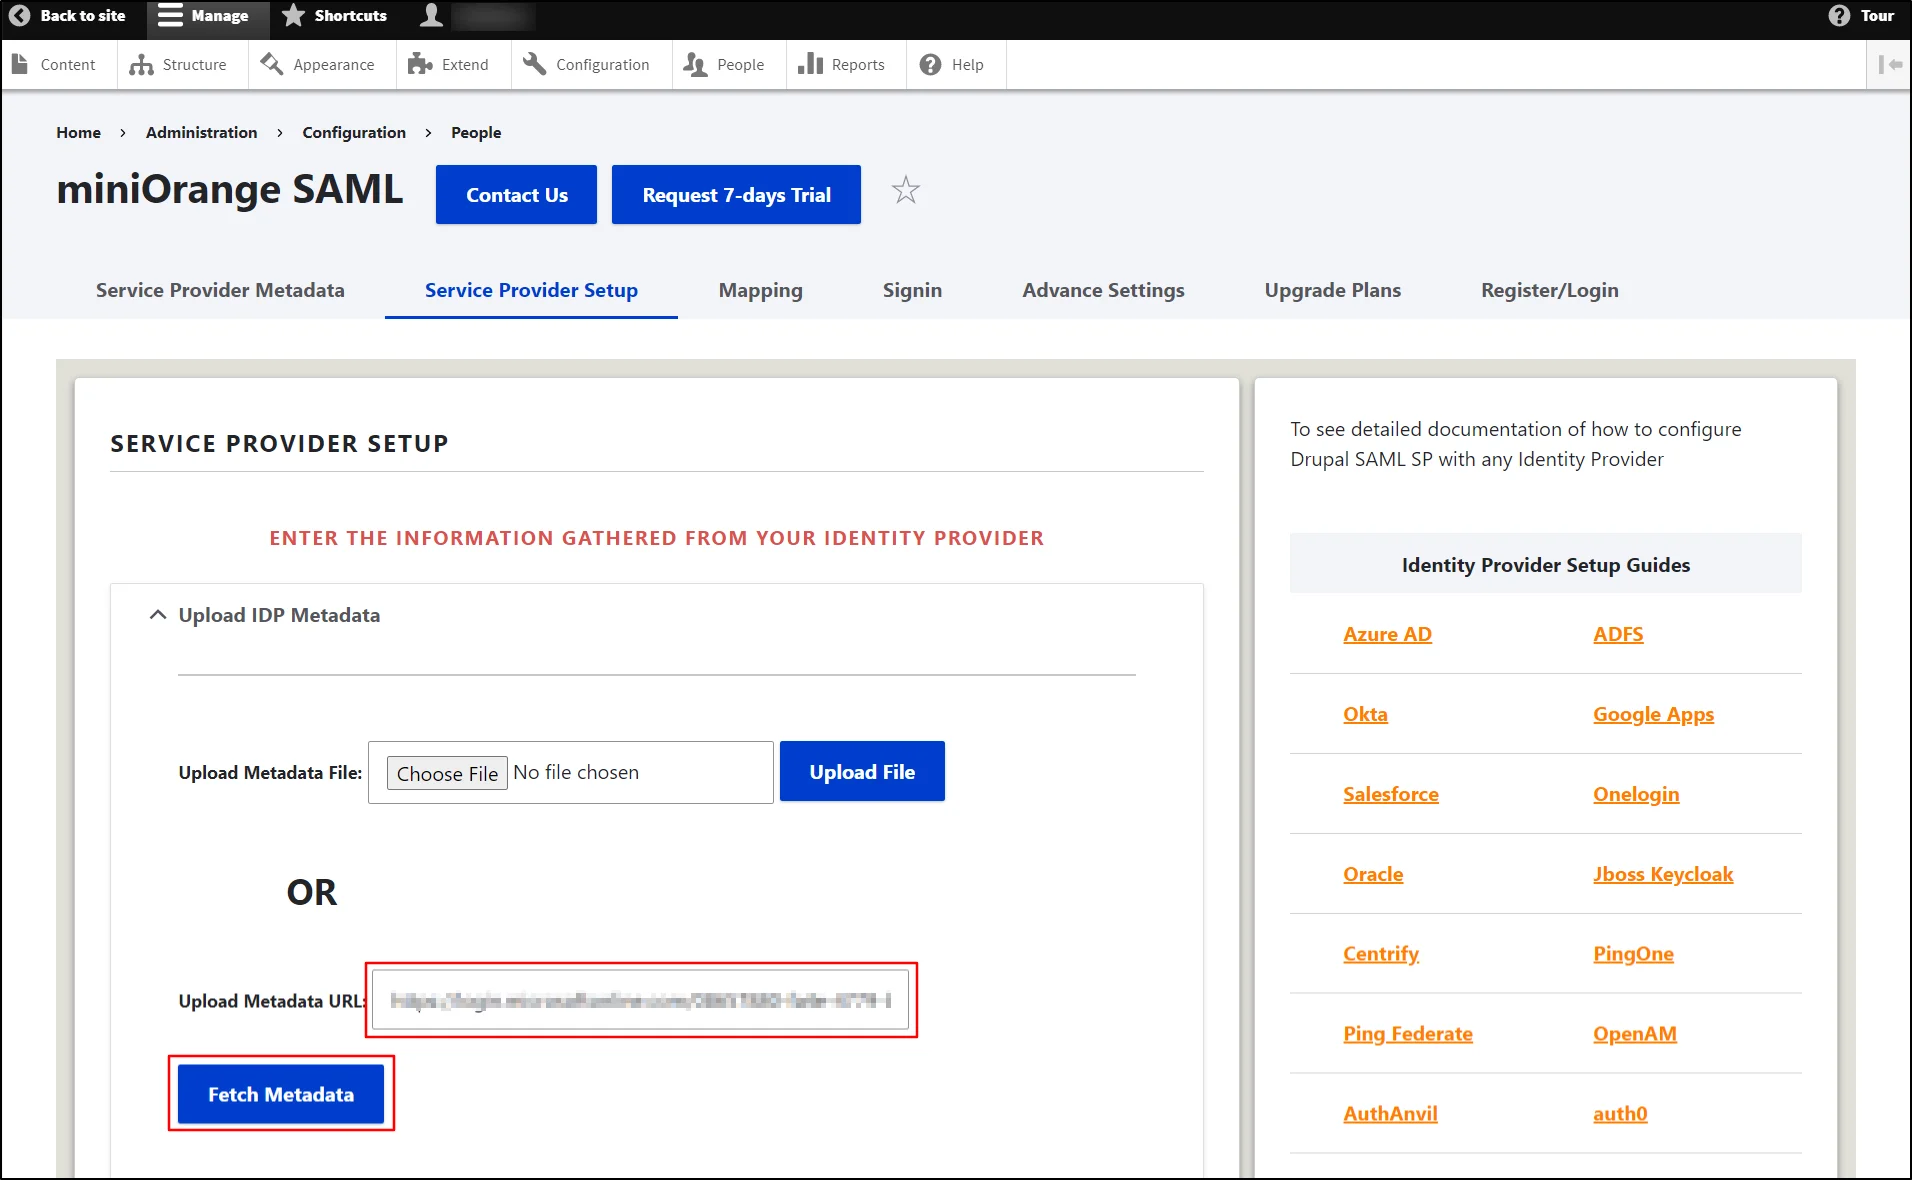
- Open your Drupal site. Go to the Service Provider Setup tab of the module.
- Click on Upload IDP Metadata Section
- Now paste the metadata URL from the ADFS IdP.
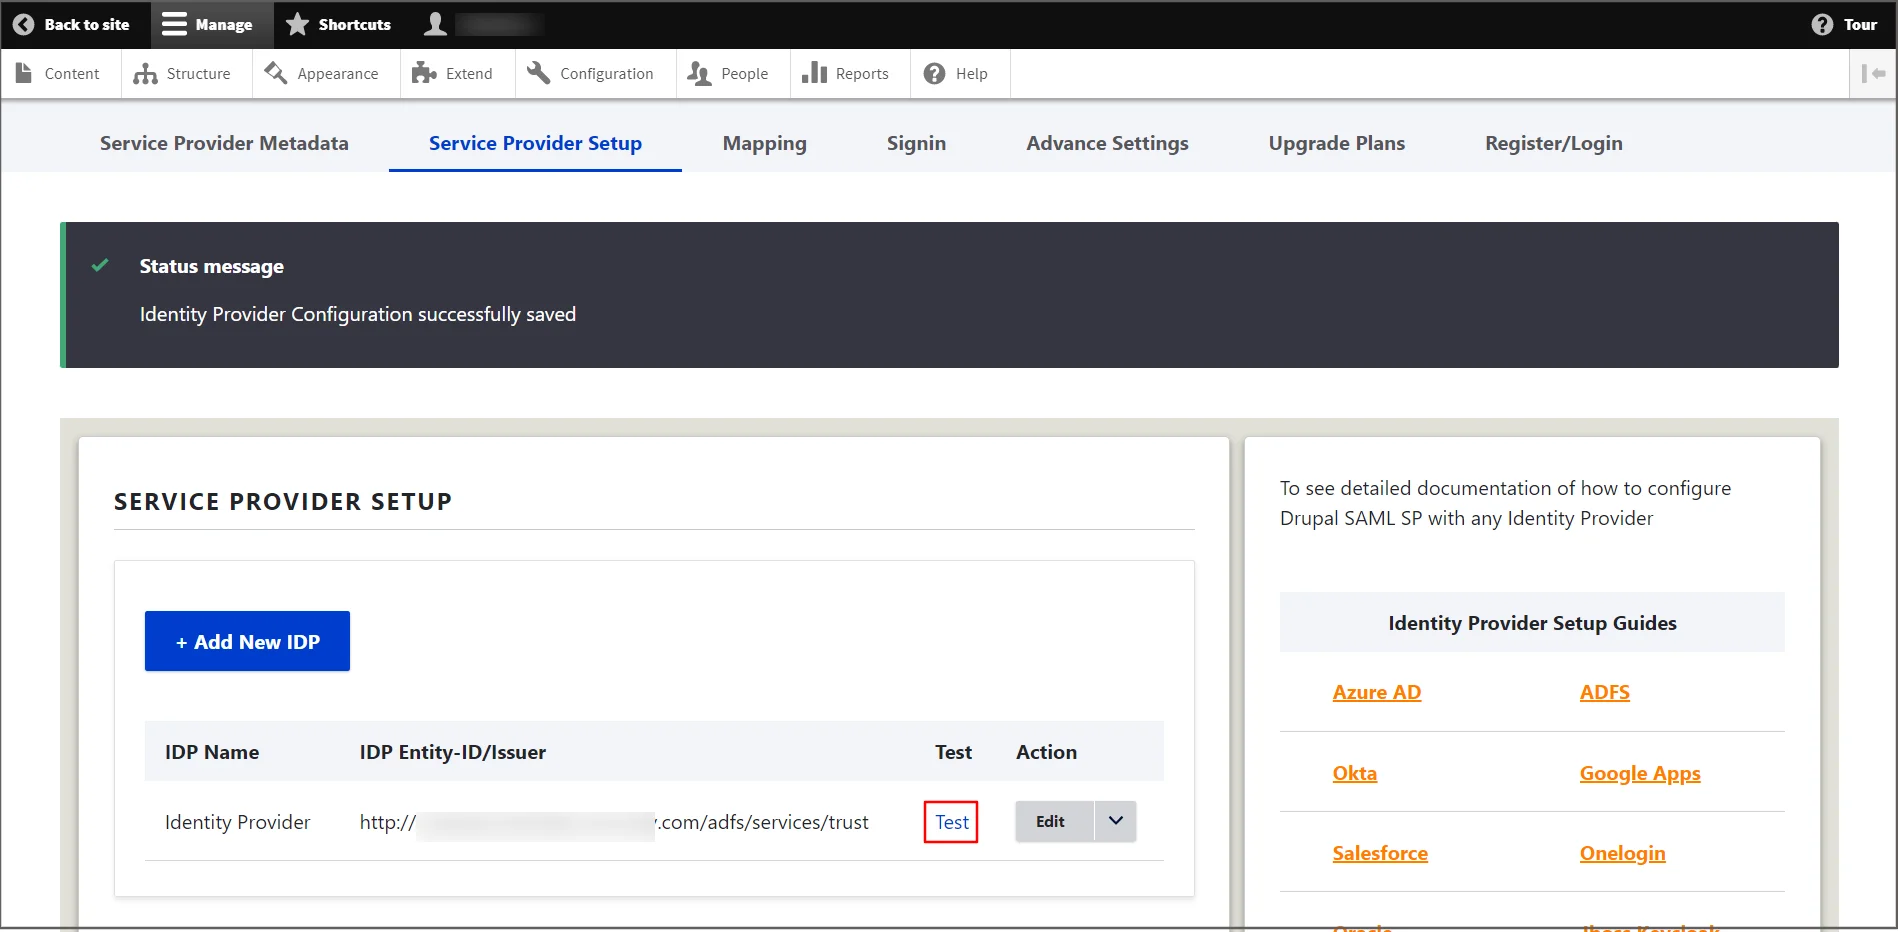
- Click the Test link to verify the connection between Drupal and ADFS.
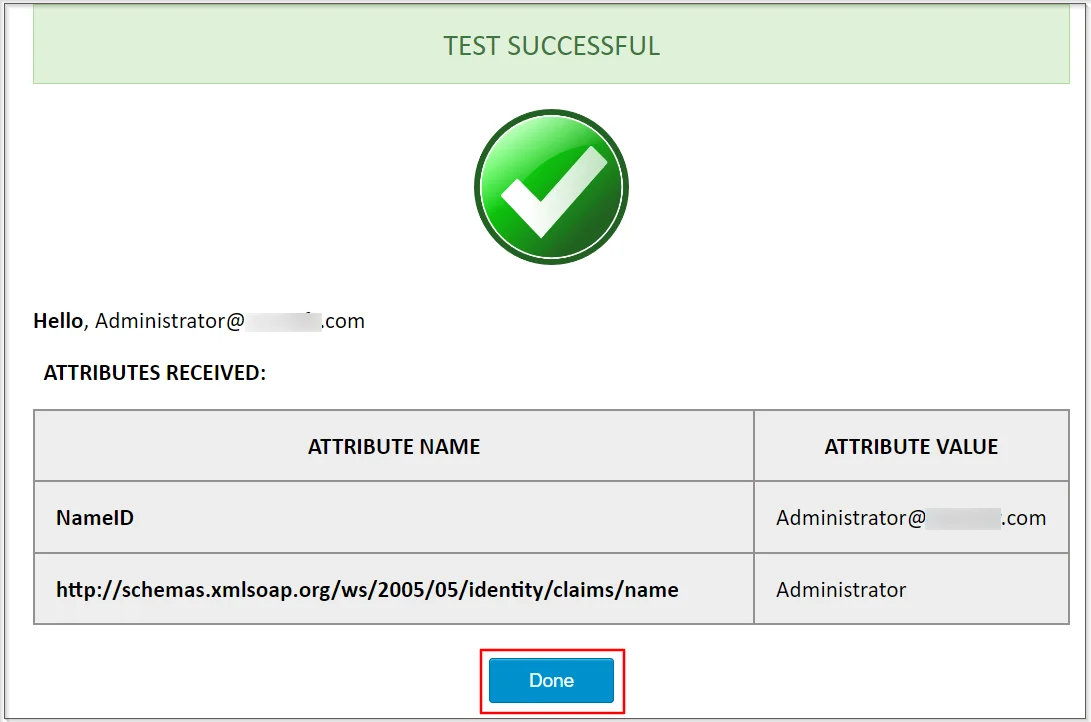
- In the test configuration window, a success message with SAML response attributes will appear if the configurations are correct; otherwise, error messages with additional troubleshooting instructions will appear. Click on Done
Congratulations! You have successfully configured ADFS as an Identity Provider and Drupal as a Service Provider.
How does SAML SSO login work?
- Open a new browser/private window and navigate to the Drupal site login page.
- Click the Login using Identity Provider (ADFS) link.
- You will be redirected to the ADFS login page. Enter the ADFS credentials. After successful authentication, the user will be redirected back to the Drupal site.
Windows SSO
 Steps to configure
ADFS for Windows Authentication
- Open elevated Command Prompt on the ADFS Server and execute the following command on it:
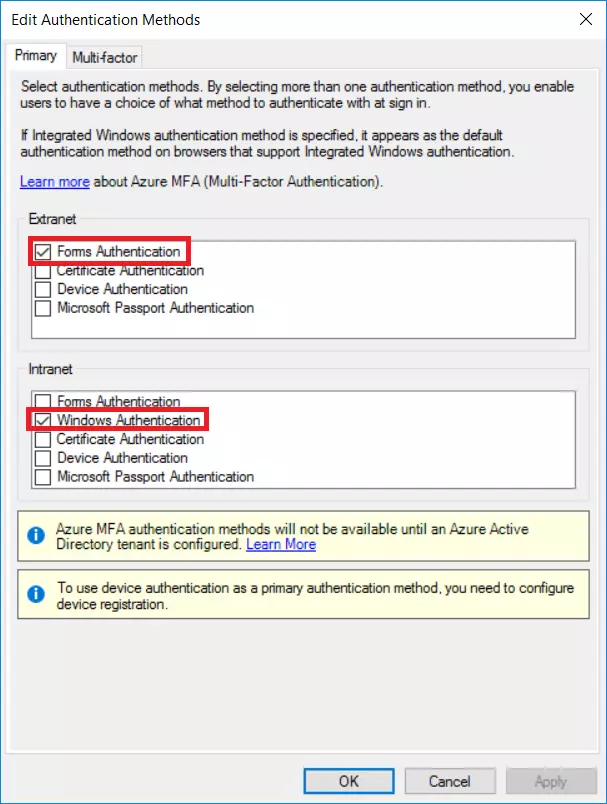
- Open AD FS Management Console and go to Authentication Policies section, edit the Global Authentication Policies. Check Windows Authentication in Intranet zone.
- Open Internet Explorer. Navigate to Security tab in Internet Options.
- Add the FQDN of AD FS to the list of sites in Local Intranet and restart the browser.
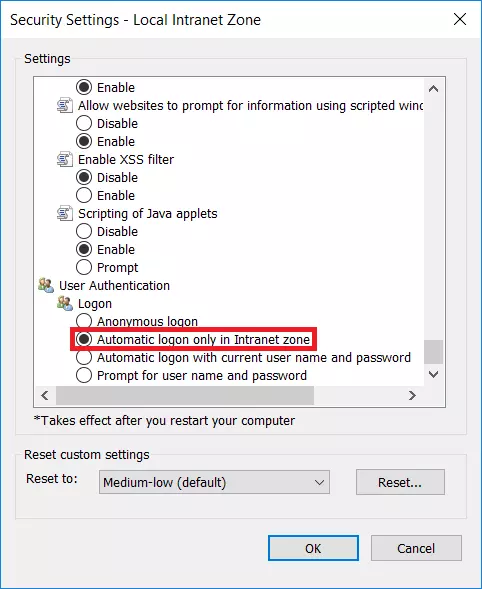
- Select Custom Level for the Security Zone. In the list of options, select Automatic Logon only in Intranet Zone.
- Open the powershell and execute following two commands to enable windows authentication in Chrome browser.
- You have configured ADFS for Windows Authentication. Now to add Relying Party for your Drupal you can follow these steps.
 setspn -a HTTP/##ADFS Server FQDN##
##Domain Service Account##
 FQDN is Fully Qualified Domain Name
(Example : adfs4.example.com)
 Domain Service Account is the
username of the account in AD.
 Example : setspn -a
HTTP/adfs.example.com username/domain
 Set-AdfsProperties
-WIASupportedUserAgents ((Get-ADFSProperties | Select -ExpandProperty WIASupportedUserAgents) + "Chrome")
 Get-AdfsProperties | Select
-ExpandProperty WIASupportedUserAgents
Additional Features:
Explore the advanced features offered by the module with full-featured trial. You can initiate the trial request using Request 7-day trial button of the module or reach out to us at drupalsupport@xecurify.com for one-on-one assistance from Drupal expert.
- Map Attributes/Roles from IdP to the Drupal site
- Multiple IdP setup
Redirect users to a specific page after login/logout - Protect site from anonymous access - forced authentication
Need Help? We are right here!

Thanks for your inquiry.
If you dont hear from us within 24 hours, please feel free to send a follow up email to info@xecurify.com
Cookie Preferences
Cookie Consent
This privacy statement applies to miniorange websites describing how we handle the personal information. When you visit any website, it may store or retrieve the information on your browser, mostly in the form of the cookies. This information might be about you, your preferences or your device and is mostly used to make the site work as you expect it to. The information does not directly identify you, but it can give you a more personalized web experience. Click on the category headings to check how we handle the cookies. For the privacy statement of our solutions you can refer to the privacy policy.
Strictly Necessary Cookies
Always Active
Necessary cookies help make a website fully usable by enabling the basic functions like site navigation, logging in, filling forms, etc. The cookies used for the functionality do not store any personal identifiable information. However, some parts of the website will not work properly without the cookies.
Performance Cookies
Always Active
These cookies only collect aggregated information about the traffic of the website including - visitors, sources, page clicks and views, etc. This allows us to know more about our most and least popular pages along with users' interaction on the actionable elements and hence letting us improve the performance of our website as well as our services.
