Configure Joomla login using LDAP / Active Directory
Contents
Configure Joomla login using LDAP / Active Directory
The miniOrange Active Directory/ LDAP Authentication Integration for Joomla Intranet sites plugin allows you to log in/authenticate into your Joomla website using your Active Directory / LDAP Server credentials. You can also map user attributes present in your Active Directory to the user profiles present in Joomla and assign Joomla roles to your users based on their Active Directory roles/attributes.
The premium version of our LDAP plugin supports a number of add-ons that enhance the functionality of the plugin such as auto-logging users on your Joomla site using the Kerberos / NTLM SSO authentication / Windows login add-on, importing users from your LDAP active directory to your Joomla website using the Import Users to Joomla add-on, syncing user password from Joomla to your LDAP active directory using our LDAP Password Sync add-on, syncing your Joomla user attributes to your LDAP active directory using the Directory Sync add-on and many more.
Know more about the Joomla LDAP / Active Directory Integration plugin.
Pre-requisites : Download And Installation
Download and Setup Joomla LDAP / Active Directory Integration plugin
- Download the zip file for the miniOrange LDAP / Active Directory Integration plugin for Joomla from the here.
- Login into your Joomla site’s Administrator console.
- From left toggle menu, click on System, then under Install section click on Extensions.
- Here click on Browse for file button to locate and install the plugin file downloaded earlier.
- Once Installation of plugin is successful. Now click on Start Using miniOrange LDAP/ Active Directory Integration plugin.
Steps To Configure Active Directory Authentication On Your Joomla Site
1. Setup LDAP Configuration
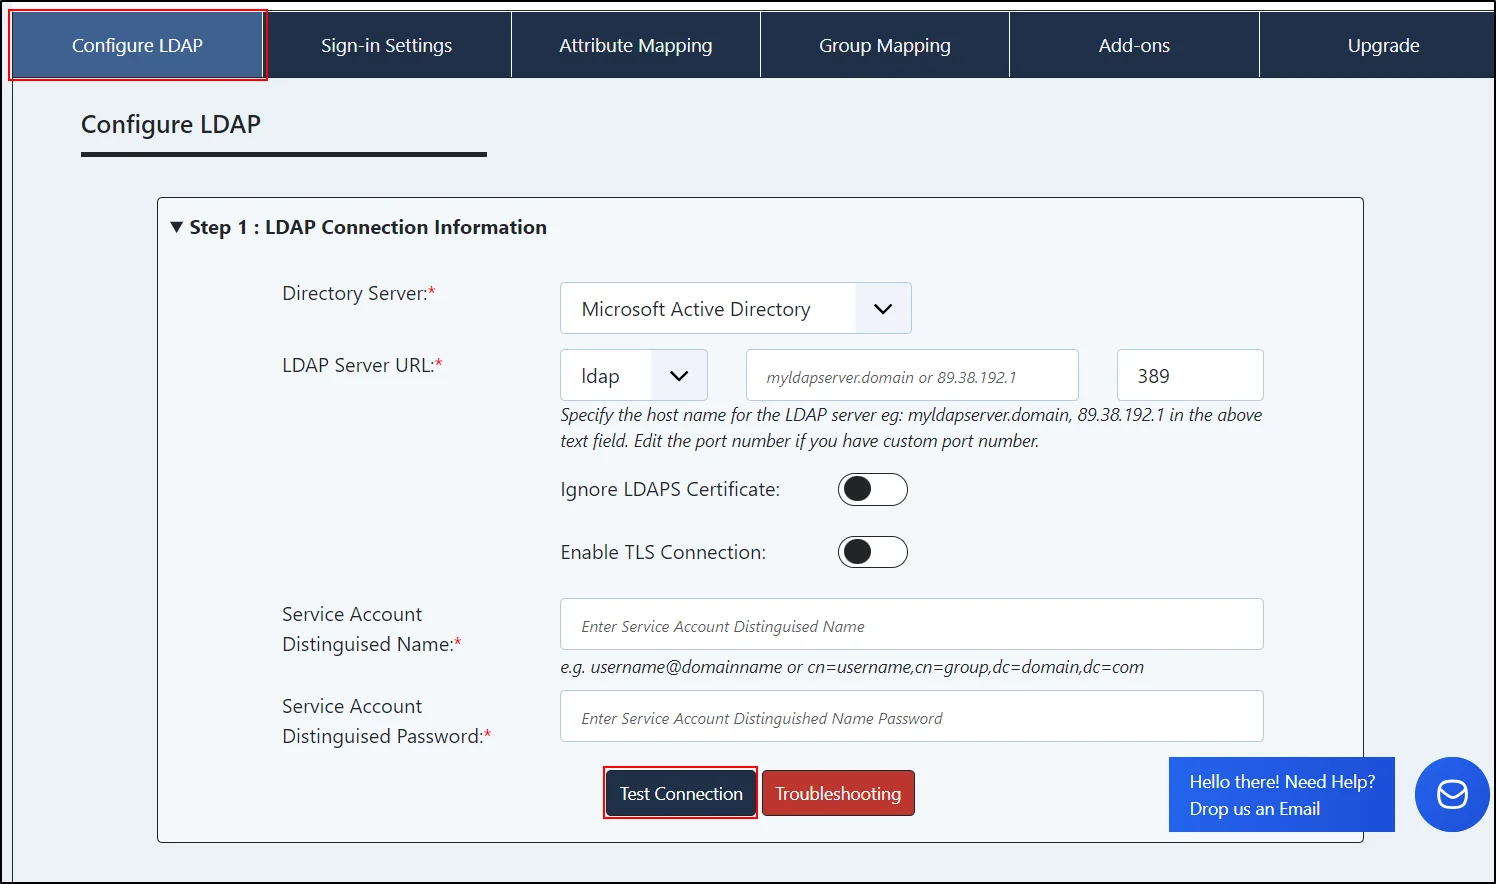
- Go to the Configure LDAP tab.
- Directory Server: Select your directory server from the dropdown.
- LDAP Server URL: Select the directory server protocol (LDAP / LDAPS) from the dropdown and then enter the hostname or IP address of the directory server and select the port number (389,636).
- Service Account DN: Enter the service account username.
- Service Account Password: Enter the password of the service account username.
- Click on the Test Connection button to connect to your Active Directory / LDAP Server.
- Once the connection is established with your Active Directory / LDAP Server, you can scroll down to the LDAP User Mapping Configurations.
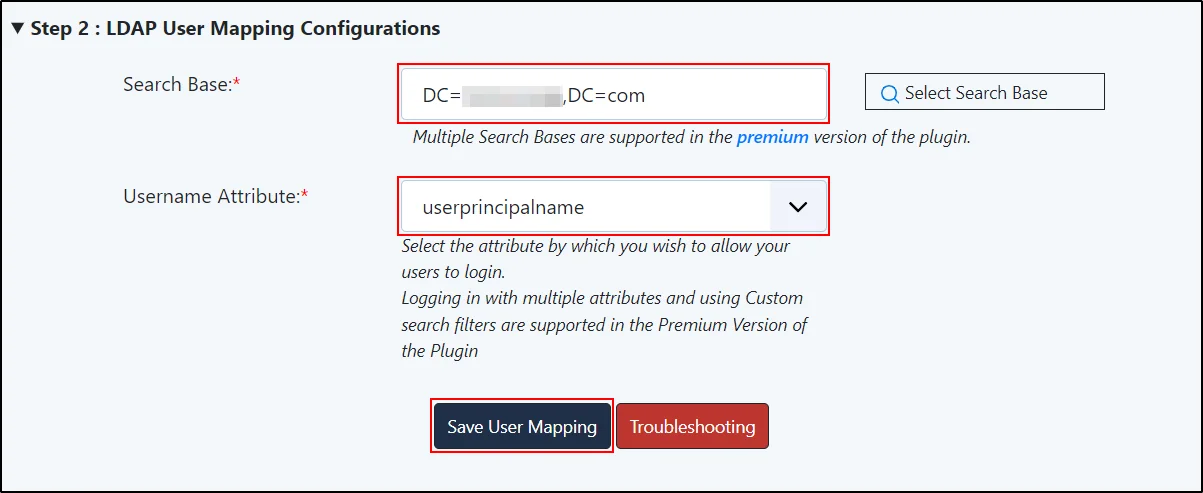
LDAP User Mapping Configurations:
- Search Base: Enter the Search Base. If you need clarification on your Search Base, you can click on the Select Search Bases and select the preferred search base from the list. Our LDAP free version only allows you to choose one search base, you can allow your users present in different search bases to authenticate themselves in our premium version of the plugin.
- Username Attribute: Select the LDAP Username attribute from the dropdown. This value will be the username for the LDAP users that log in to your Joomla site.
- Click on the Save User Mapping button.
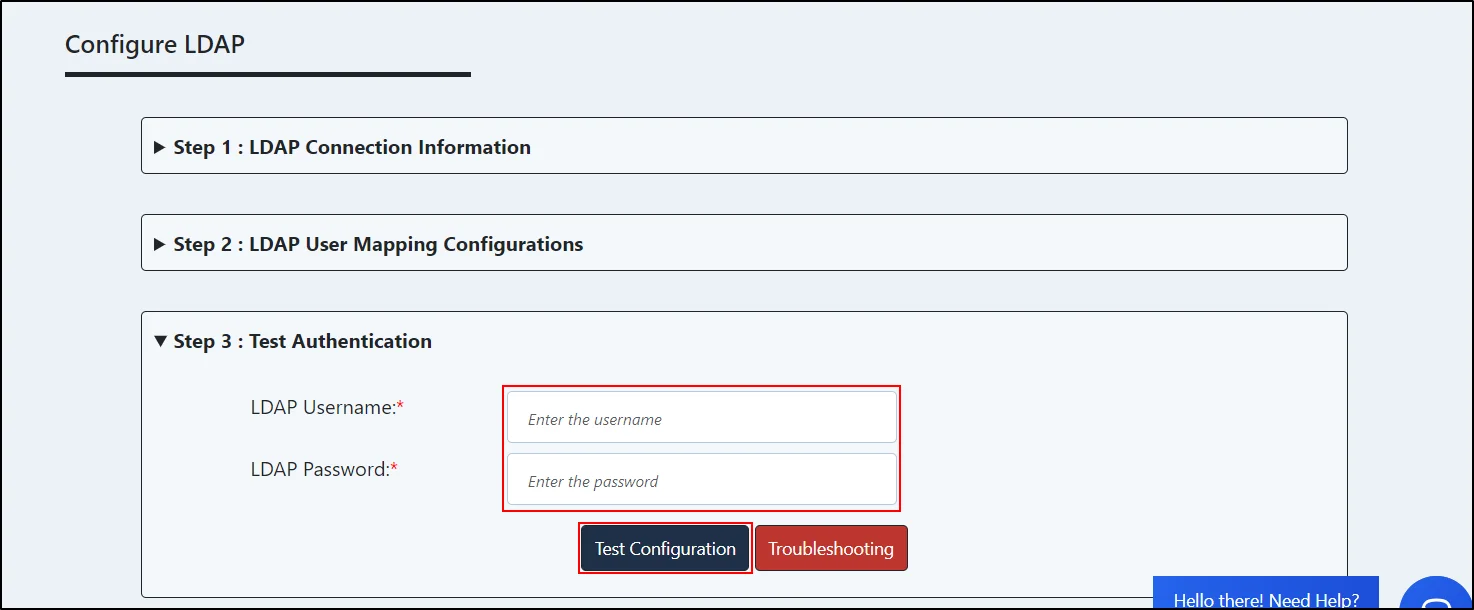
Test Authentication:
- Enter the LDAP Username and the LDAP Password of any LDAP user that exists in the configured search Base.
- Click on the Test Configuration button.
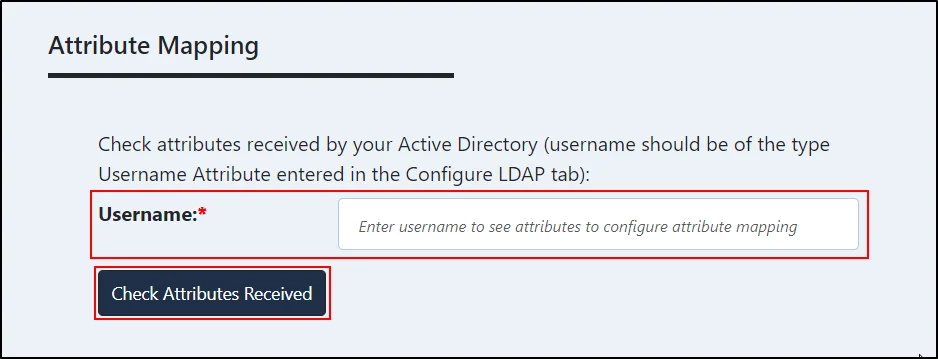
2. Setup Attribute Mapping
- After successfully testing the connection to your Active Directory/ LDAP Server, proceed to the Attribute Mapping Tab.
- Enter the username of an LDAP user and click on the Check Attributes Receiving button to get a list of the attributes received from the AD.
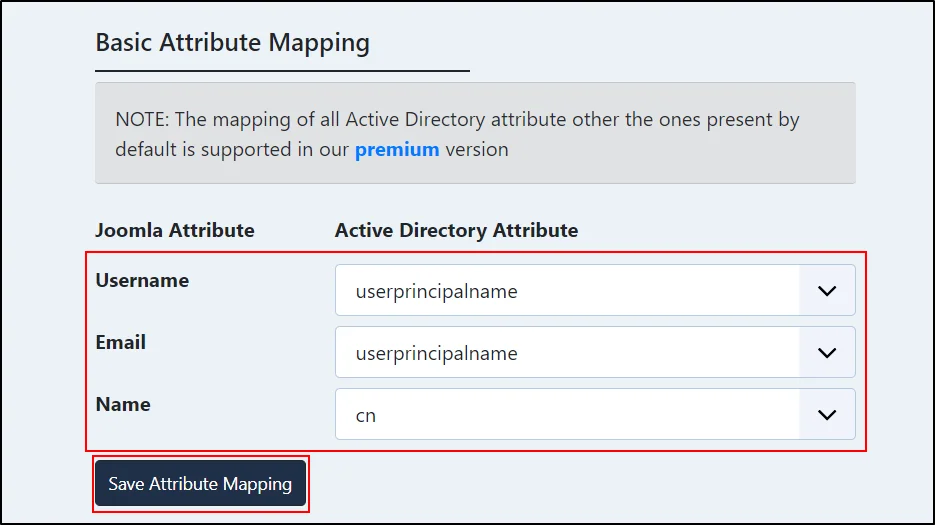
- Select the Joomla Attributes based on your Active Directory / LDAP Server attributes and click on the Save Attribute Mapping button.
- Adding User profile attributes and User Field attributes is a feature that is available in the premium version of our plugin.
- After successfully configuring the attributes, proceed to the Sign-On Settings Tab.
3. Setup Sign-On Settings
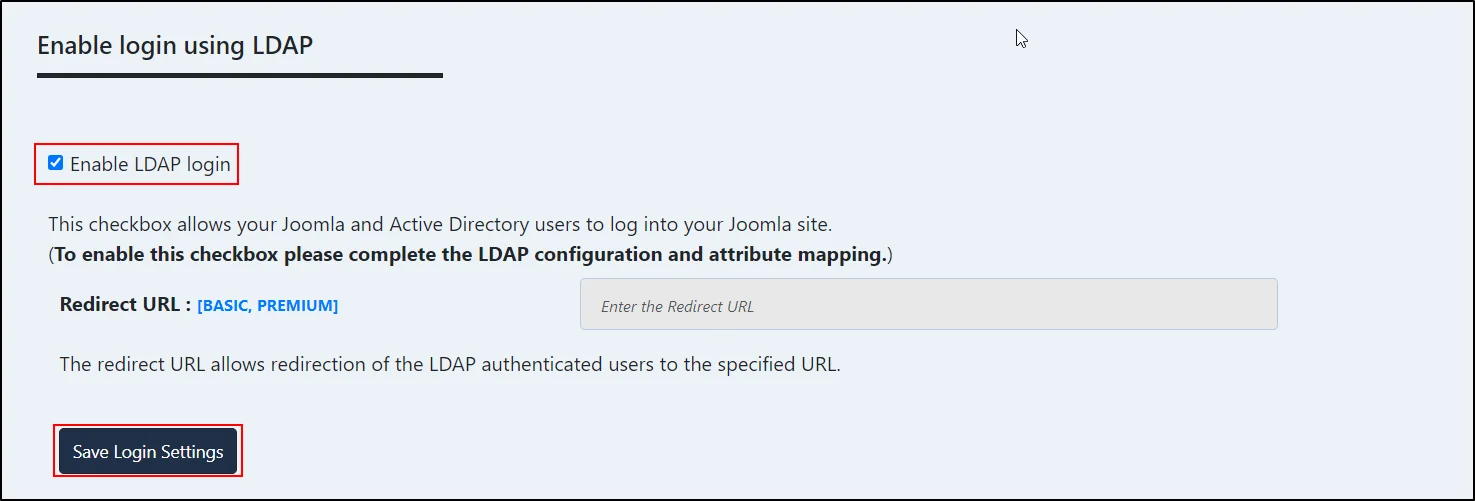
- Enable LDAP Login: Check the checkbox to enable login using LDAP. This allows your users to log in to your Joomla site using their LDAP credentials.
- Users will be auto-registered into your Joomla database after they log in to your Joomla site using their LDAP credentials.
- Click on the Save Login Settings button to allow your users to log in via their LDAP credentials
4. Setup Group Mapping
- Go to the Group Mapping tab.
- Enable Group Mapping: On checking this checkbox the default role will be assigned to your users once they login to your Joomla site using their LDAP credentials.
- Select the default role from the Joomla roles dropdown lost.
- Our LDAP Premium plugin enables you to map Joomla user roles based on their Active Directory roles.
- Click on the Save Group Mapping button.

5. Login to Joomla using LDAP credentials
- Open a private/incognito window and go to your Joomla site login page.
- Enter the User's LDAP credentials. Remember, the username should match the LDAP attribute value you choose from the User Attribute dropdown.
- The LDAP user has been created in Joomla with the registered group mapping assigned to it.
- You have successfully logged into Joomla using your LDAP user.
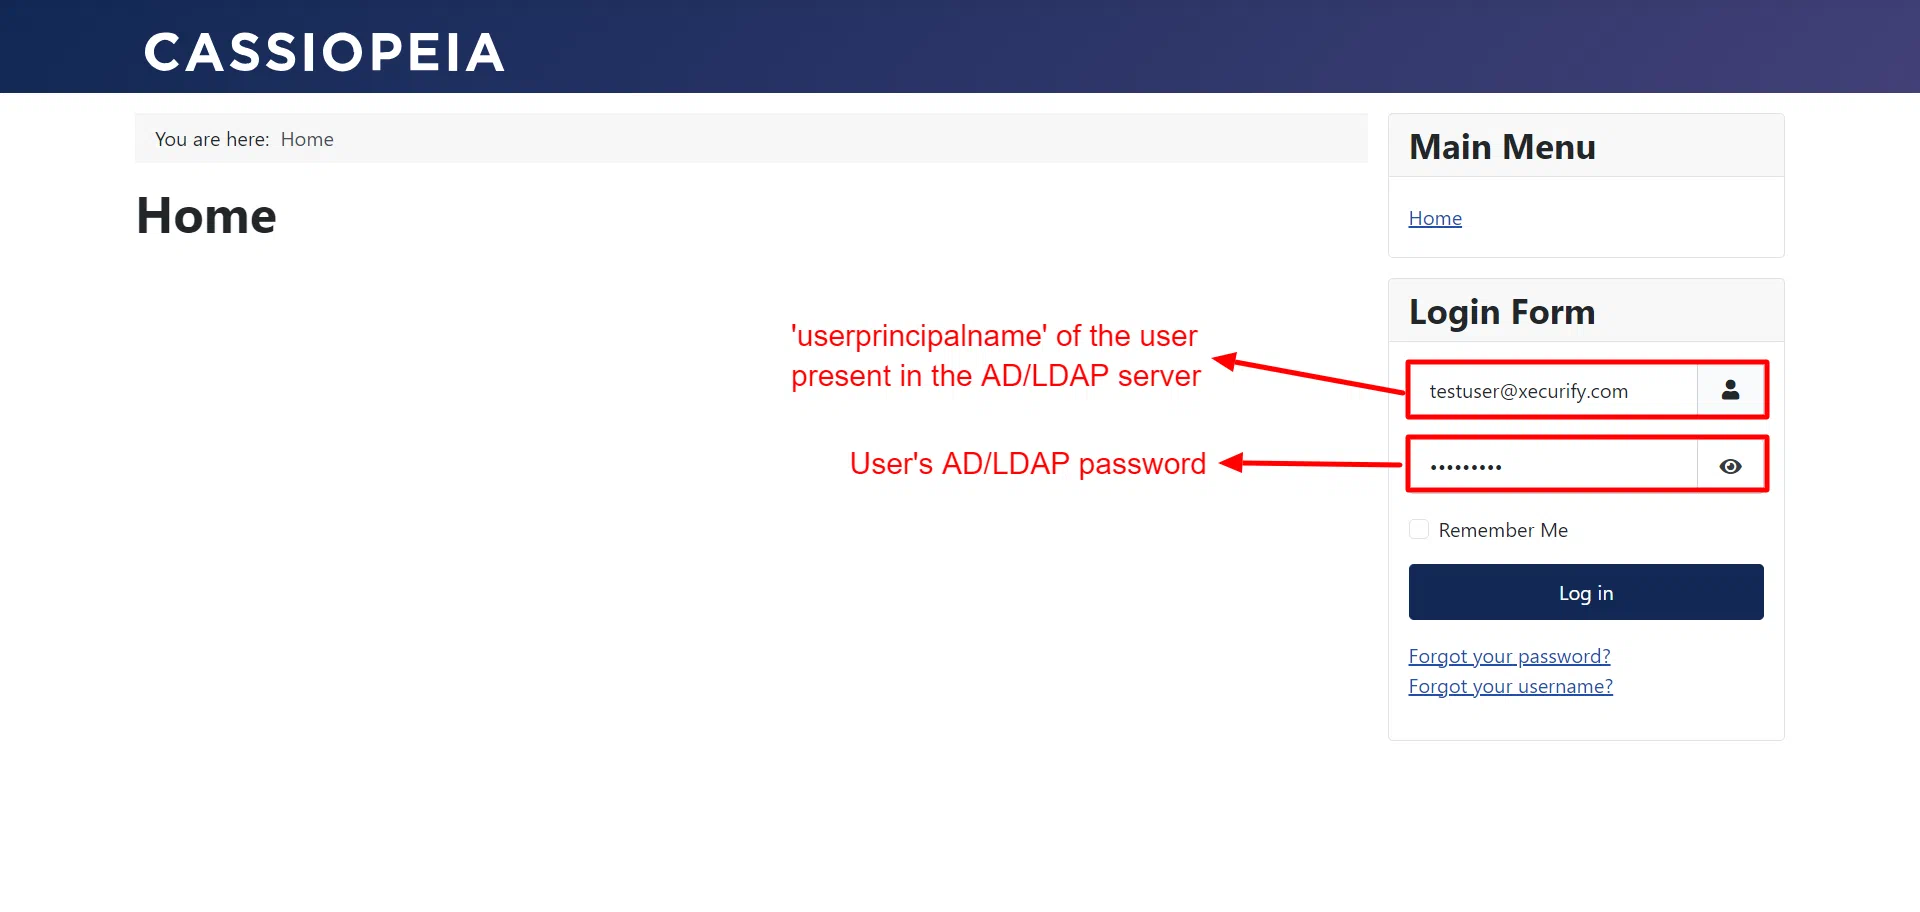

You have successfully configured LDAP Login for Intranet Sites for Joomla.
Additional Resources
- LDAP Authentication with Active Directory
- What is Kerberos?
- NTLM / Kerberos Authentication Mechanism
- How to configure NTLM?
- Guide to setup NTLM SSO with Apache on Windows
- Configure Apache Directory Studio with Joomla LDAP for Intranet
- Configure Active Directory on Windows Server
- Configure browsers settings for NTLM / Kerberos Authentication
Mail us on joomlasupport@xecurify.com for quick guidance(via email/meeting) on your requirement and our team will help you to select the best suitable solution/plan as per your requirement.
Need Help? We are right here!

Thanks for your inquiry.
If you dont hear from us within 24 hours, please feel free to send a follow up email to info@xecurify.com
Cookie Preferences
Cookie Consent
This privacy statement applies to miniorange websites describing how we handle the personal information. When you visit any website, it may store or retrieve the information on your browser, mostly in the form of the cookies. This information might be about you, your preferences or your device and is mostly used to make the site work as you expect it to. The information does not directly identify you, but it can give you a more personalized web experience. Click on the category headings to check how we handle the cookies. For the privacy statement of our solutions you can refer to the privacy policy.
Strictly Necessary Cookies
Always Active
Necessary cookies help make a website fully usable by enabling the basic functions like site navigation, logging in, filling forms, etc. The cookies used for the functionality do not store any personal identifiable information. However, some parts of the website will not work properly without the cookies.
Performance Cookies
Always Active
These cookies only collect aggregated information about the traffic of the website including - visitors, sources, page clicks and views, etc. This allows us to know more about our most and least popular pages along with users' interaction on the actionable elements and hence letting us improve the performance of our website as well as our services.
