Okta WordPress Login using SAML SSO | WP SSO with Okta as SAML IDP | WordPress Okta SAML SSO
Okta Single Sign On (SSO) login for WordPress [SAML] can be achieved by using our WordPress SAML Single Sign On (SSO) plugin. Our SSO plugin is compatible with all the SAML compliant Identity Providers and enables secure Okta Login into WordPress sites. Here we will go through a guide to configure WordPress Okta SSO / Login into WordPress site by considering Okta As IDP (Identity Provider) and WordPress as SP (Service Provider).
You can visit our WordPress SSO plugin to know more about the other features we provide.
Pre-requisites : Download And Installation
- Log into your WordPress instance as an admin.
- Go to the WordPress Dashboard → Plugins and click on Add New.
- Search for WordPress Single Sign On (SSO) plugin and click on Install Now.
- Once installed click on Activate.
Step-by-step video to Setup WordPress Okta SSO / Login with Okta into WordPress (WP)
Steps to configure Okta Single Sign-On (SSO) Login into WordPress (WP)
1. Setup Okta as IdP (Identity Provider)
Follow the steps below to configure Okta as IdP
 Configure Okta as IdP
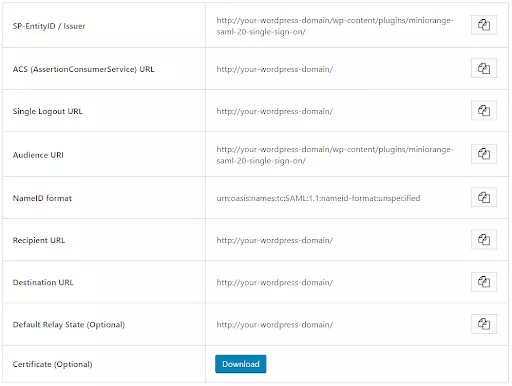
- In the miniOrange WordPress SAML SP SSO plugin, navigate to SP (Service Provider) Metadata tab. Here, you can find the SP metadata such as SP Entity ID and ACS (AssertionConsumerService) URL which are required to configure Okta as the IdP (Identity Provider).
- Login into your Okta Admin dashboard.
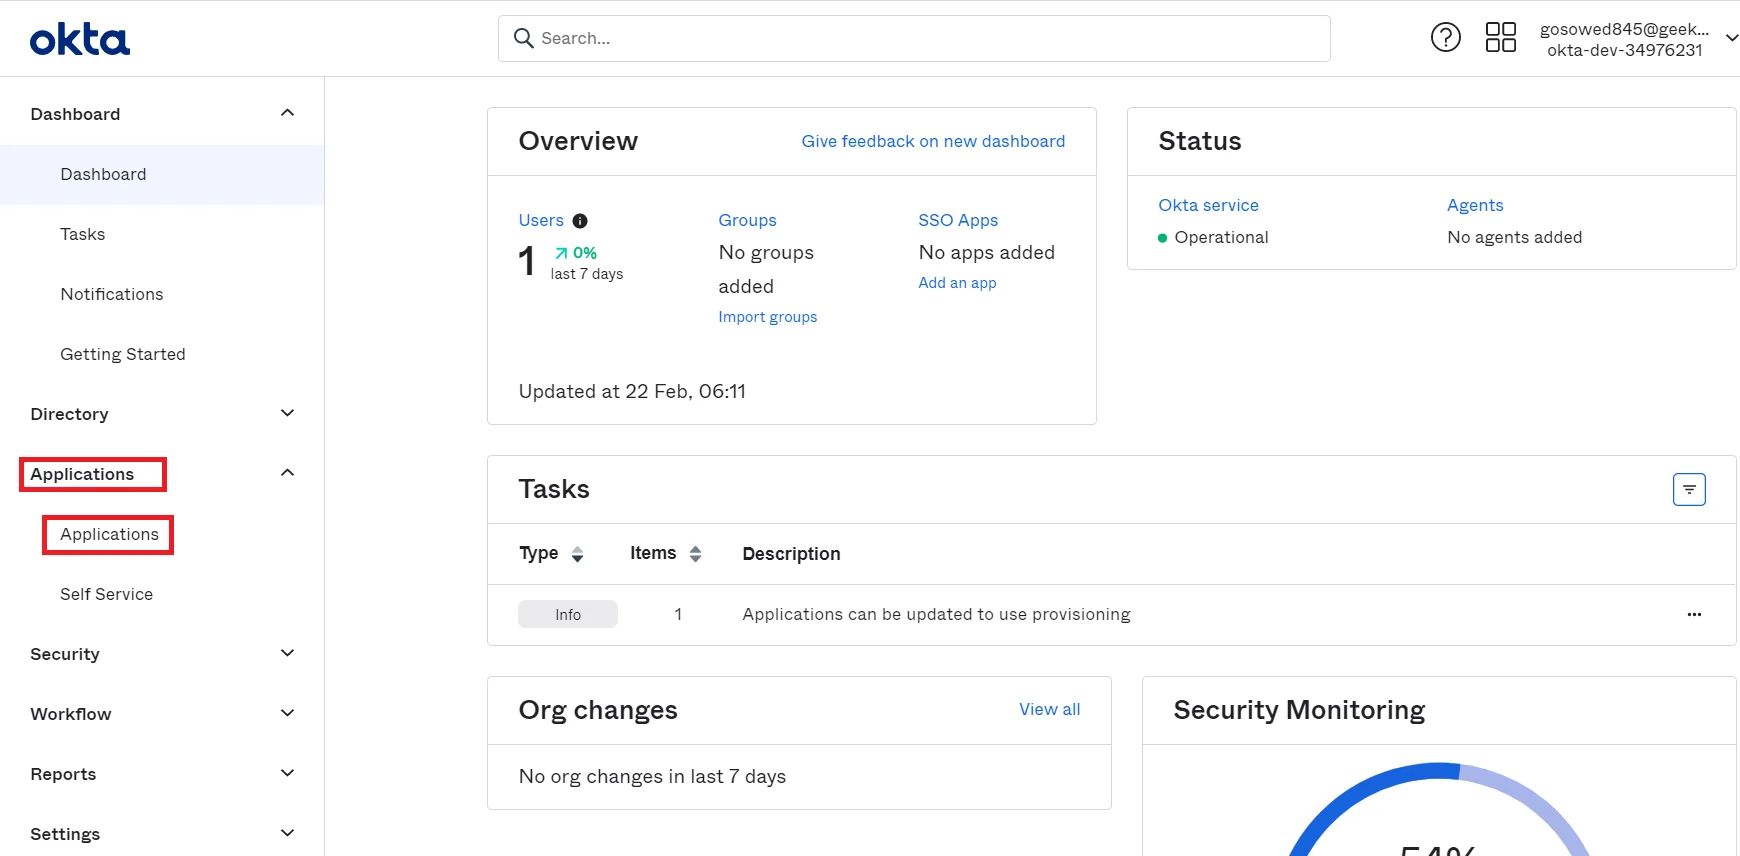
- Then navigate to Applications tab and select Applications.
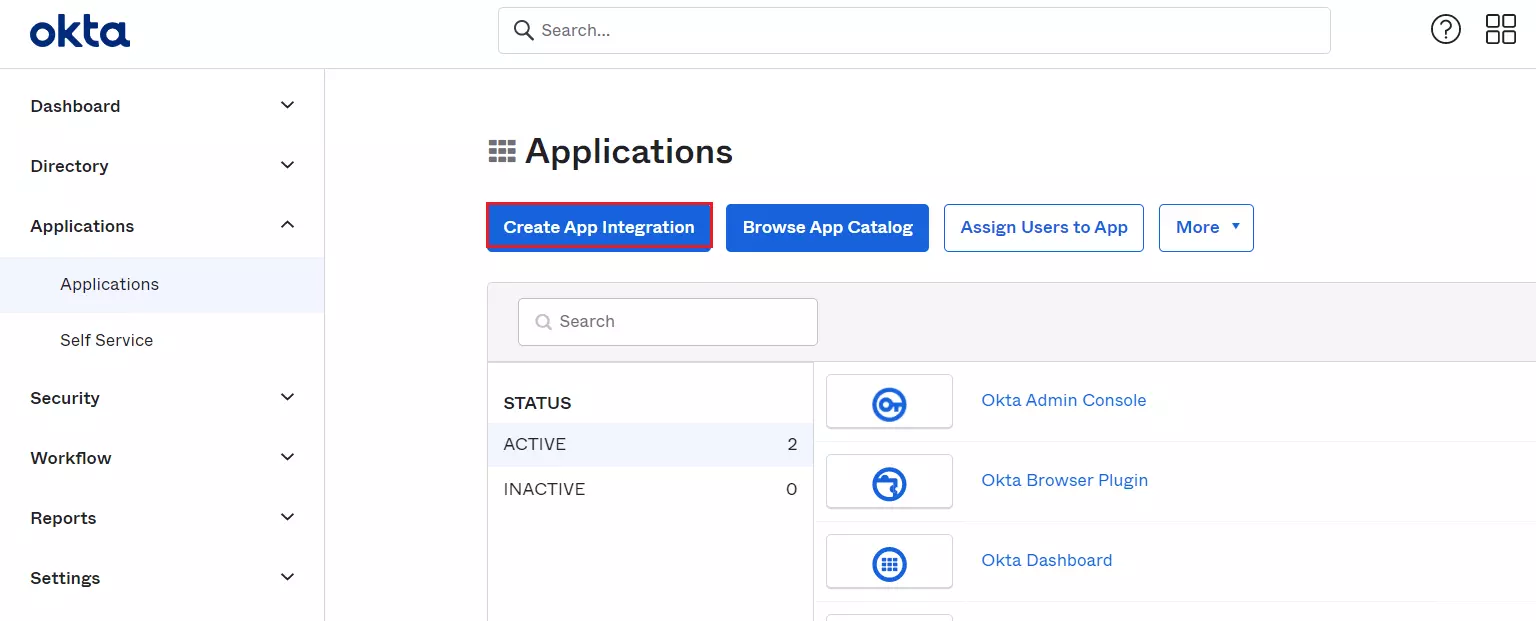
- Click on the Create App Integration button to create new app.
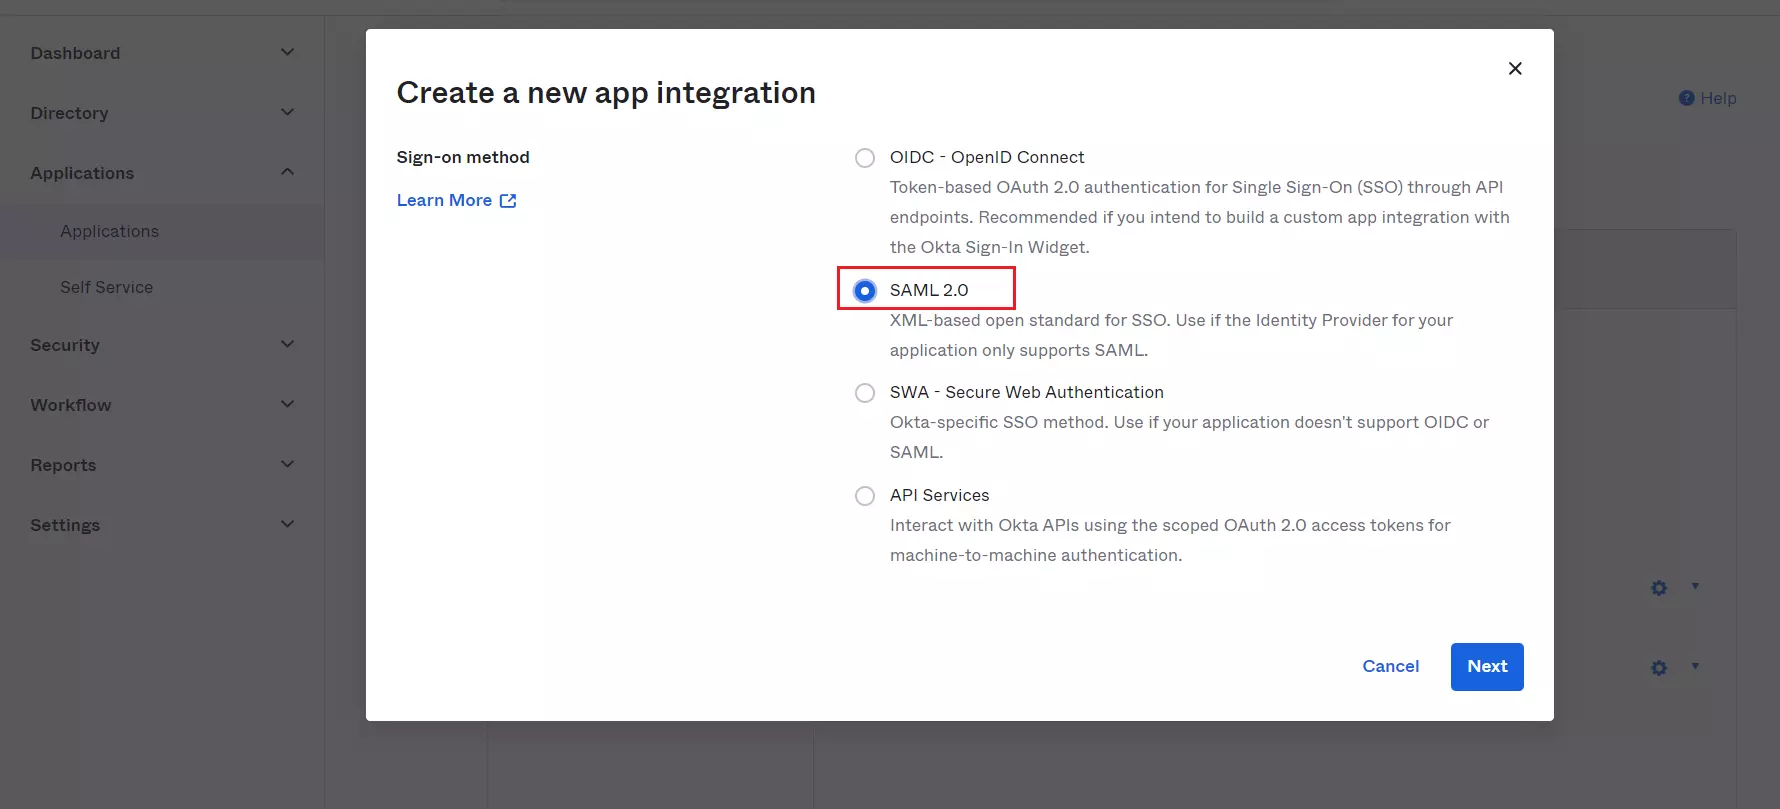
- Select SAML 2.0 as Sign-On method and Click on Next button.
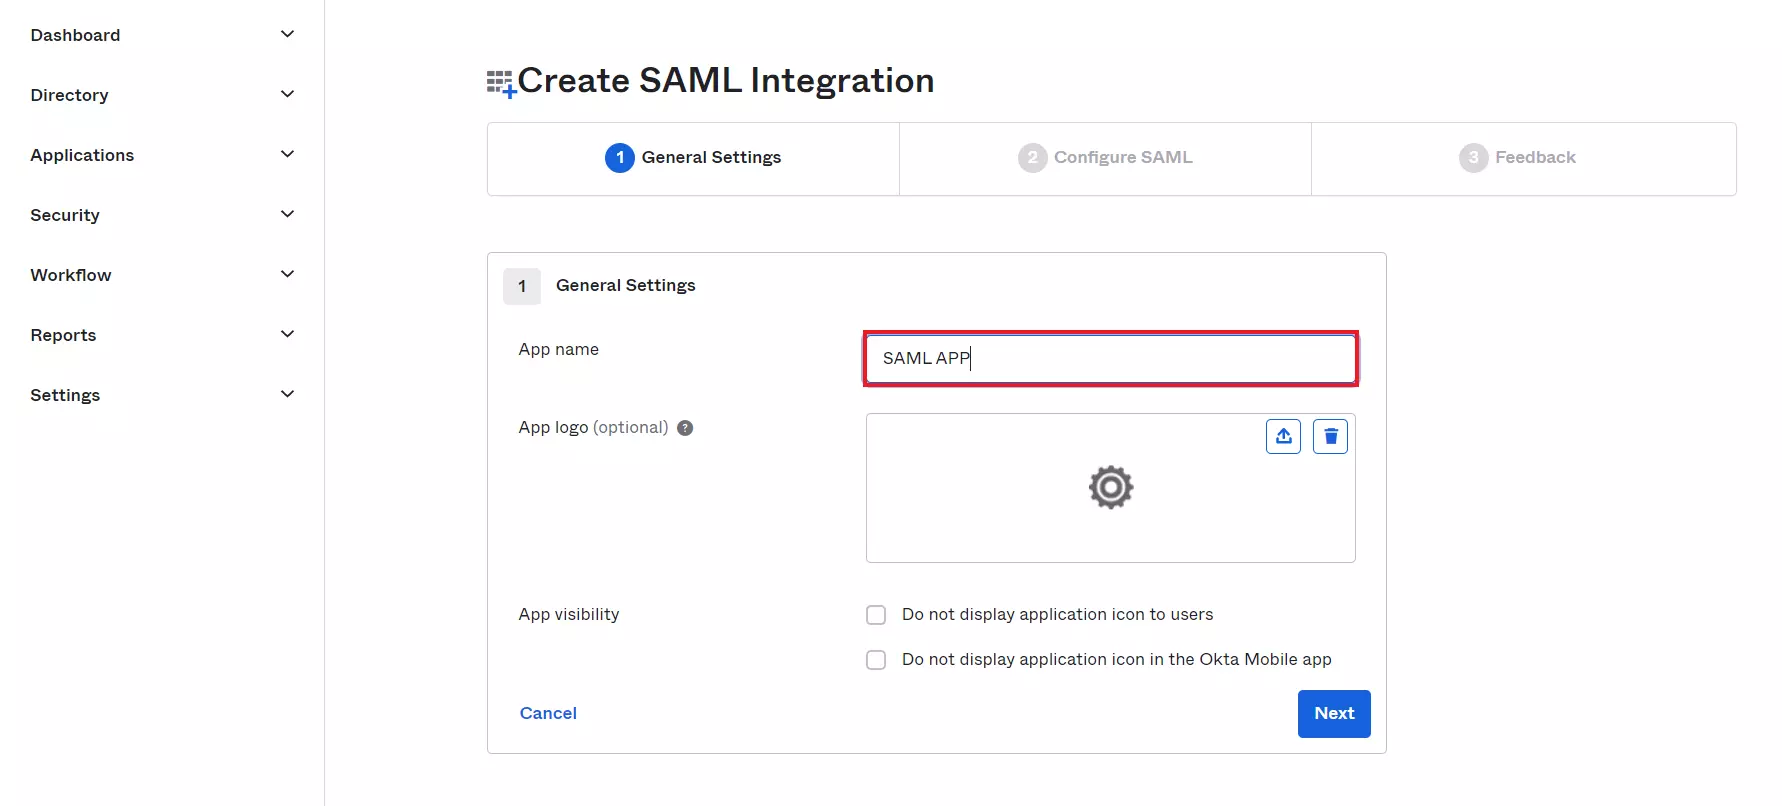
- In General Settings tab, enter App Name and click on Next button.
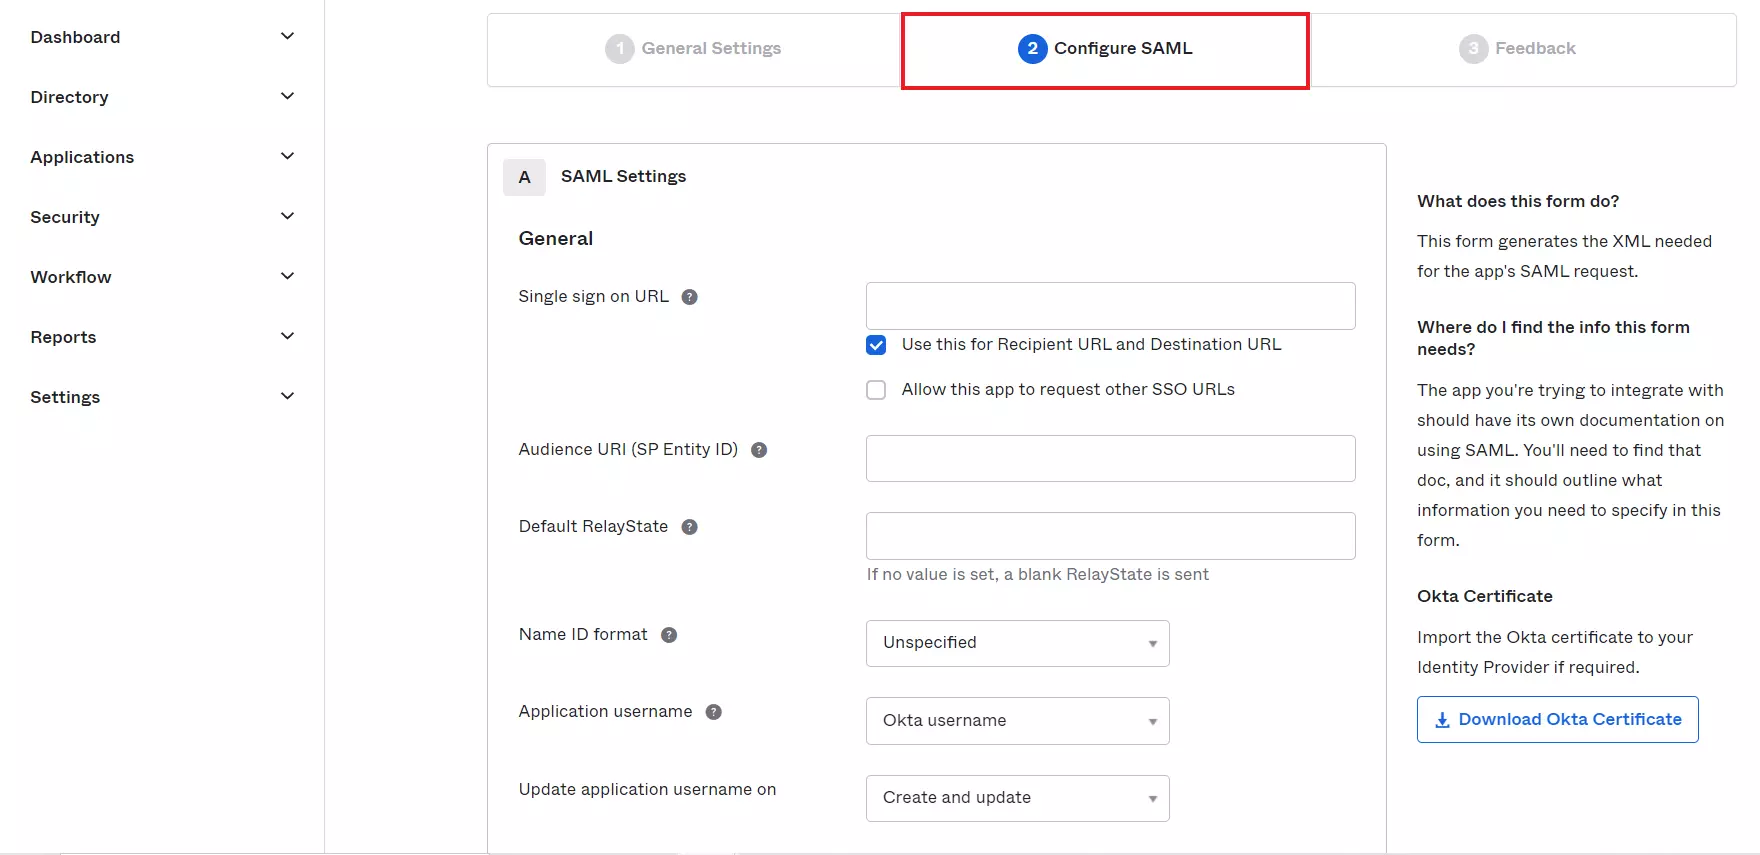
- In Configure SAML tab, enter the required details:
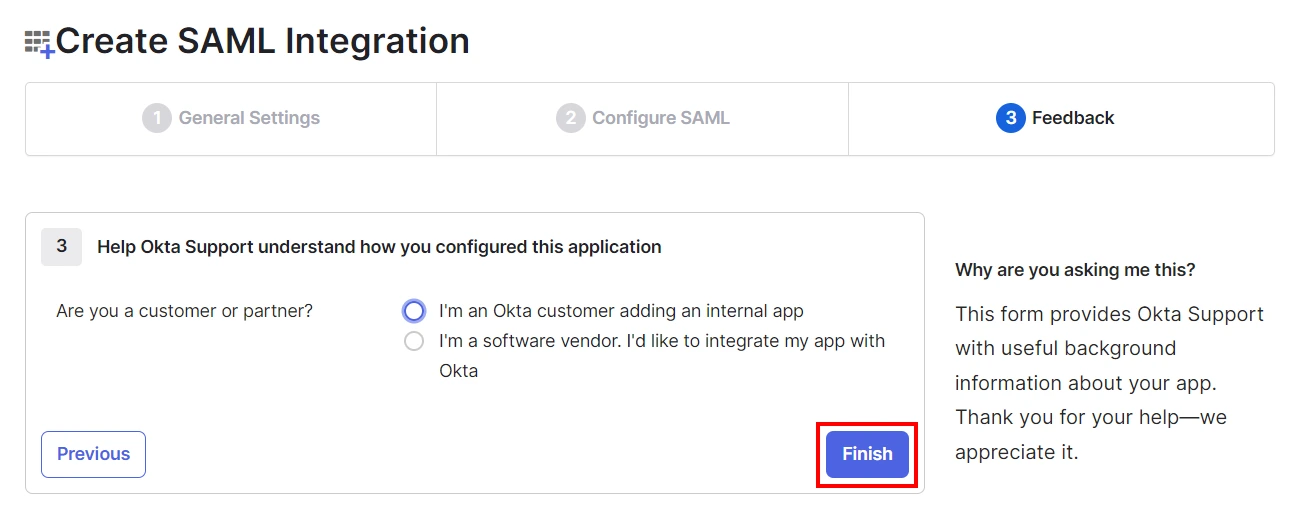
- Configure Group Attribute Statements (Optional) and click on Next button.
- Select type of configured application and click on Finish button.
| Single Sign On URL |
ACS (AssertionConsumerService) URL from the Service Provider Metadata tab of the Plugin |
| Audience URL (SP Entity ID) |
SP Entity ID / Issuer from the Service Provider Metadata tab of the Plugin |
| Default Relay State |
Relay State from the Service Provider Metadata tab of the Plugin |
| Name ID Format |
Select E-Mail Address as a Name Id from dropdown list |
| Application Username |
Okta username |

Assigning
Groups/People
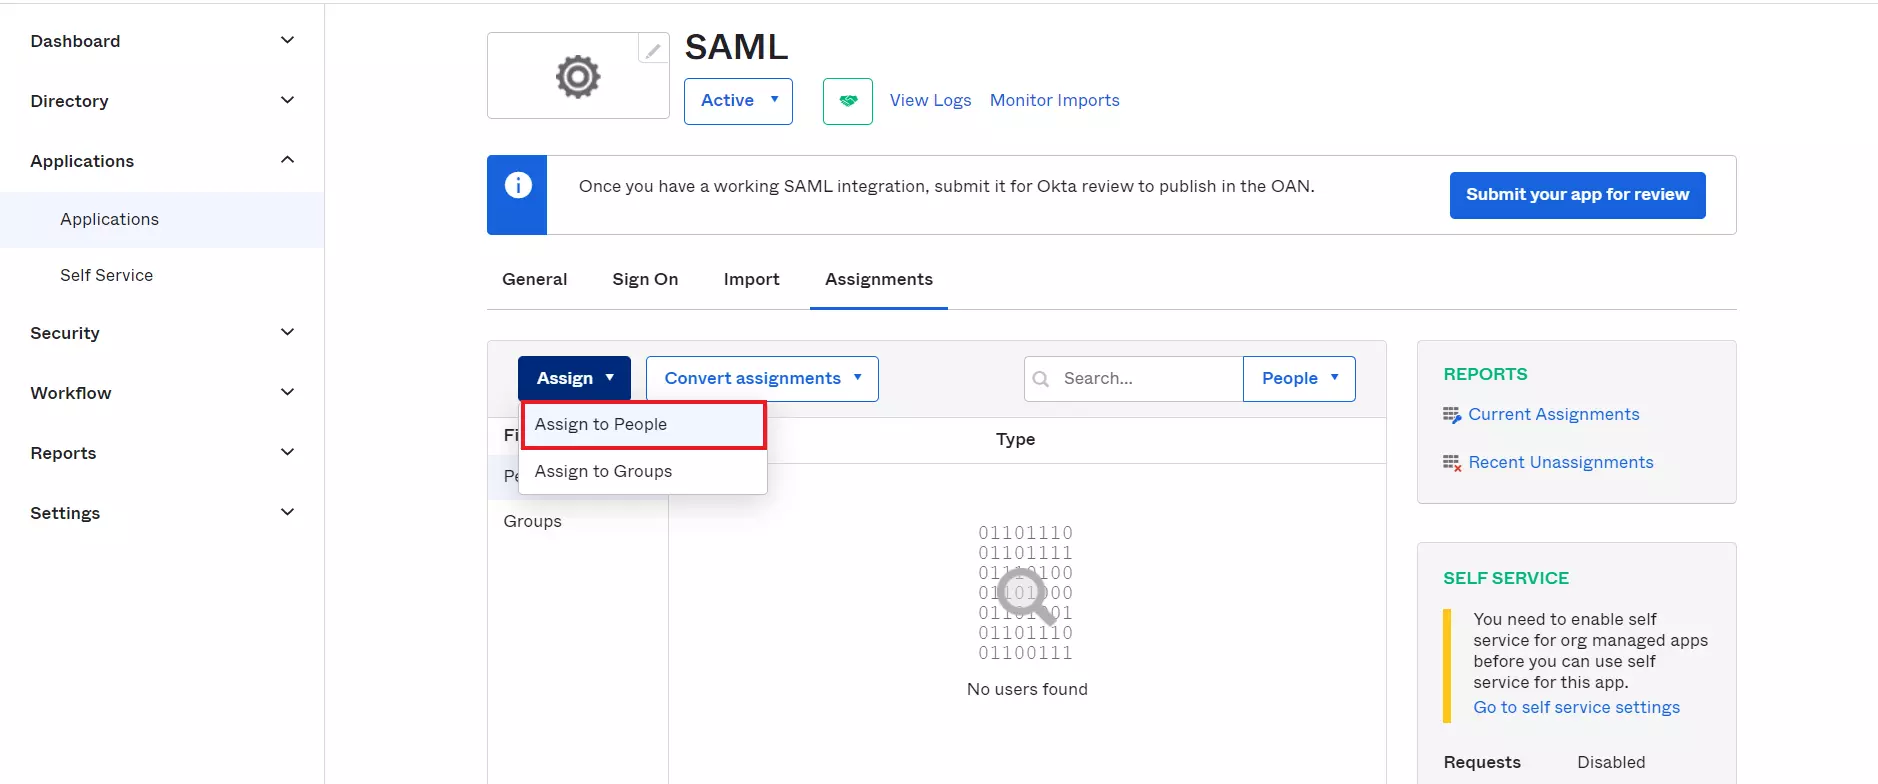
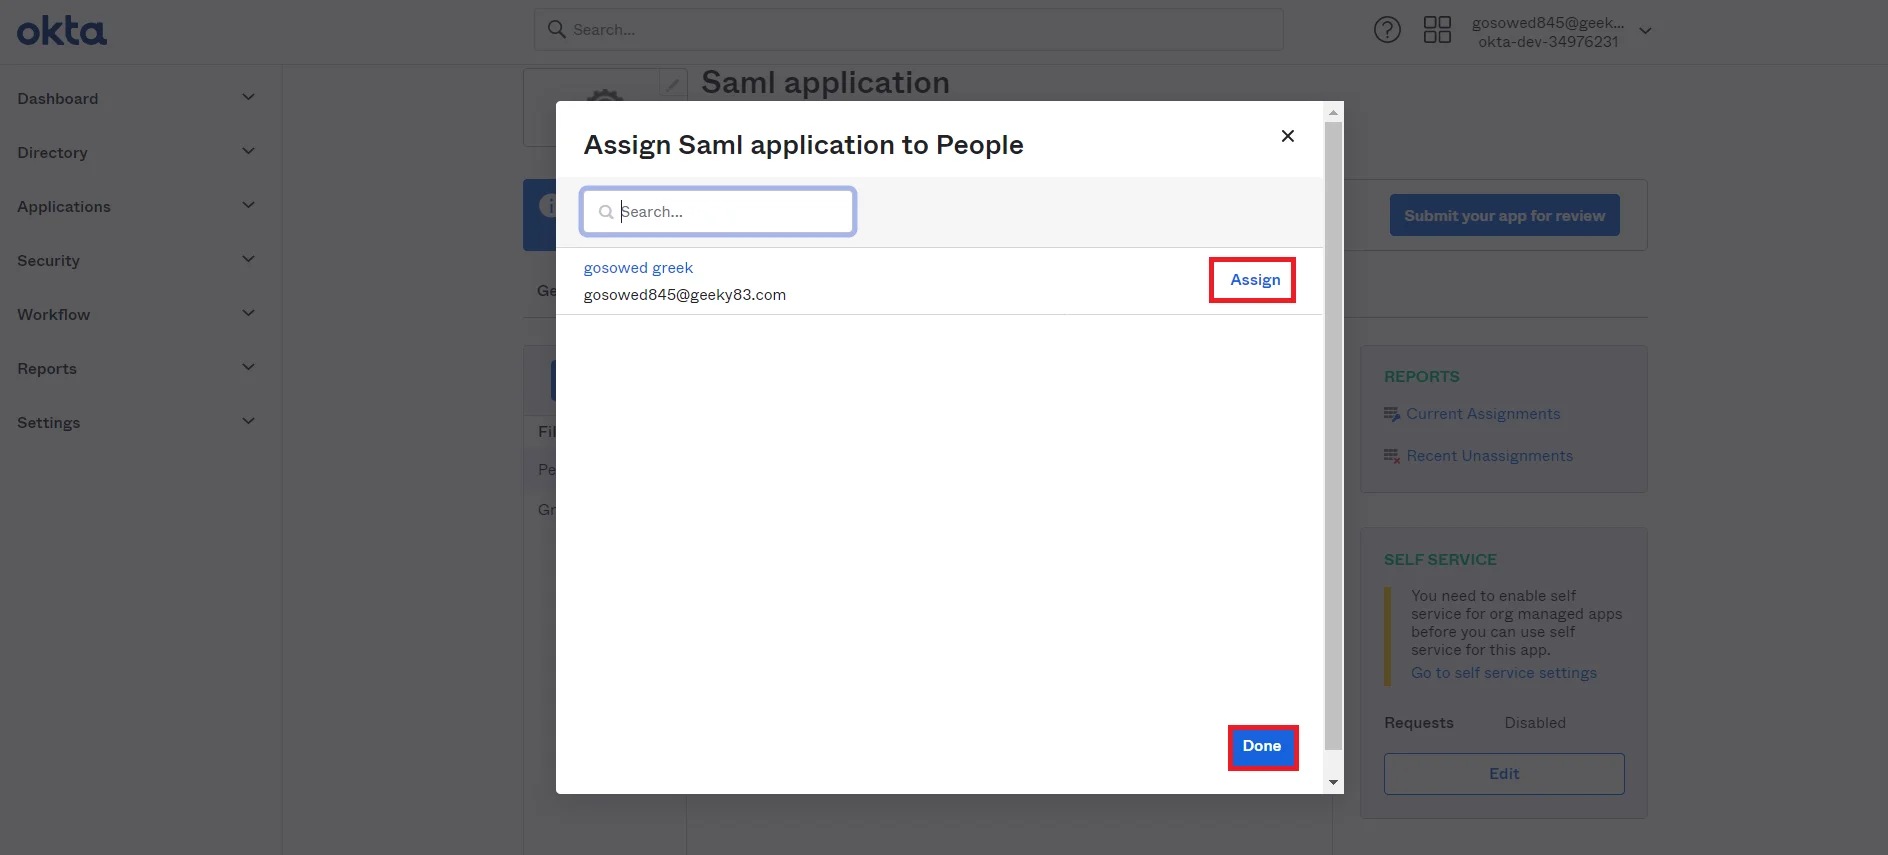
- Navigate to the application you created and click on the Assignments Tab in Okta.
- Click on Assign button to Assign People and Assign Groups.
- Once you Assign the user, click on Done button.
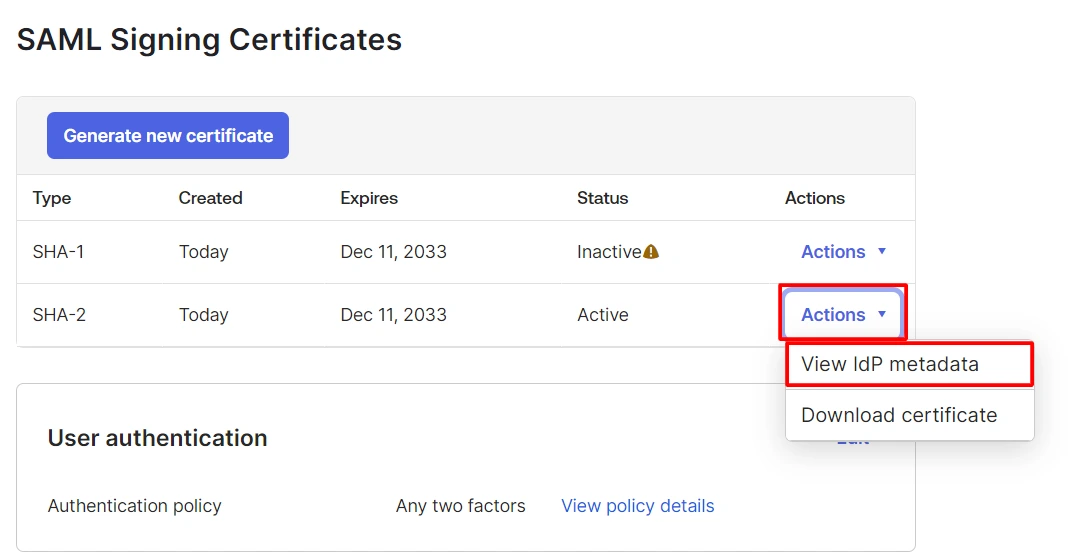
- Click on Sign On tab and scroll down to the SAML Signing Certificates section.
- Click on Action dropdown for the Active certificate and then click on the View IdP Metadata option to get IdP Metadata which will be required for configuring your Service Provider.
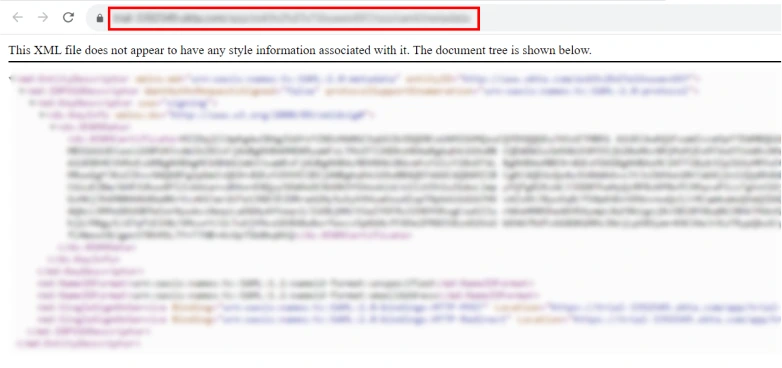
- Copy the Metadata URL.
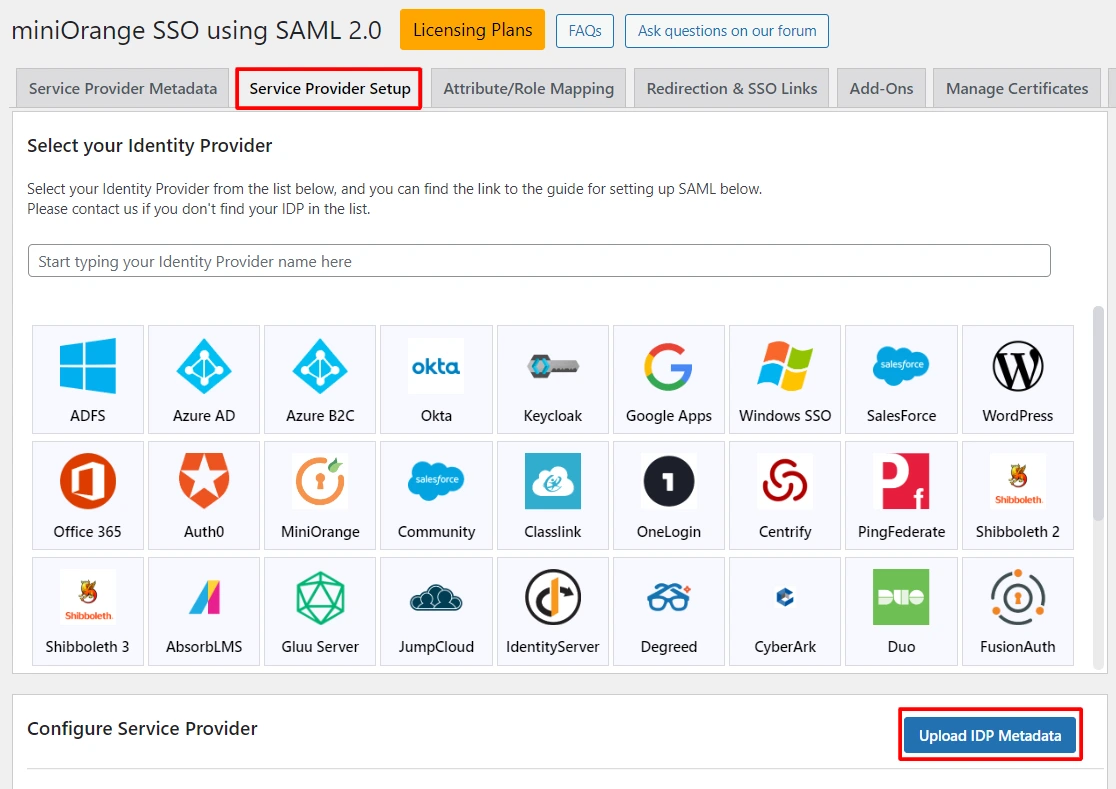
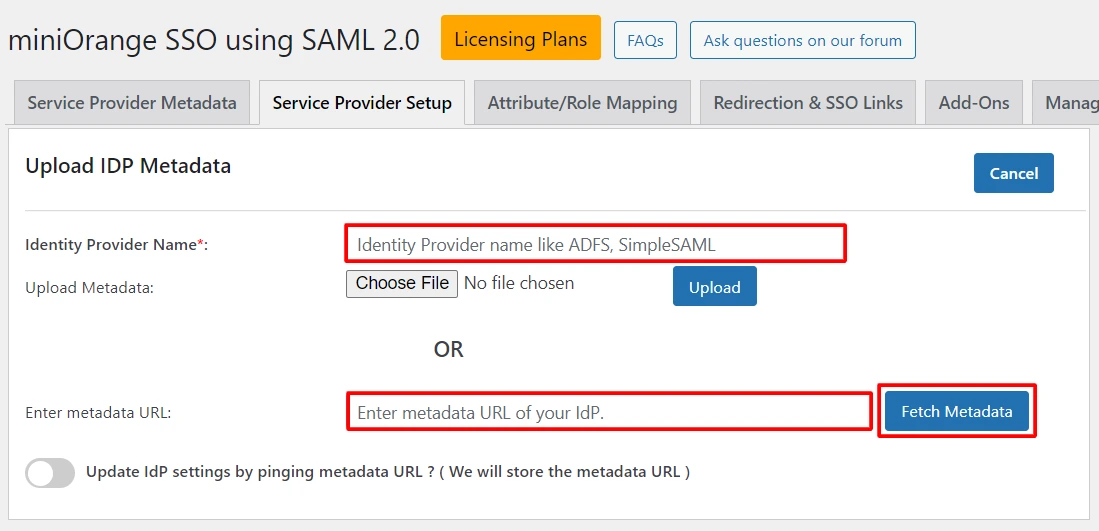
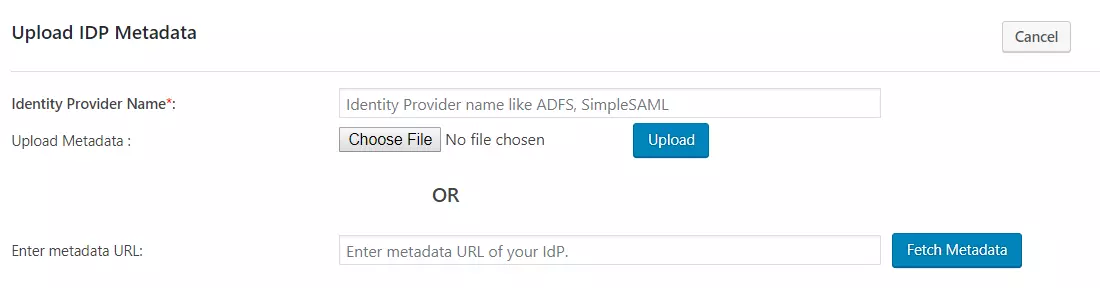
- In miniOrange SAML 2.0 SP SSO plugin, click on Service Provider Setup tab and click on Upload IDP Metadata button.
- Enter Identity Provider Name and paste the Metadata URL in the field.
- Click on the Fetch Metadata button.
- You have successfully configured Okta as SAML IdP (Identity Provider) for achieving Okta WordPress Login via Single Sign On, ensuring secure Okta Login into WordPress (WP) Site.

Note: If you intend to set up Attribute Mapping, Role Mapping, and other configurations on the Identity Provider's end, you can find detailed instructions in the provided setup guide, which is linked here.
2. Configuring WordPress as SP (Service Provider)
-
Free
-
Standard
-
Premium
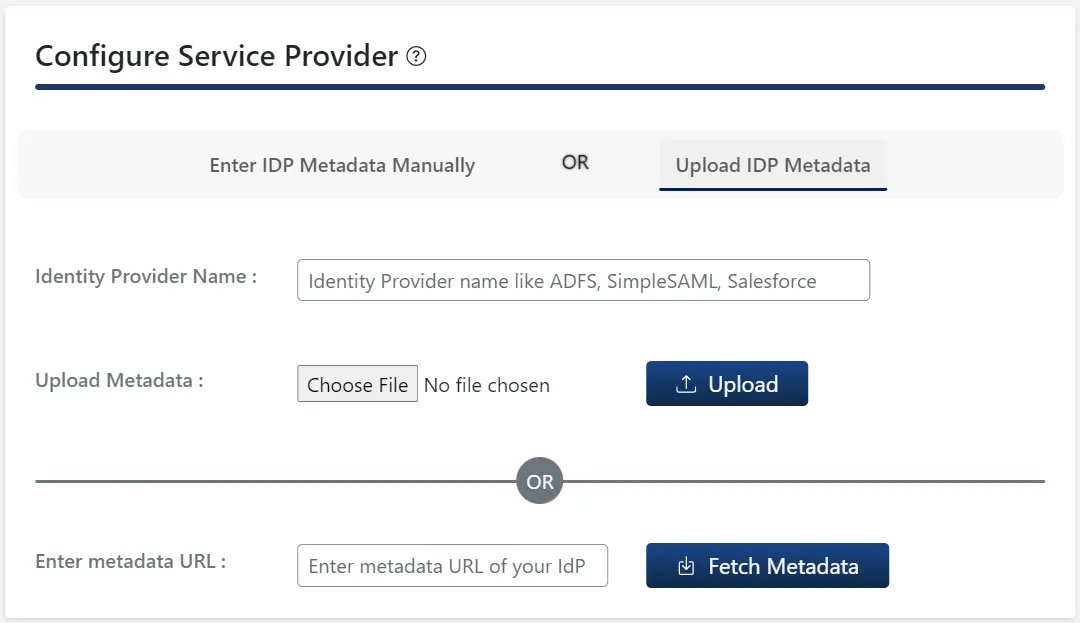
In the WordPress SAML SSO plugin, go to the Service Provider Setup tab of the plugin. There are two ways to configure the WordPress SSO plugin:
A. By uploading IDP metadata:
- Click on Upload IDP metadata button.
- Enter the Identity Provider Name
- You can either upload a metadata file and click on Upload button or use a metadata URL and click on Fetch Metadata.
B.Manual Configuration:
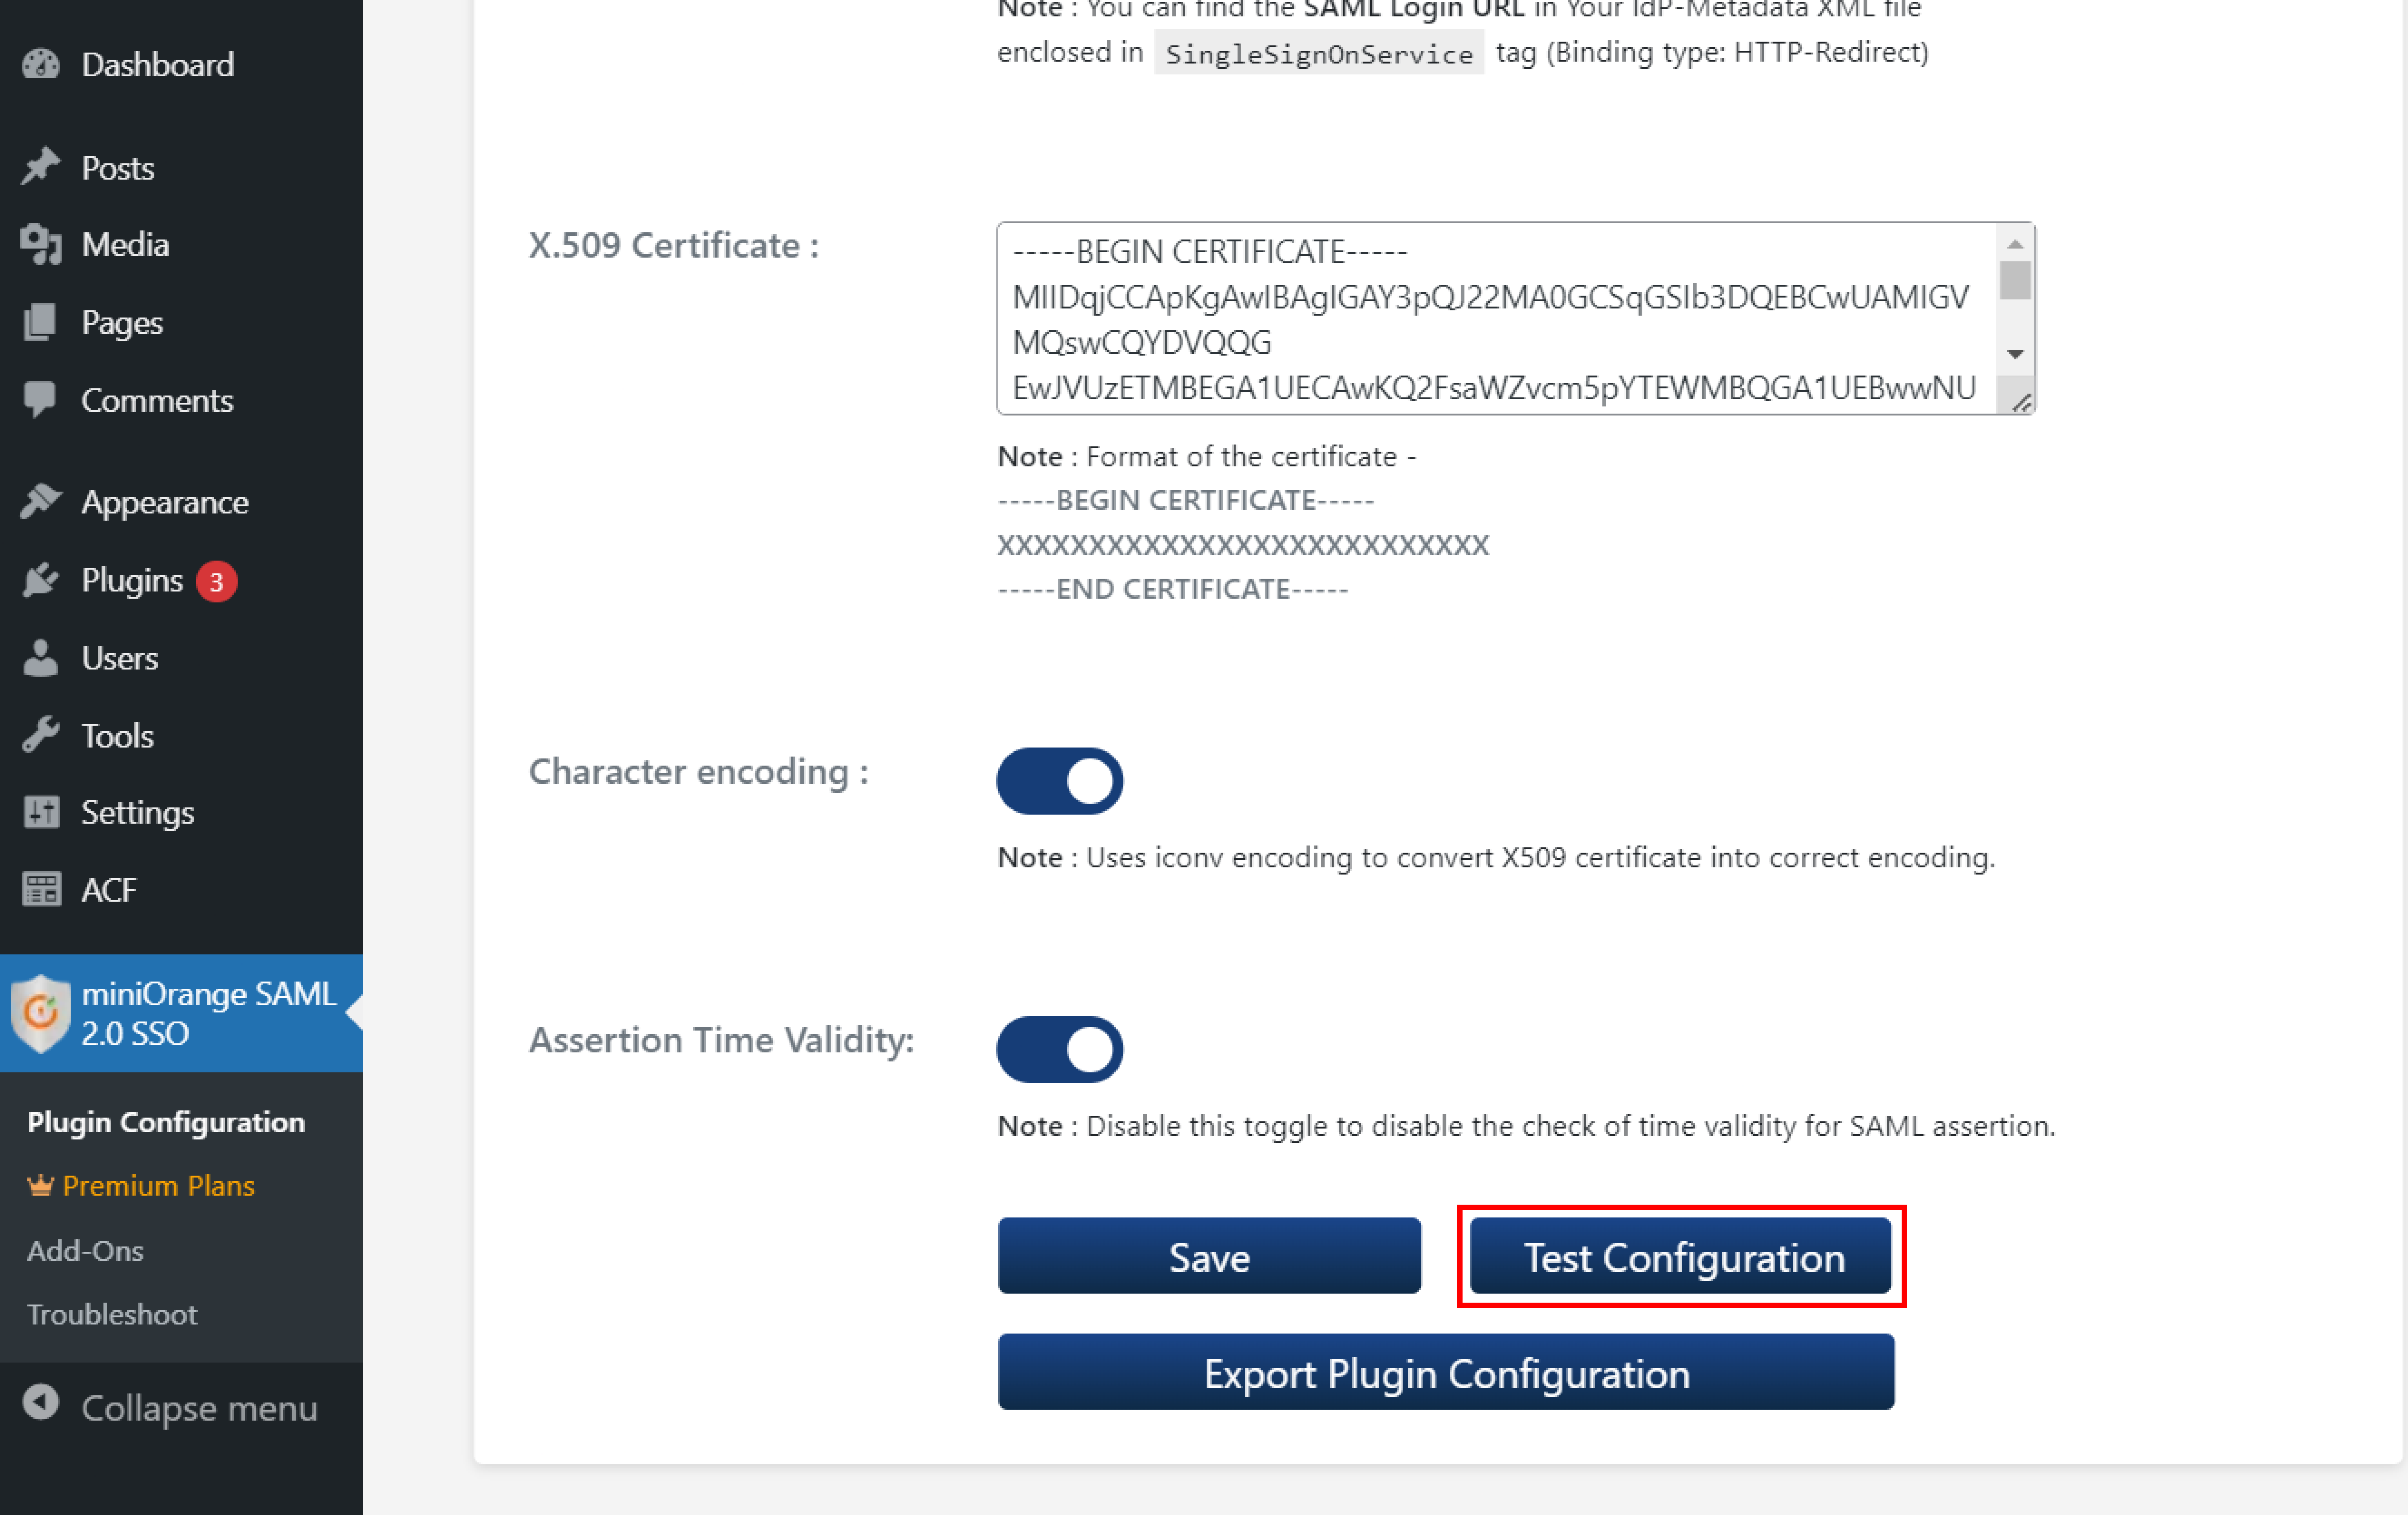
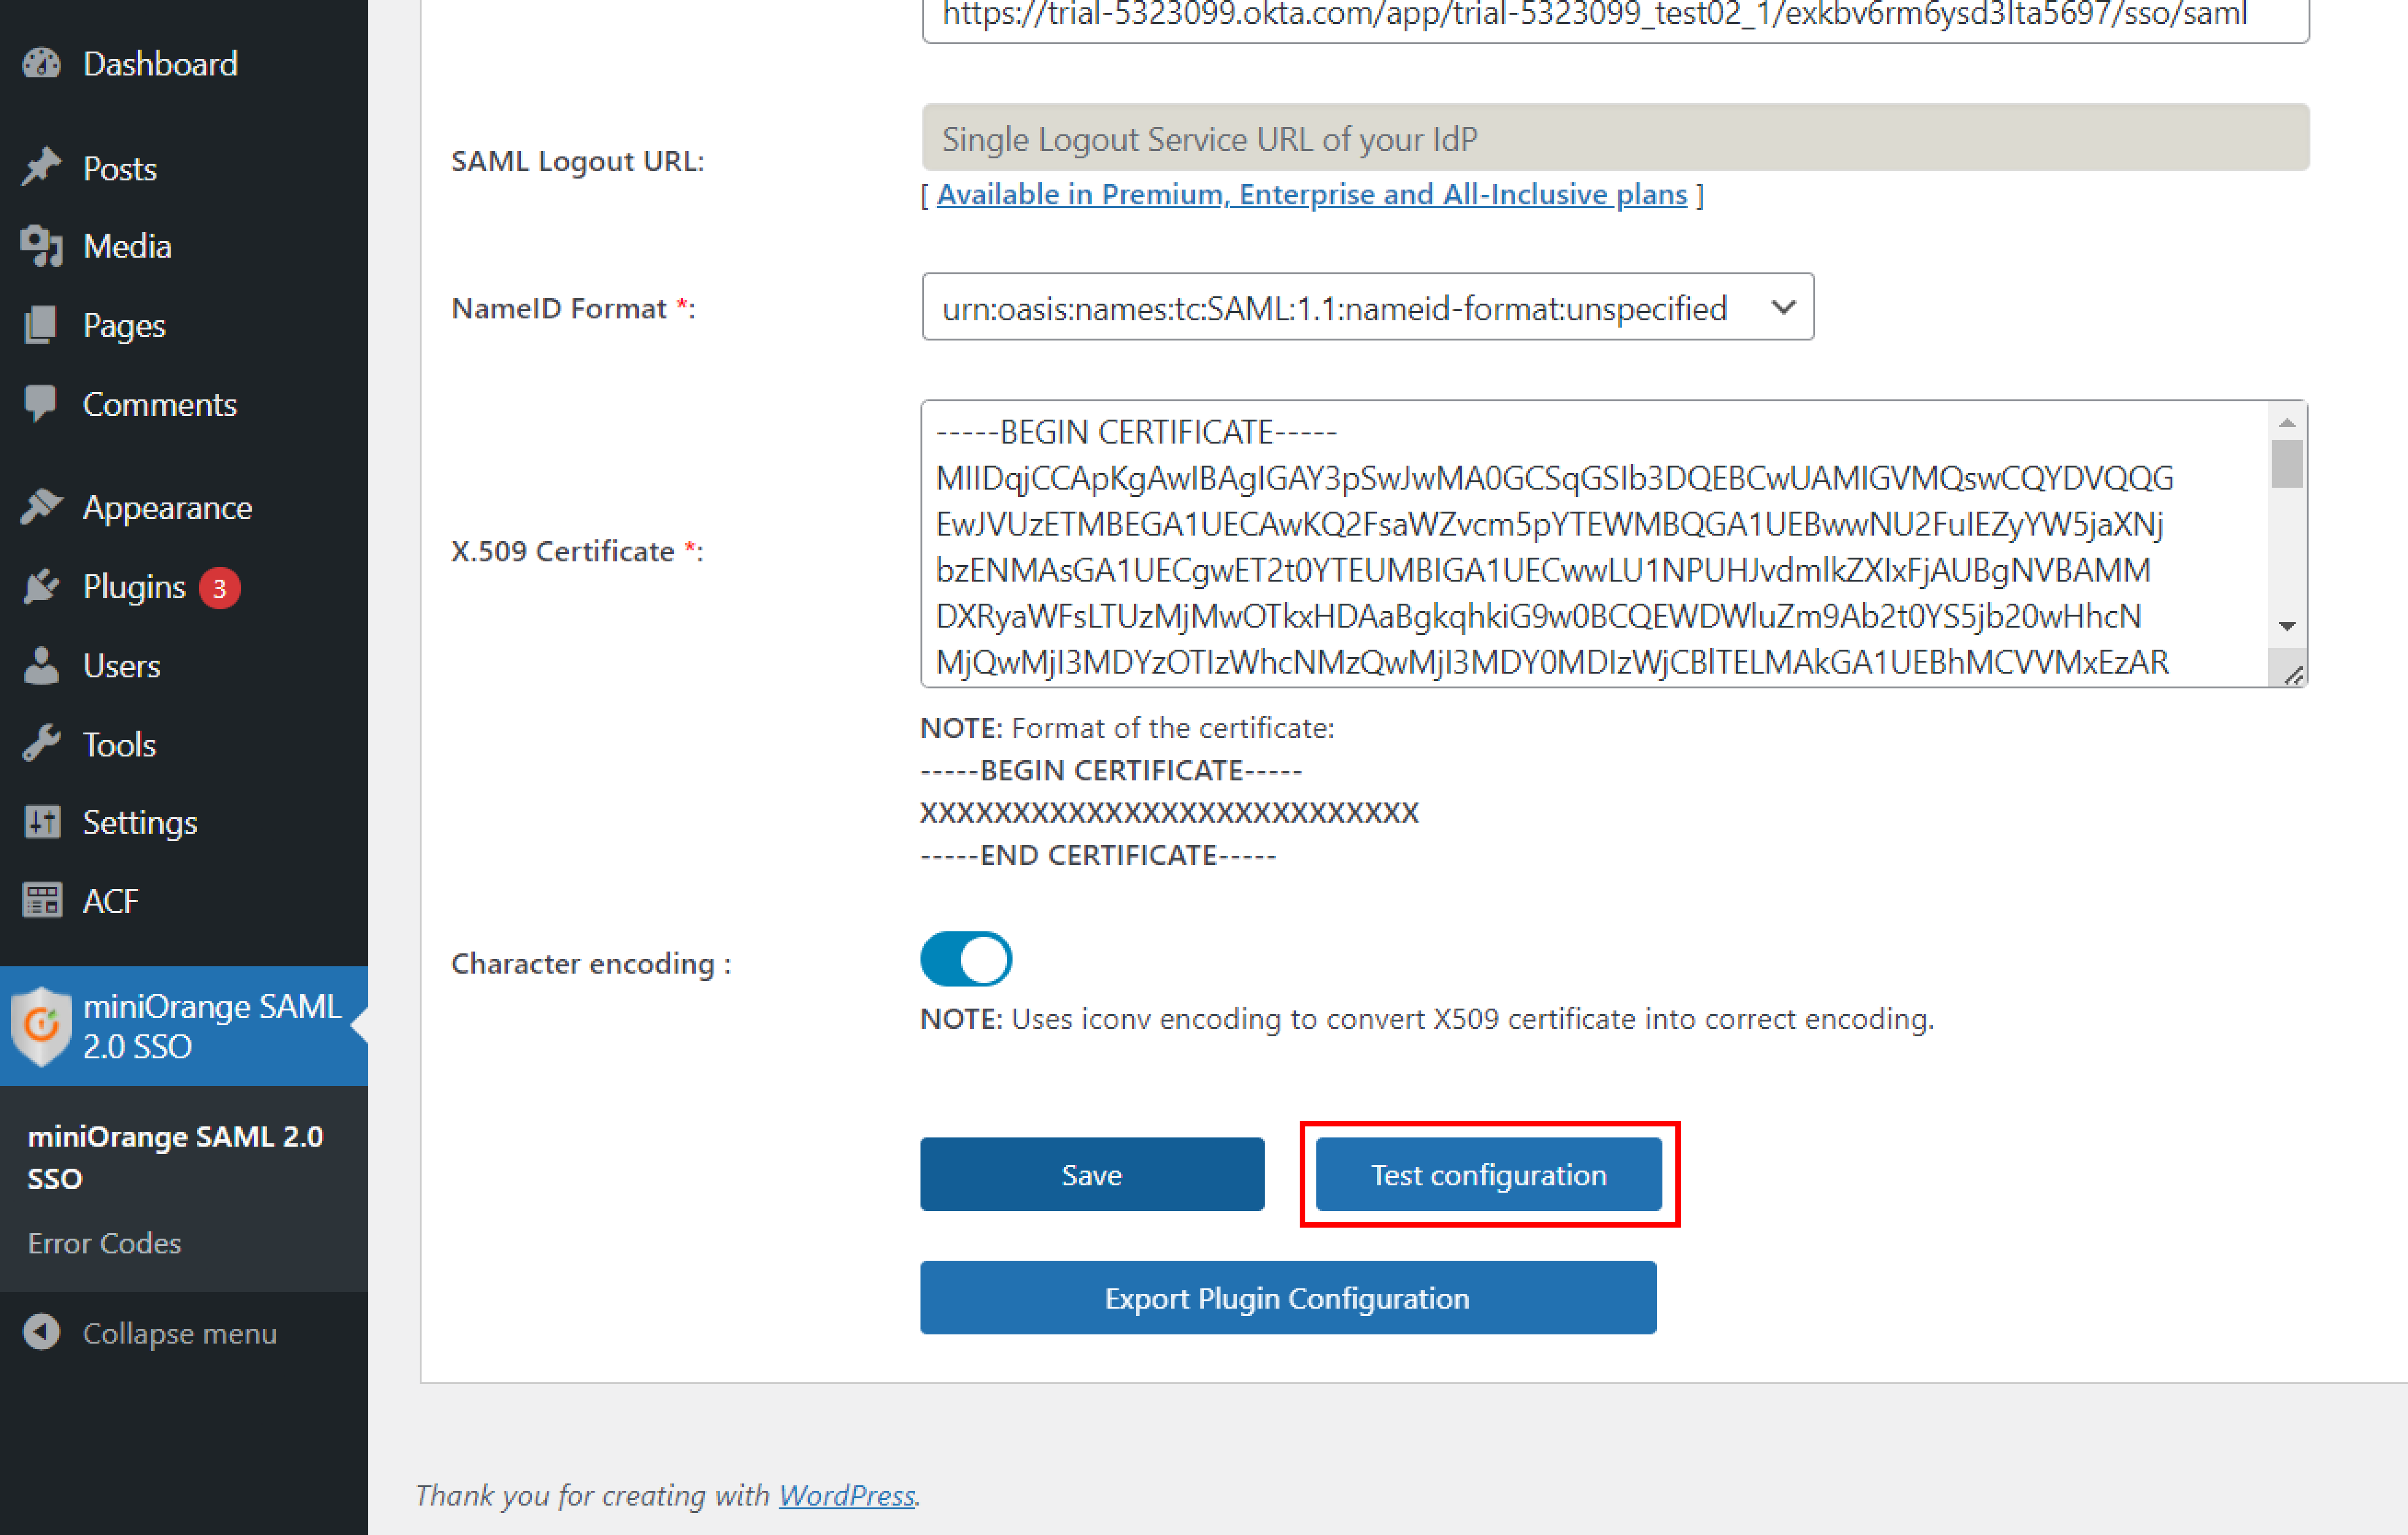
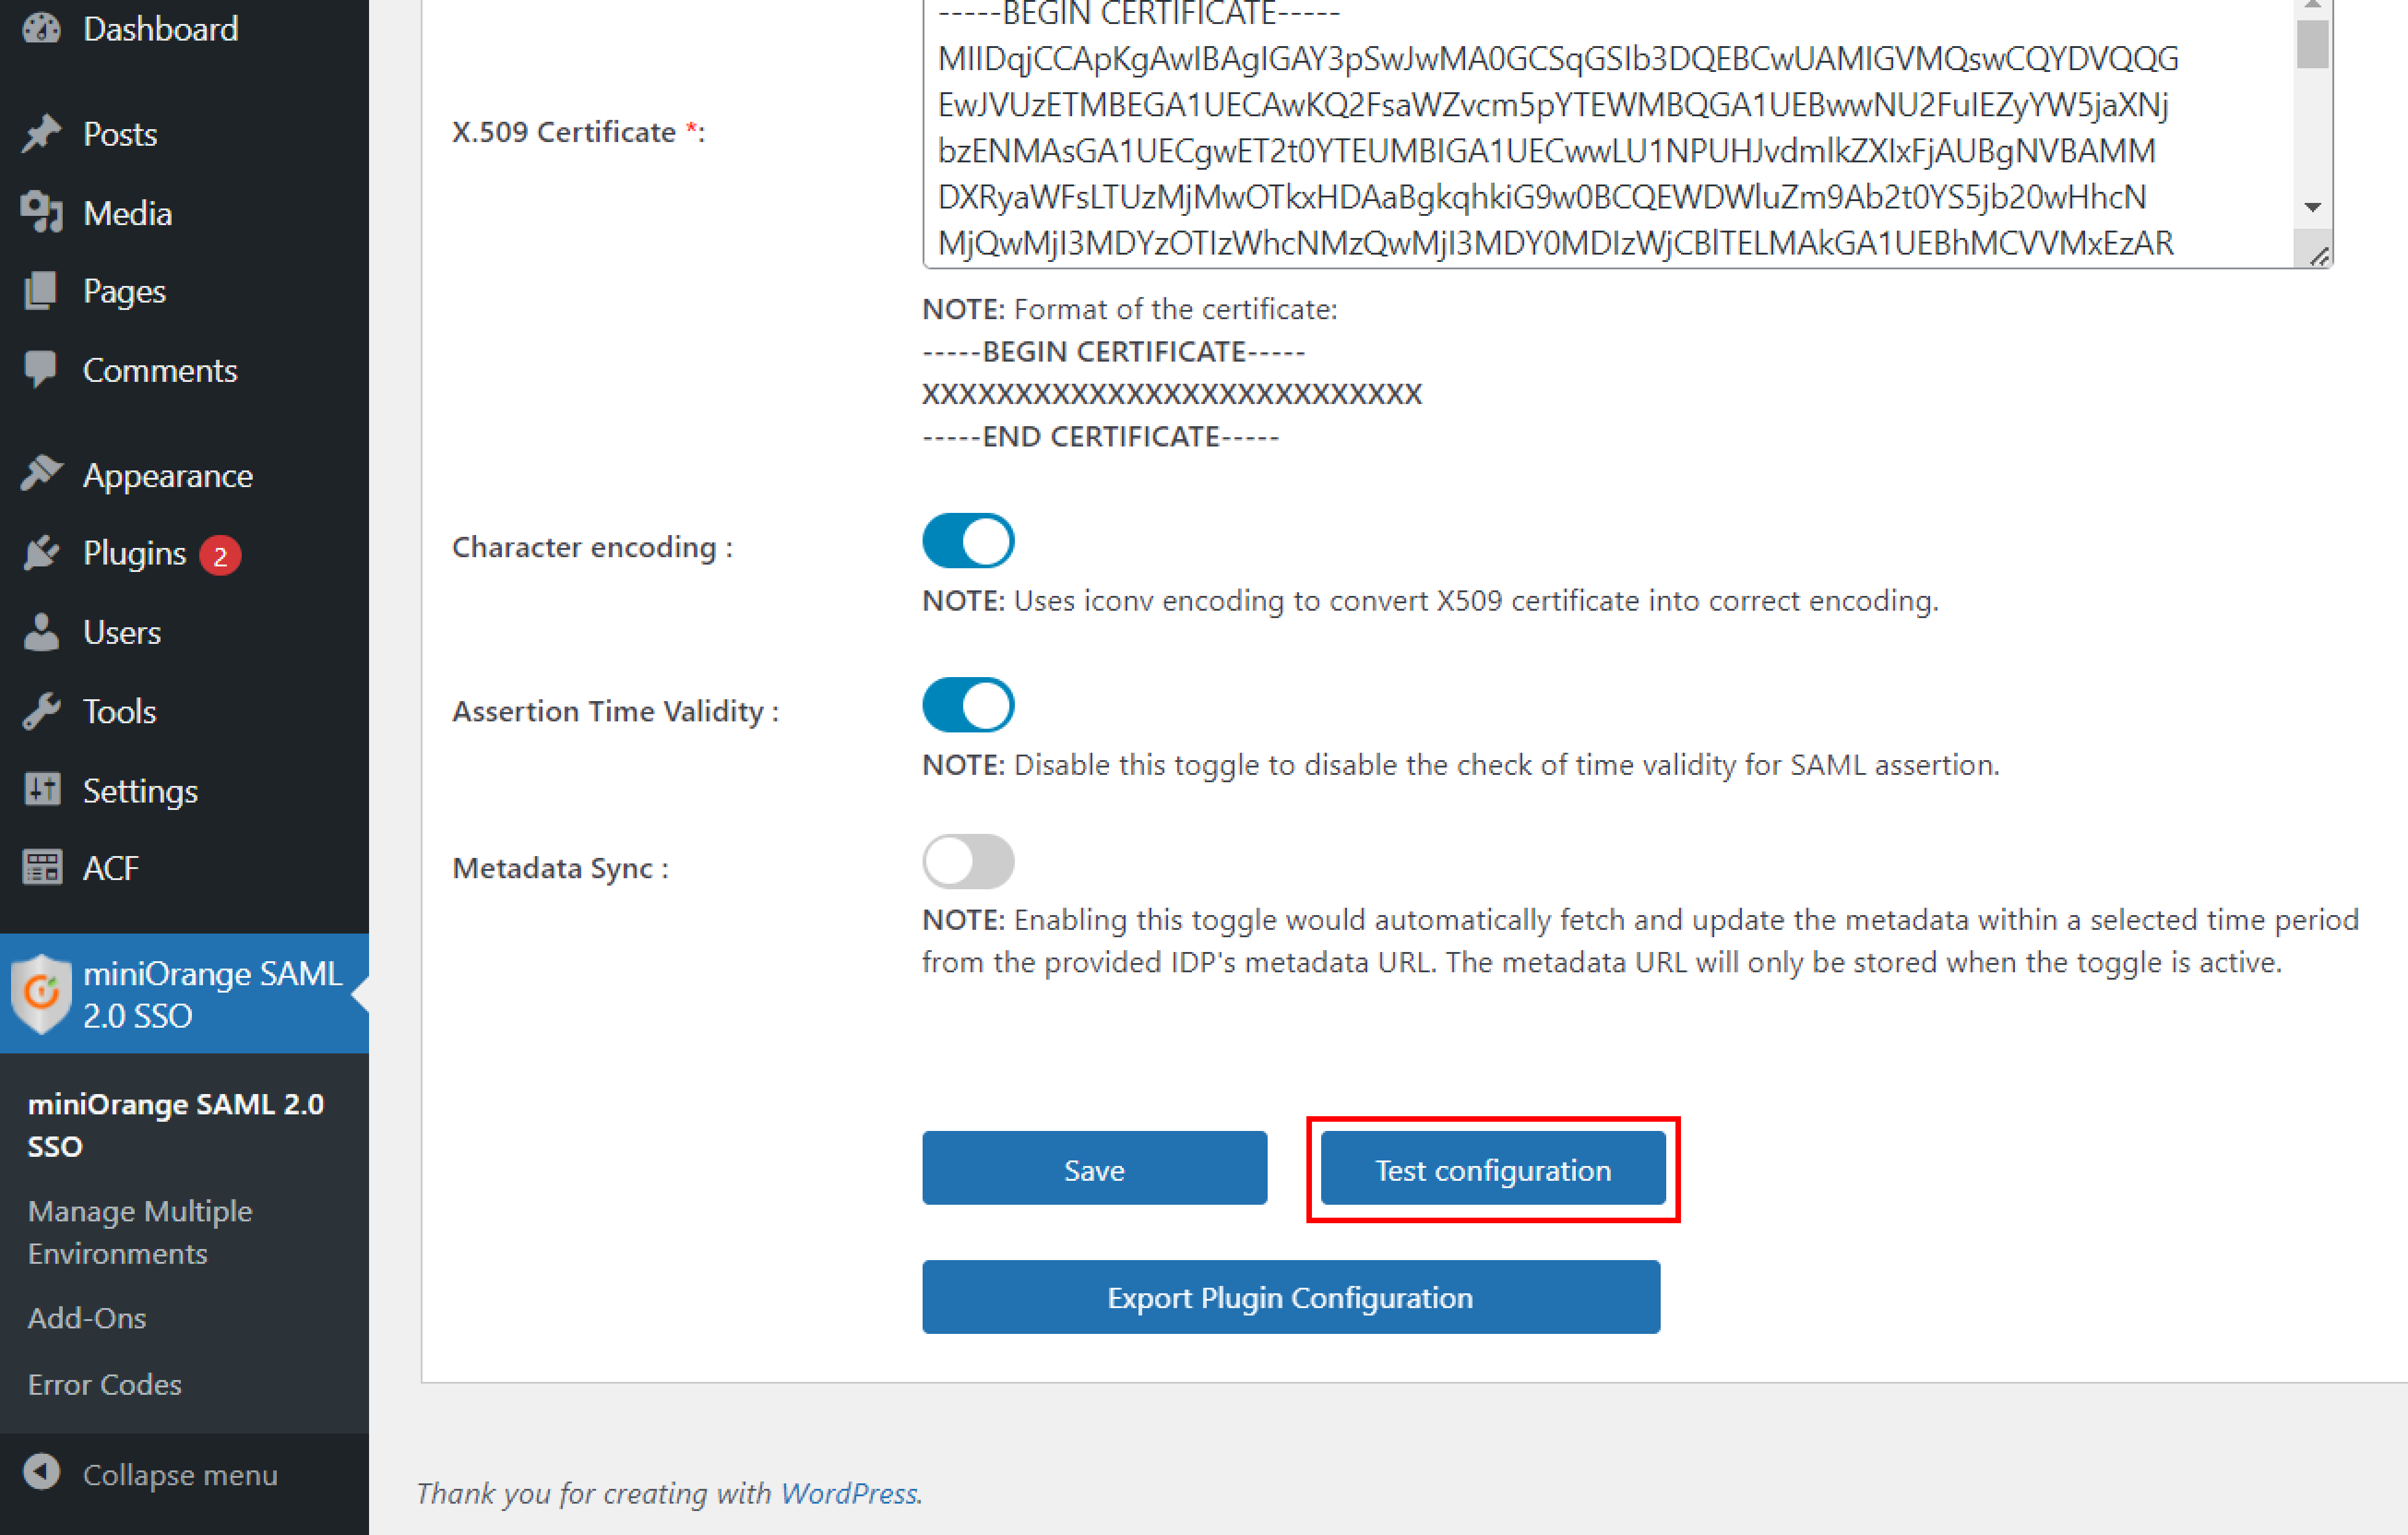
- Provide the required settings (i.e. Identity Provider Name, IdP Entity ID or Issuer, SAML Login URL, X.509 Certificate) as provided by your Identity Provider and click on the Save button.
- Click on Test configuration to check the attributes and values sent by IDP.
Step 3: Attribute Mapping for WordPress Okta SSO
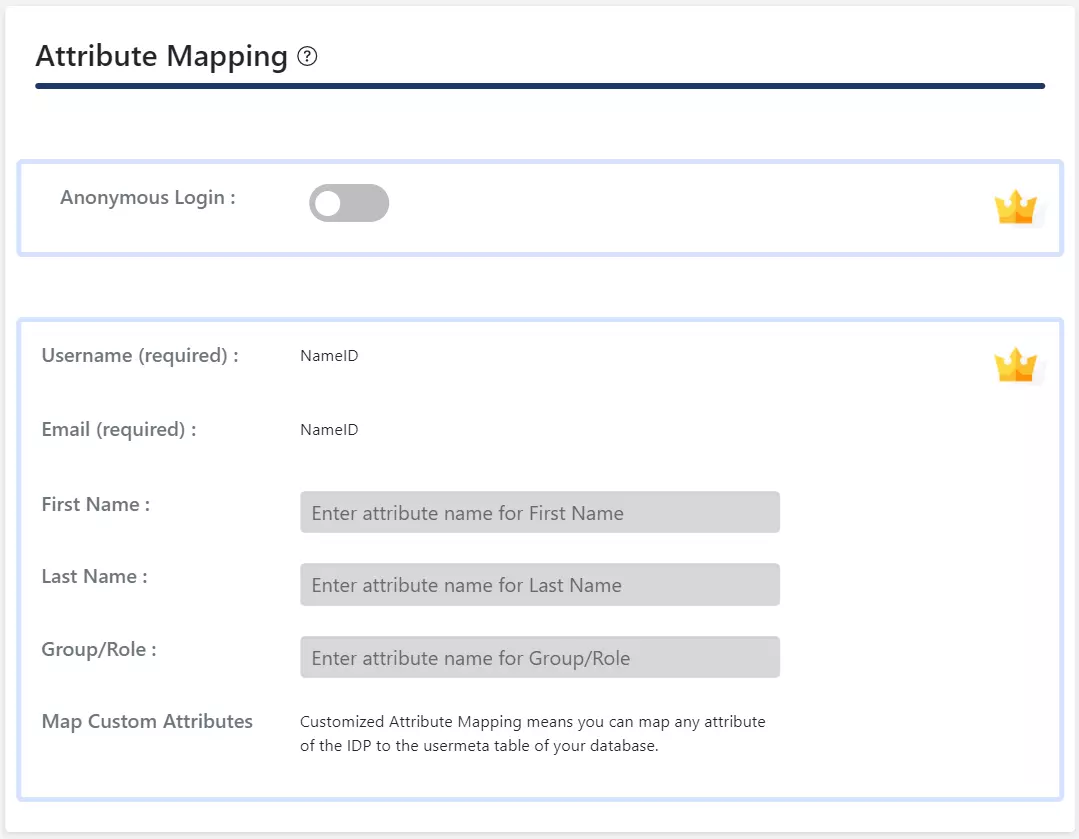
- In the free plugin, only NameID is supported for Email and Username attributes of the WordPress user.
- When a user performs SSO, the NameID value sent by the IDP will get mapped to the email and username of the WordPress user.
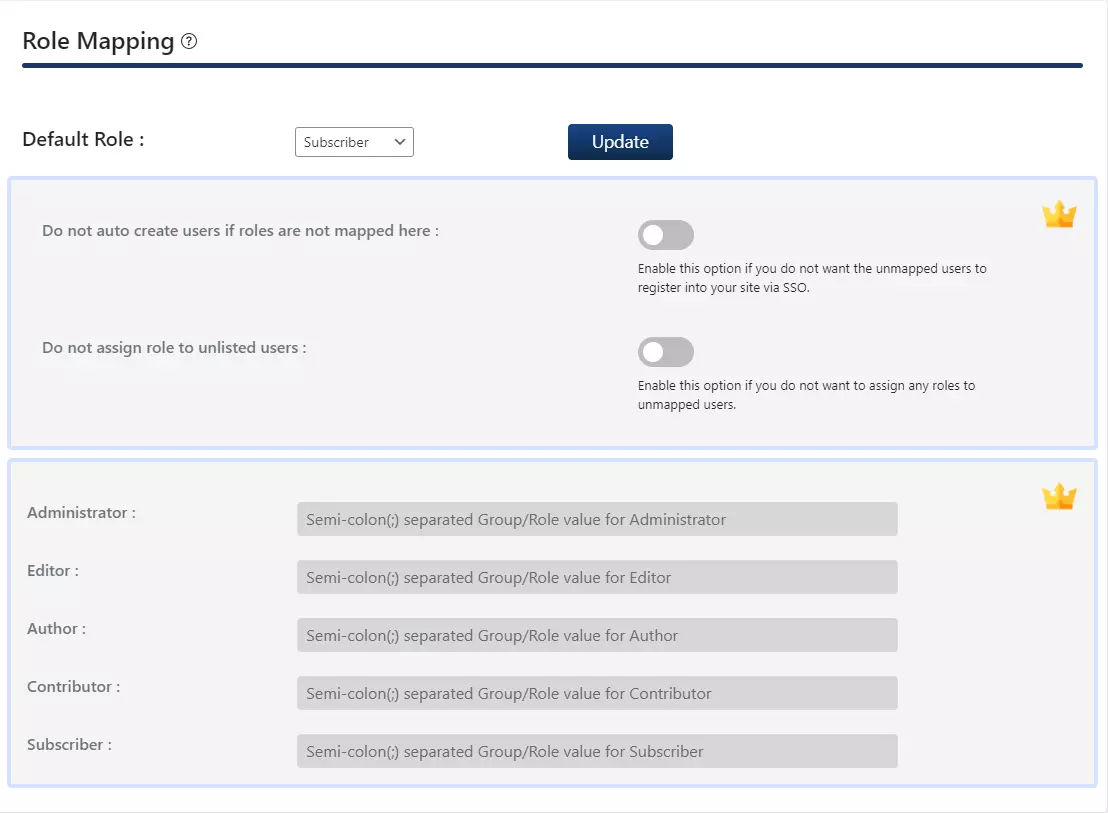
Step 4: Role Mapping of WordPress Okta Single Sign On
- In the free plugin, you can choose a Default Role which will be assigned to all the non-admin users when they perform SSO.
- Go to Attribute/Role mapping tab and navigate to Role Mapping section.
- Select the Default Role and click on the Update button.
Step 5: SSO Settings for Okta WordPress login
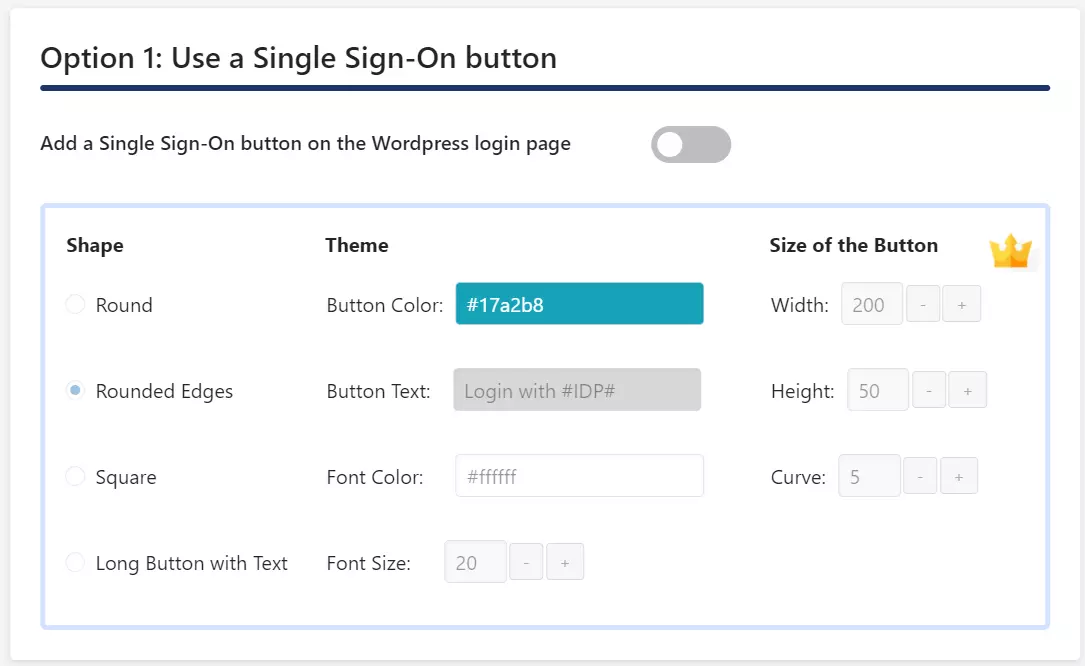
- In the free plugin you can add a Single Sign On button by enabling Add a Single Sign On button on the WordPress Login Page toggle in Option 1.
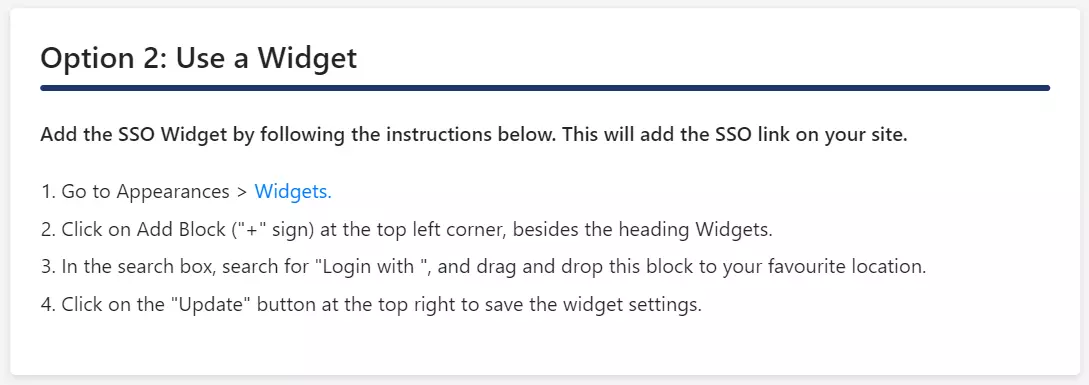
- If your WordPress theme supports login widget, you can add a login widget to enable SP-Initiated SSO on your site.
- Navigate to Redirection and SSO links tab and follow the given steps given under Option 2: Use a Widget to add a login widget on your site.
In the WordPress SAML SSO plugin, go to the Service Provider Setup tab of the plugin. There are two ways to configure the WordPress SSO plugin:
A. By uploading IDP metadata:
- Click on Upload IDP metadata button.
- Enter the Identity Provider Name
- You can either upload a metadata file and click on Upload button or use a metadata URL and click on Fetch Metadata.
B.Manual Configuration:
- Provide the required settings (i.e. Identity Provider Name, IdP Entity ID or Issuer, SAML Login URL, X.509 Certificate) as provided by your Identity Provider and click on the Save button.
- Click on Test configuration to check the attributes and values sent by IDP.
Step 3: Attribute Mapping for WordPress Okta SSO
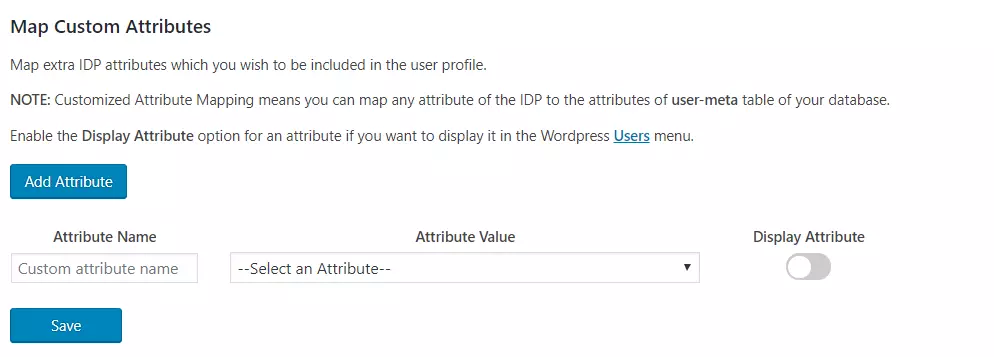
- Attribute Mapping feature allows you to map the user attributes sent by the IDP during SSO to the user attributes at WordPress.
- In WordPress SAML plugin, go to Attribute/Role Mapping tab and fill up the following fields in Attribute Mapping section.
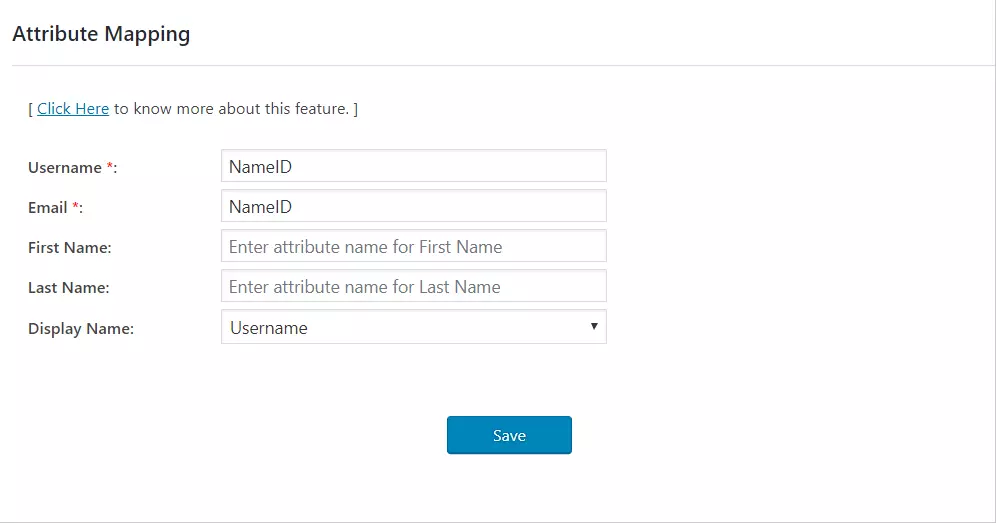
NOTE: If you click on Test Configuration button in Service Provider Setup tab and authenticate with your IDP, you can see a list of attributes sent by the IDP in the Attribute/Role mapping tab. This information can be used to provide the above mapping.
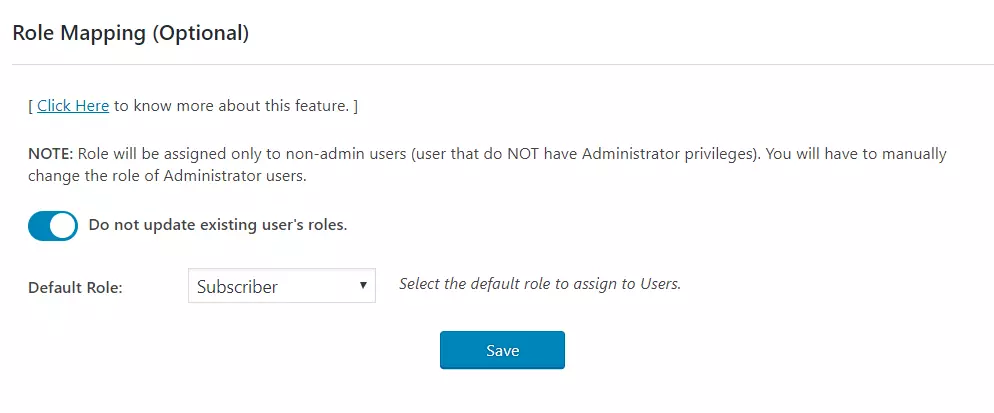
Step 4: Role Mapping of WordPress Okta Single Sign On
- Go to Attribute/Role mapping tab and navigate to Role Mapping section.
- Select the Default Role and click on the Save button.
In the standard plugin, you can choose a default role which will be assigned to all the non-admin users when they perform SSO.
Step 5: SSO Settings for Okta WordPress login
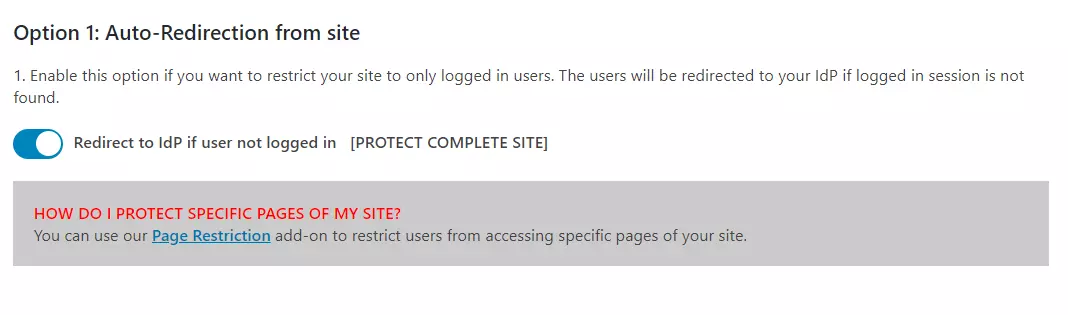
- Auto-Redirection from site: If this option is enabled, any unauthenticated user trying to access your site will get redirected to the IDP login page and after successful authentication, they will be redirected back to the same page on your site which they were trying to access.
- Go to Redirection and SSO Links tab of the plugin and navigate to Option 1: Auto - Redirection from site.
- Enable Redirect to IdP if user not logged in [PROTECT COMPLETE SITE]option.
- Auto-Redirection from WordPress Login: If this option is enabled, any unauthenticated user trying to access the default WordPress login page will get redirected to the IDP login page for authentication. After successful authentication, they will be redirected back to the WordPress site.
- Go to Redirection and SSO Links tab of the plugin and navigate to Option 2: Auto- Redirection from WordPress Login.
- Enable Redirect to IdP from WordPress Login Page option.
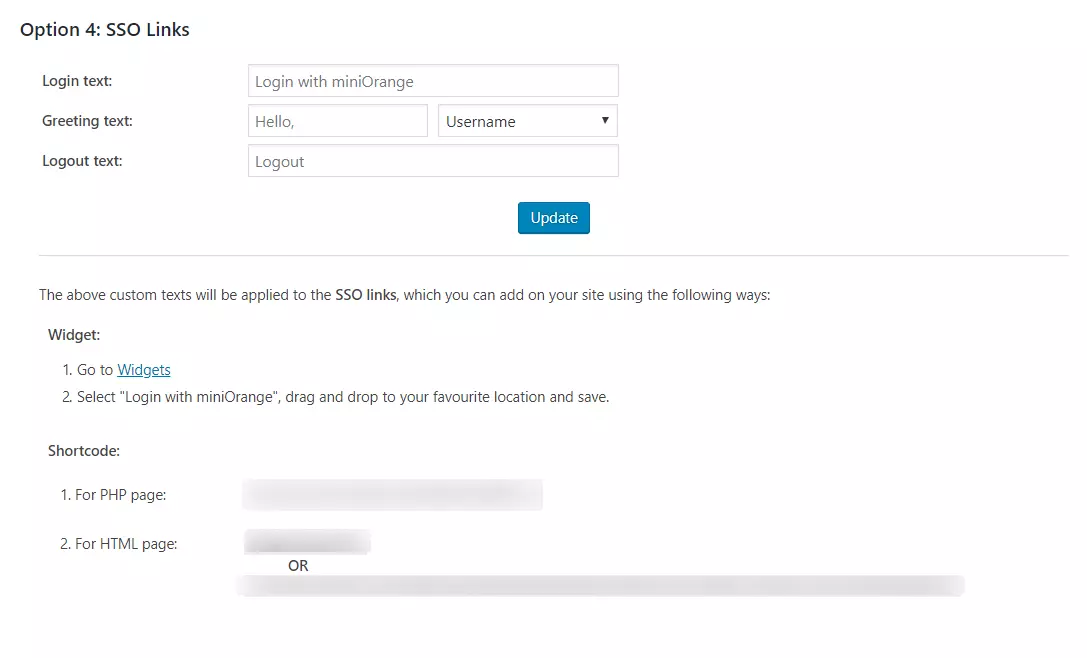
- SSO Links: You can add SSO links anywhere on your site using the Shortcode and Widget provided in Redirection and SSO Links tab > Option 3: SSO Links section of the plugin
In the Standard plugin you can enable SP-initiated SSO using the following options.
Steps:
Steps:

NOTE: Please enable the Backdoor login and note down the backdoor URL. This will allow you to access the WordPress login page in case you get locked out of the IDP.

In the WordPress SAML SSO plugin, go to the Service Provider Setup tab of the plugin. There are two ways to configure the WordPress SSO plugin:
A. By uploading IDP metadata:
- Click on Upload IDP metadata button.
- Enter the Identity Provider Name
- You can either upload a metadata file and click on Upload button or use a metadata URL and click on Fetch Metadata.
- In the Premium plugin, you can enable auto-sync for the metadata URL which will auto-update the plugin configuration as per the IDP metadata after a set interval of time
B.Manual Configuration:
- Provide the required settings (i.e. Identity Provider Name, IdP Entity ID or Issuer, SAML Login URL, X.509 Certificate) as provided by your Identity Provider and click on the Save button.
- Click on Test configuration to check the attributes and values sent by IDP.
- In the Premium Plugin, you can provide the SAML Logout URL to achieve Single Logout on your WordPress site.
Step 3: Attribute Mapping for WordPress Okta SSO
- Attribute Mapping feature allows you to map the user attributes sent by the IDP during SSO to the user attributes at WordPress.
- In WordPress SAML plugin, go to Attribute/Role Mapping tab and fill up the following fields in Attribute Mapping section.
- Custom Attribute Mapping: This feature allows you to map any attribute sent by the IDP to the usermeta table of WordPress.

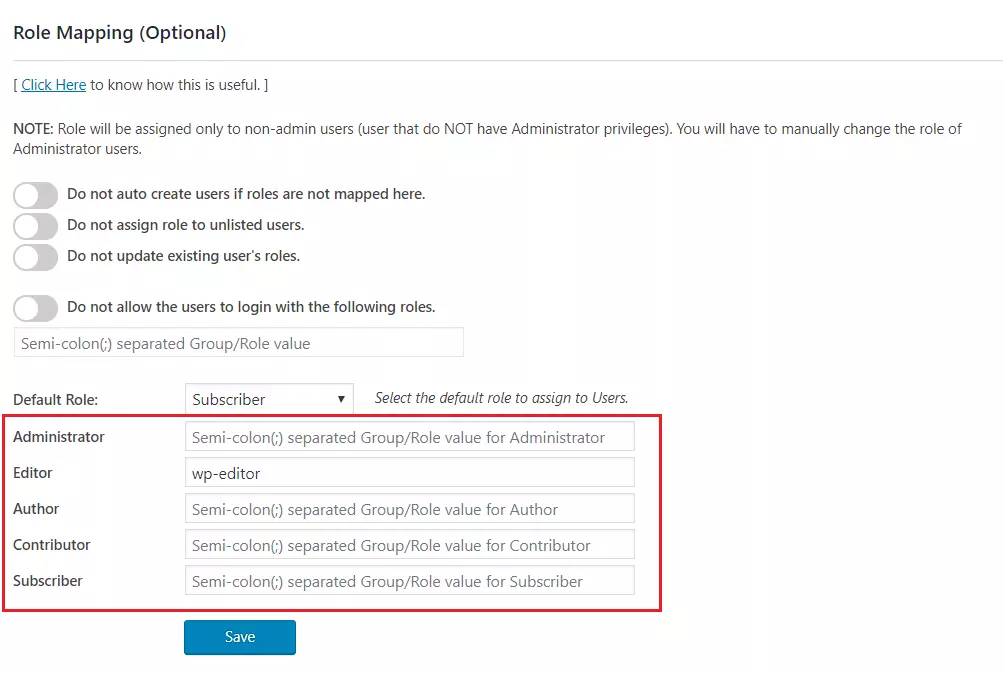
Step 4: Role Mapping of WordPress Okta Single Sign On
- From the Attribute Mapping section of the plugin, provide a mapping for the field named Group/Role. This attribute will contain the role related information sent by the IDP and will be used for Role Mapping.
- Navigate to role mapping section and provide the mappings for the highlighted roles.
- For example, If you want a user whose Group/Role attribute value is wp-editor to be assigned as an Editor in WordPress, just provide the mapping as wp-editor in the Editor field of Role Mapping section.
This feature allows you to assign and manage roles of the users when they perform WordPress Okta SSO. Along with the default WordPress roles, this is compatible with any custom roles as well.
Step 5: SSO Settings for Okta WordPress login
- Auto-Redirection from site: If this option is enabled, any unauthenticated user trying to access your site will get redirected to the IDP login page and after successful authentication they will be redirected back to the same page on your site which they were trying to access.
- Go to Redirection and SSO Links tab of the plugin and navigate to Option 1 : Auto-Redirection from site.
- Enable Redirect to IdP if user not logged in [PROTECT COMPLETE SITE] option.
- Auto-Redirection from WordPress Login: If this option is enabled, any unauthenticated user trying to access the default WordPress login page will get redirected to the IDP login page for authentication. After successful authentication, they will be redirected back to the WordPress site.
- Go to Redirection and SSO Links tab of the plugin and navigate to Option 2: Auto- Redirection from WordPress Login.
- Enable Redirect to IdP from WordPress Login Page option.
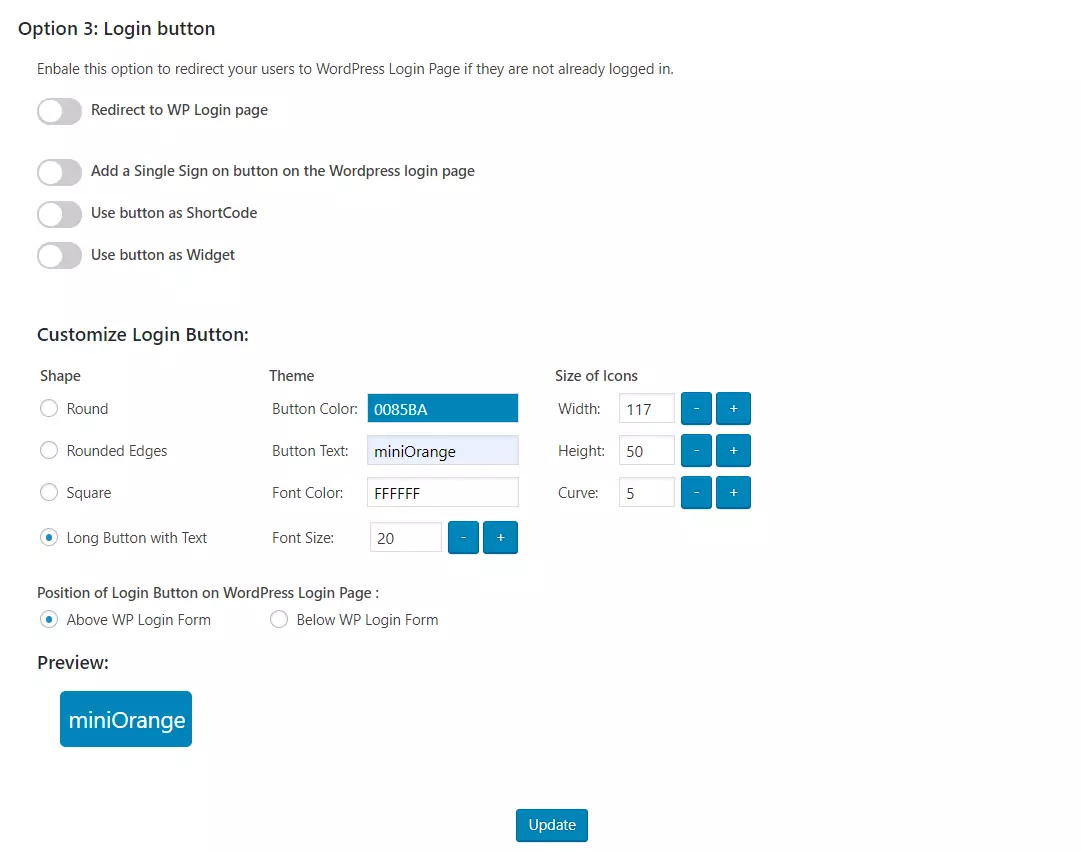
- Login Button: You can add a customized login button anywhere on your site or WordPress login page by navigating to Option 3: Login Button section of Redirection and SSO Links tab.
- SSO Links: You can add SSO links anywhere on your site using the Shortcode and Widget provided in Option 4: SSO Links section of Redirection and SSO Links tab.
In the Premium plugin you can enable SP-initiated SSO using the following options.
Steps:

Steps:
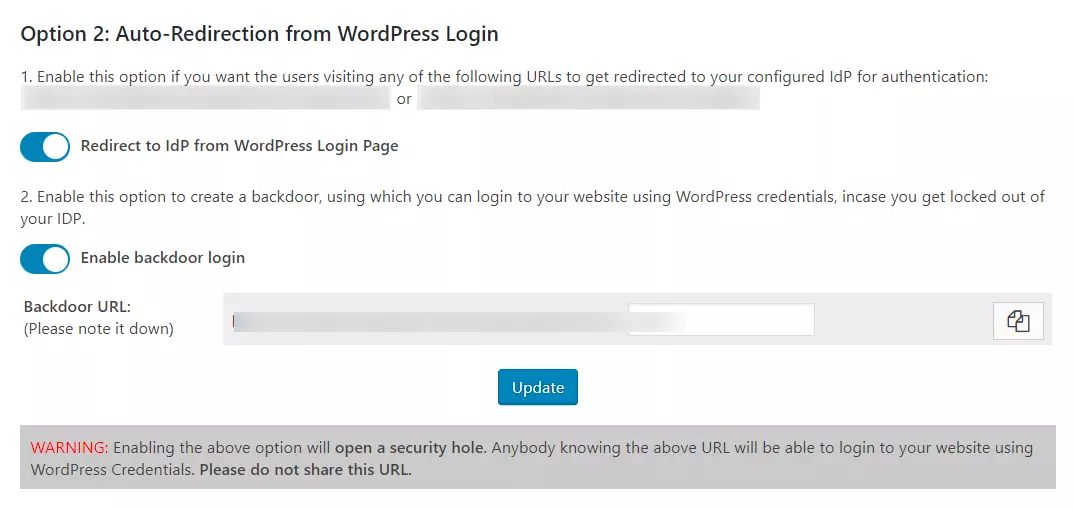
NOTE: Please enable the Backdoor login and note down the backdoor URL. This will allow you to access the WordPress login page in case you get locked out of the IDP login.
You have successfully configured WordPress as SAML SP for achieving WordPress Okta SSO into your WordPress Site via Okta.
In this Guide, you have successfully configured Okta SAML Single Sign On (Okta WordPress SSO / Okta WordPress Login), choosing Okta as IdP and WordPress as SP. WordPress SAML Single Sign On – SSO plugin solution ensures that you are ready to roll out secure access / Login into WordPress (WP) site using Okta login credentials.
Recommended Add-Ons
SCIM User Provisioning
Allows syncing user's creation, updation and deletion from your IDP to WordPress site
Know more →Page and Post Restriction
Restricts WordPress pages and posts based on User Roles and User's Login Status
Know more →Learndash Integrator
Maps SSO users to LearnDash groups as per the group attributes sent by your IDP
Know more →Additional Resources
- What is Single Sign On (SSO) Login?
- Okta SSO Login
- Setup Okta as a SAML 2.0 Identity Provider
- Okta | miniOrange Integration
- What is SAML? How SAML SSO works?
- Attribute Mappings for Okta SSO Login
- Frequently Asked Questions (FAQs)
If you are looking for anything which you cannot find, please drop us an email on samlsupport@xecurify.com
Why Our Customers choose miniOrange WordPress Single Sign-On (SSO) Solutions?
24/7 Support
miniOrange provides 24/7 support for all the Secure Identity Solutions. We ensure high quality support to meet your satisfaction.
Sign UpExtensive Setup Guides
Easy and precise step-by-step instructions and videos to help you configure within minutes.
Watch DemoWe offer Secure Identity Solutions for Single Sign-On, Two Factor Authentication, Adaptive MFA, Provisioning, and much more. Please contact us at
+1 978 658 9387 (US) | +91 97178 45846 (India) samlsupport@xecurify.com
Need Help? We are right here!
