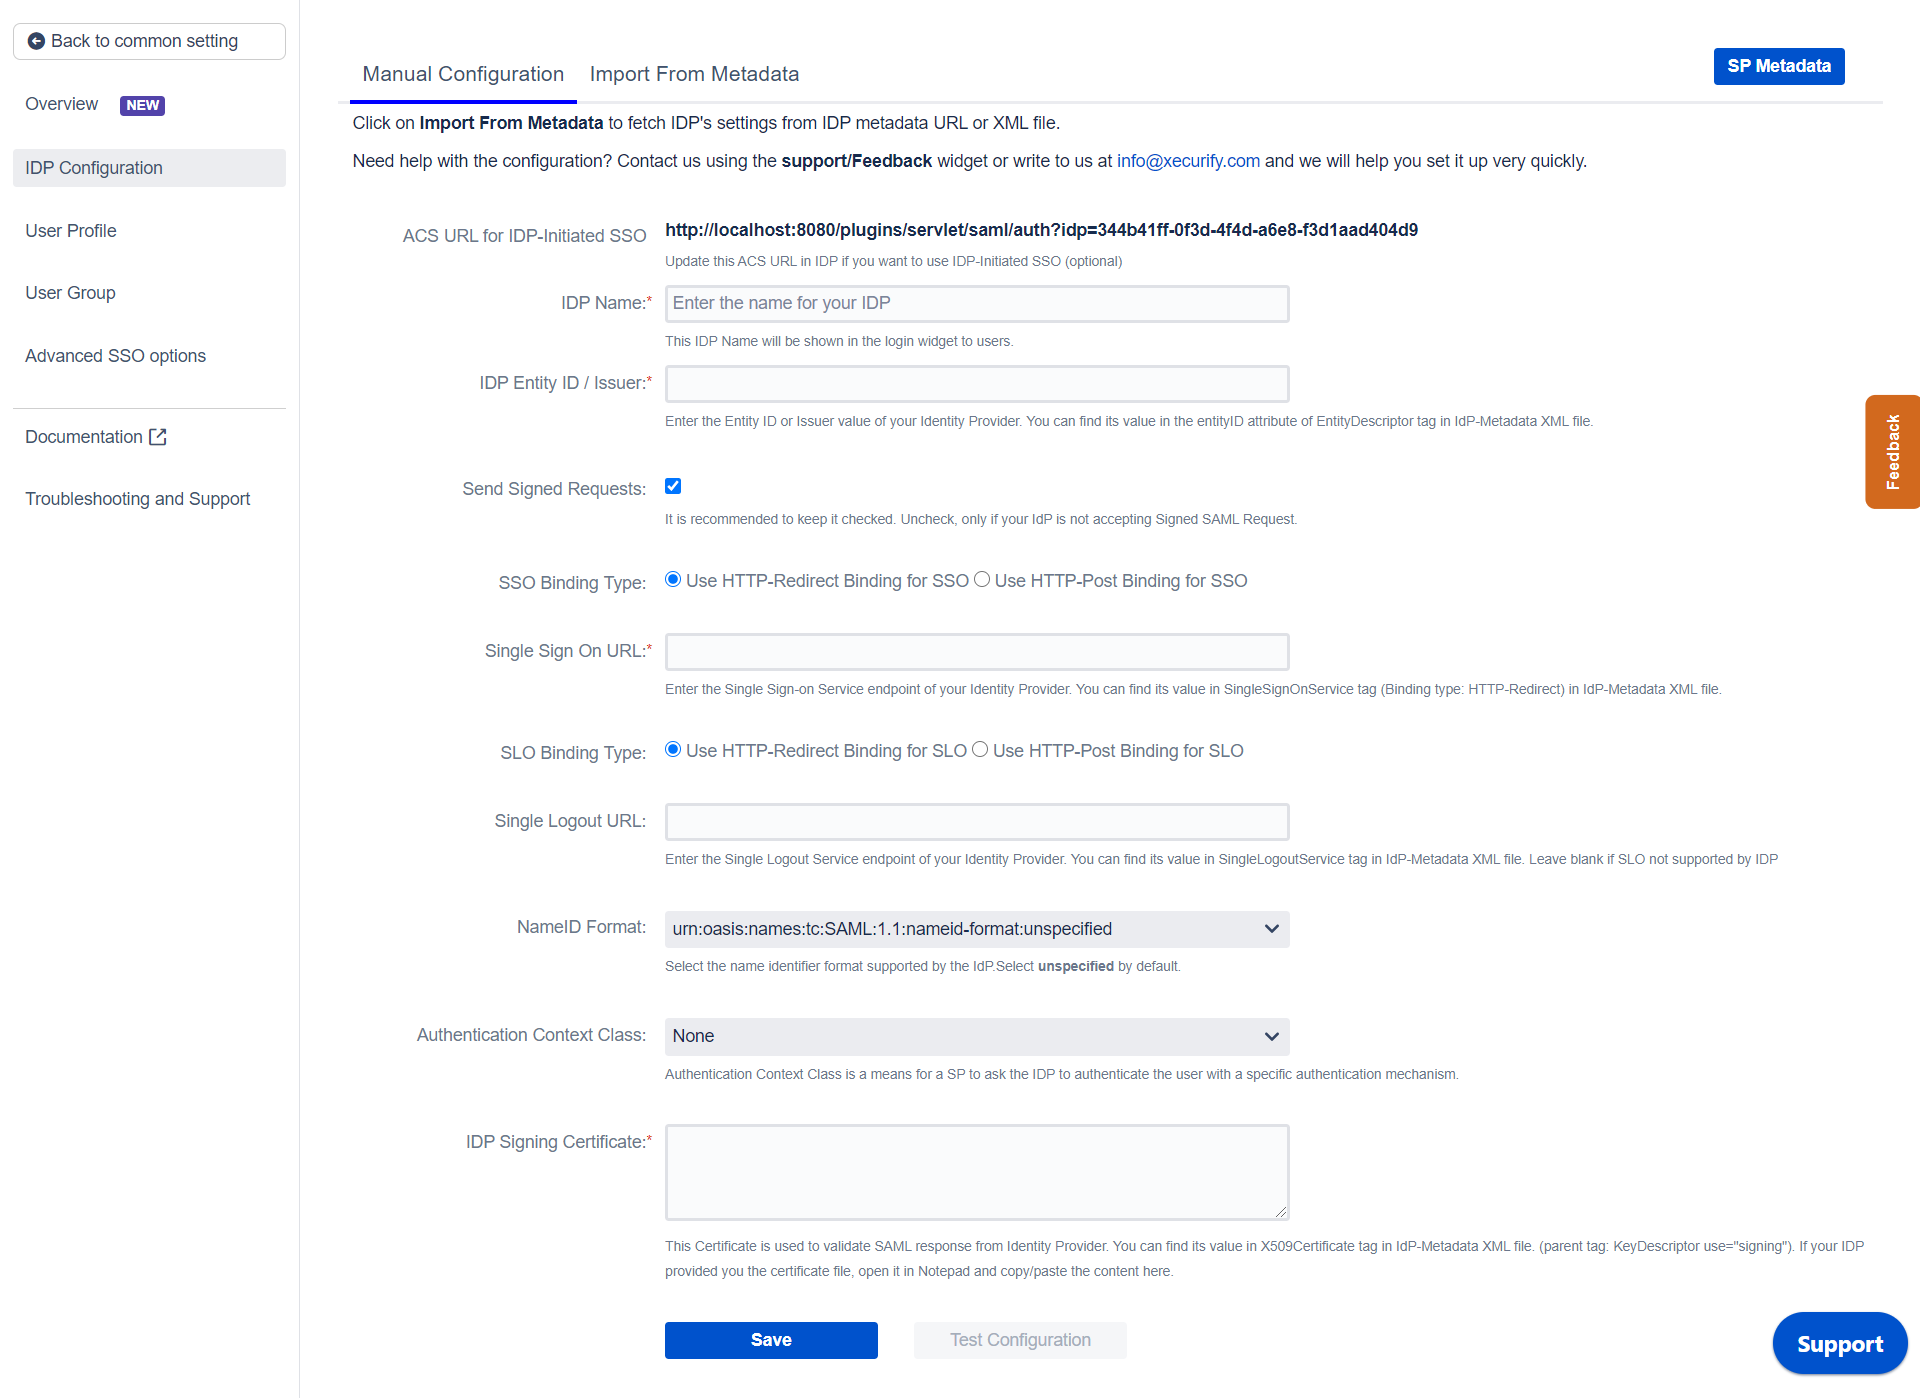
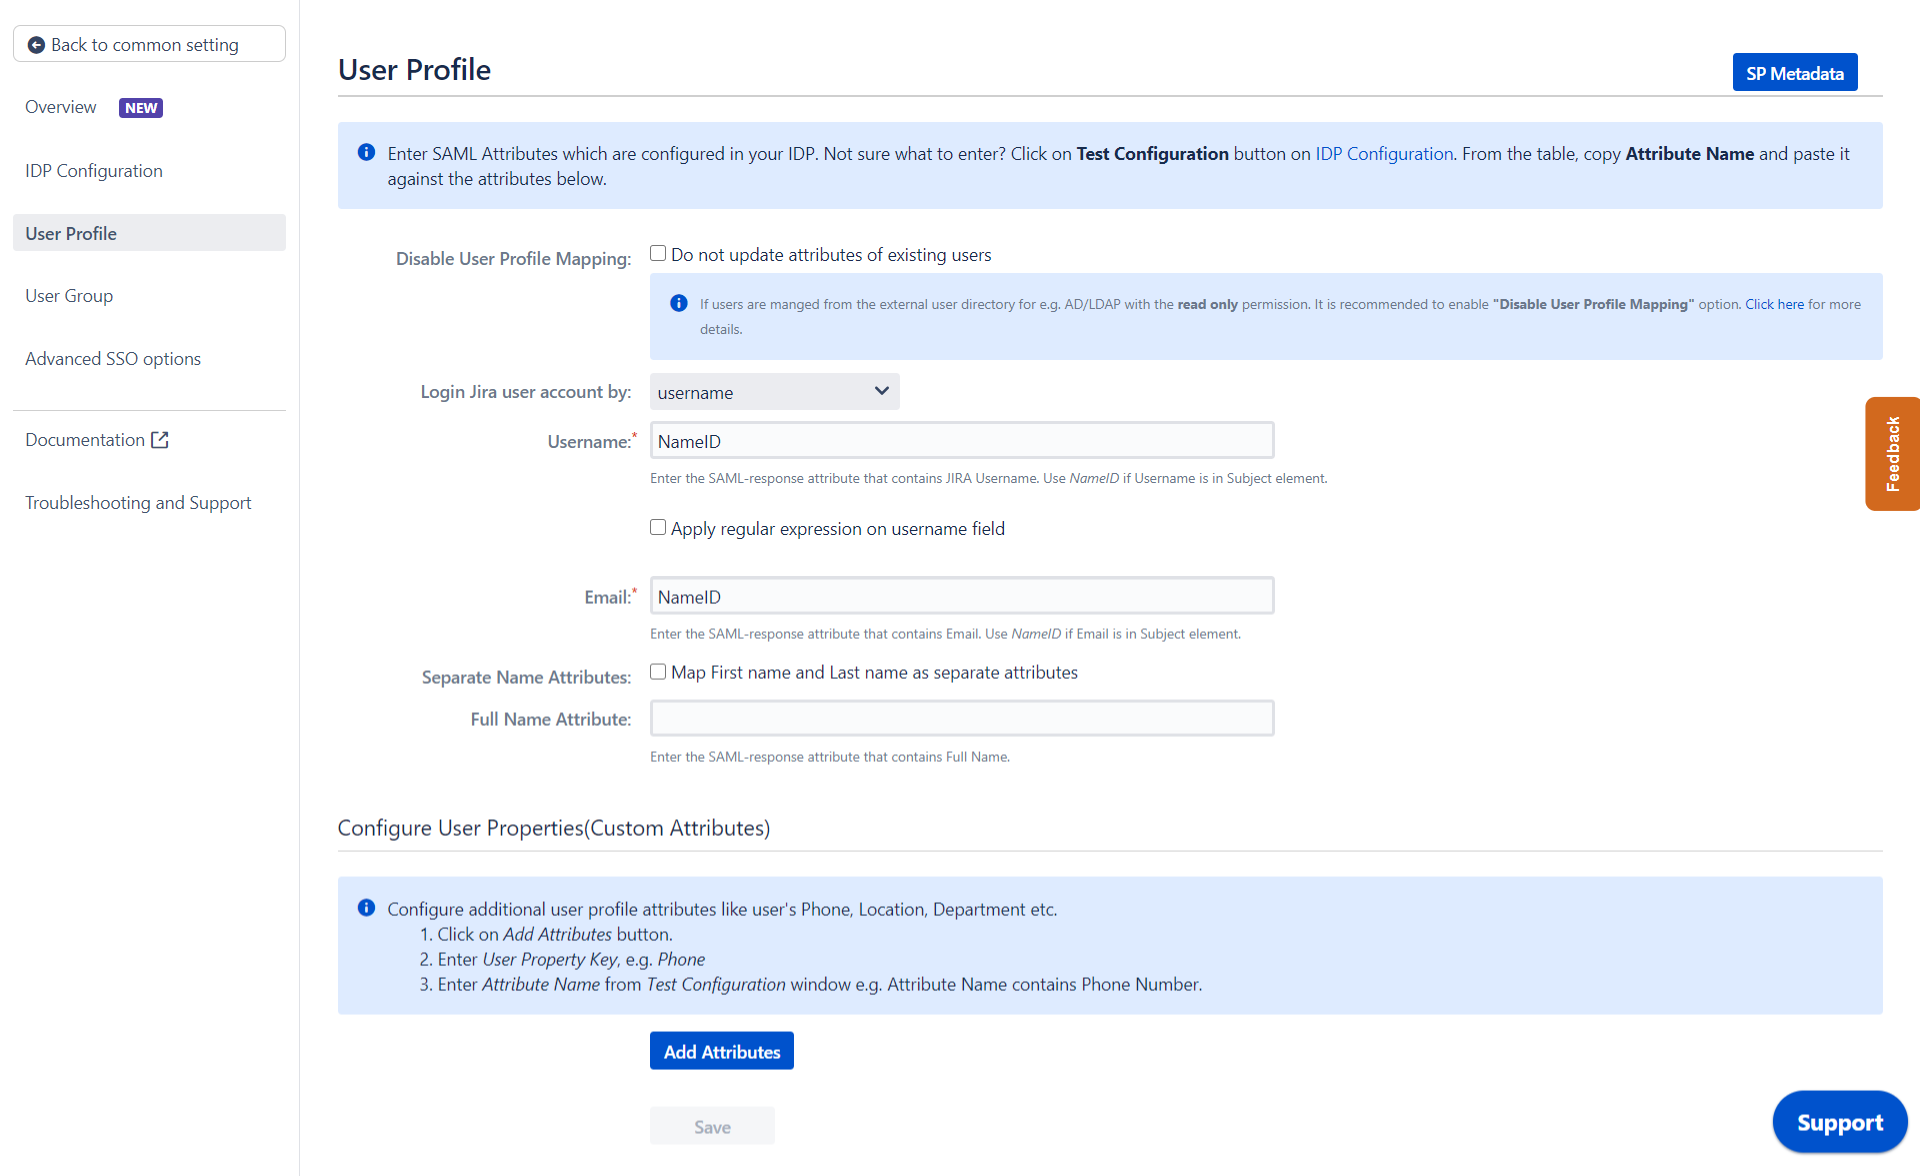
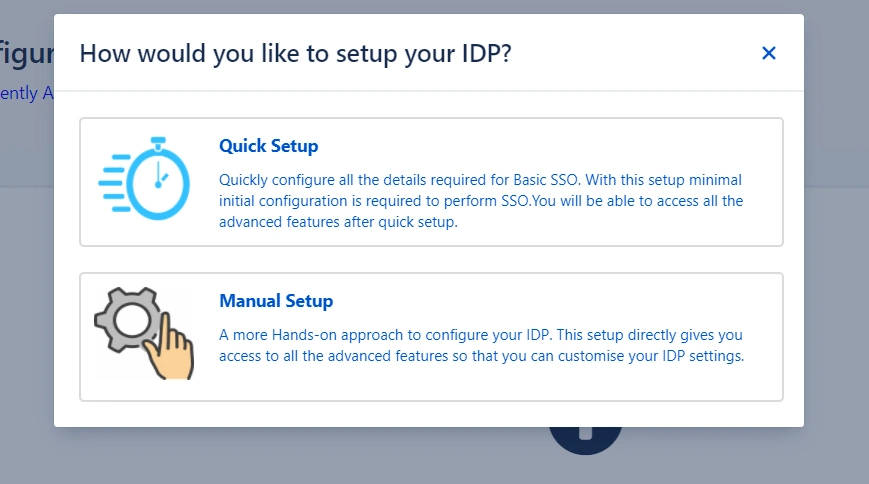
What's New !!

Pricing Offers

We are happy to announce special offers for miniOrange Atlassian SSO, 2FA, REST API, User Sync and Group Sync Apps.

Contact Info

For any query, product related information or any help , contact us now. You can also raise a ticket with our support.


Contact Us Now

SAML Single Sign On (SSO) into Jira using Bitium as IDP


Jira SAML app gives the ability to enable SAML Single Sign-On for Jira Software and Jira Service Desk. Jira Software and Jira Service Desk are compatible with all SAML Identity Providers. Here we will go through a guide to configure SAML SSO between Jira and your Identity Provider. By the end of this guide, users from your Identity Provider should be able to login and register to Jira Software and Service Desk.

Pre-requisites

To integrate your Identity Provider(IDP) with Jira, you need the following items:

  • Jira should be installed and configured.
  • Jira Server is https enabled (optional).
  • Admin credentials are set up in Jira.
  • Valid Jira Server or Data center Licence.

Download And Installation


  • Log into your Jira instance as an admin.
  • Navigate to the settings menu and Click Manage Apps.
  • Click Find new apps or Find new add-ons from the left-hand side of the page.
  • Locate Jira SSO / Single Sign On, Jira SAML SSO via search.
  • Click Try free to begin a new trial or Buy now to purchase a license for Jira SSO / Single Sign On, Jira SAML SSO.
  • Enter your information and click Generate license when redirected to MyAtlassian.
  • Click Apply licence.

Step 1. Setup Bitium as Identity Provider

      Follow these steps to configure Bitium as an Identity Provider using SAML 2.0 Single Sign On protocol.

    • Login as an administrator in Bitium
    • Once you have logged into your Bitium Admin portal, click on the Manage "your organization"
    • Click on Manage Apps
    • In the top right corner, click on Add More Apps. You'll see a search box, so search for ?custom_app? and add the app to your Bitium account.
    • Click Single Sign-On tab and select SAML Authentication.
    • Copy over into the following information for configuring the add-on:
        1) Entity ID
        2) Login URL
        3) Logout URL
        4) X.509 Certificate
        5) Metadata URL
    • Paste information from SP Info tab in the plugin into Bitium
    • Click Save in the application provider
    • Click Save Changes in Bitium

Step 2: Setup Jira as Service Provider


Configuring Single IDP

With the information you have been given by Your IDP team, you can configure IDP settings in 3 ways:


A. By Metadata URL

  • Click on Import from Metadata in Configure IDP tab
  • Select IDP: Import From Metadata URL
  • Enter IDP metadata URL: Enter your metadata URL
  • If your IDP changes certificates at intervals (Eg. Azure AD), you can select Refresh metadata periodically. Select 5 minutes for the best results.
  • Click Import

SAML Single Sign On (SSO) into Jira, Import IDP through Metadata URL

B. By Uploading Metadata XML File

  • Click on Import from Metadata in Configure IDP tab
  • Select IDP: Import from Metadata File
  • Upload metadata file
  • Click Import

SAML Single Sign On (SSO) into Jira, Import IDP through Metadata File

C. Manual Configuration

Go to Configure IDP tab and enter the following details

  • IDP Entity ID
  • Single Sign On URL
  • Single Logout URL
  • X.509 Certificate
SAML Single Sign ON (SSO) into Jira, Configure IDP Manually

Configure New IDP

If you already have one IDP & you are looking to add Second IDP then you can do it by performing the following steps.

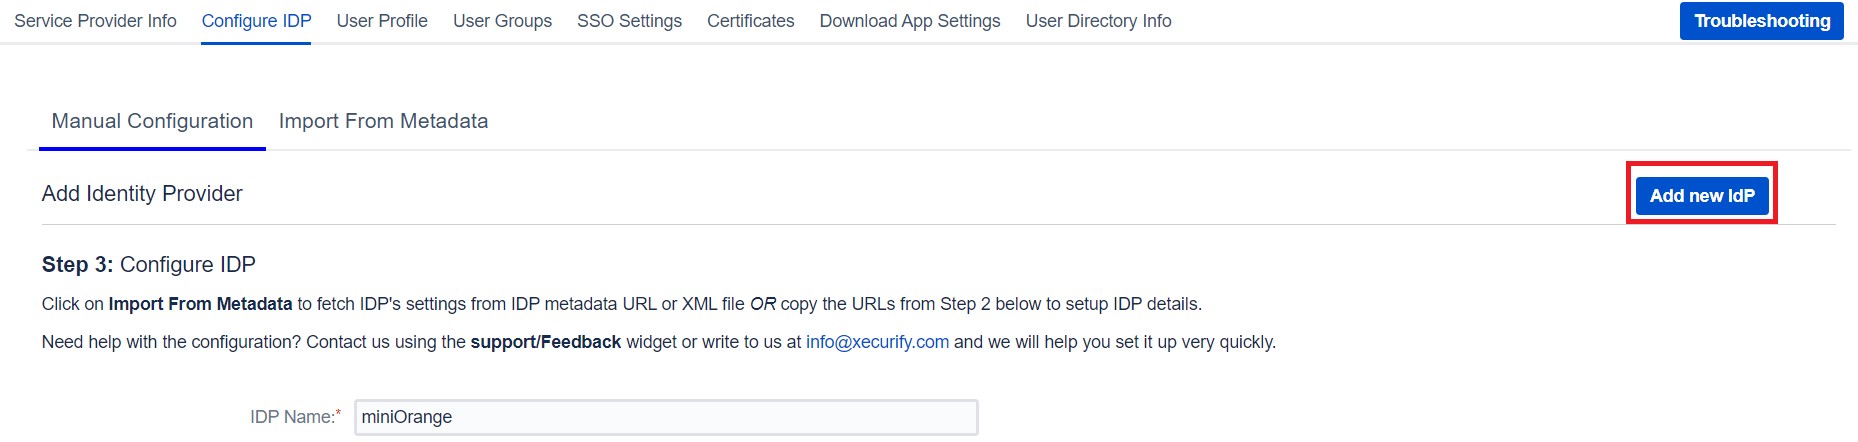
  • Navigate to Configure IDP tab.
  • Click on Add new IDP.
  • It will present a blank form & you can configure new IDP using steps from Single IdP Setup.
SAML Single Sign On (SSO) into Jira, Add second IDP into Jira

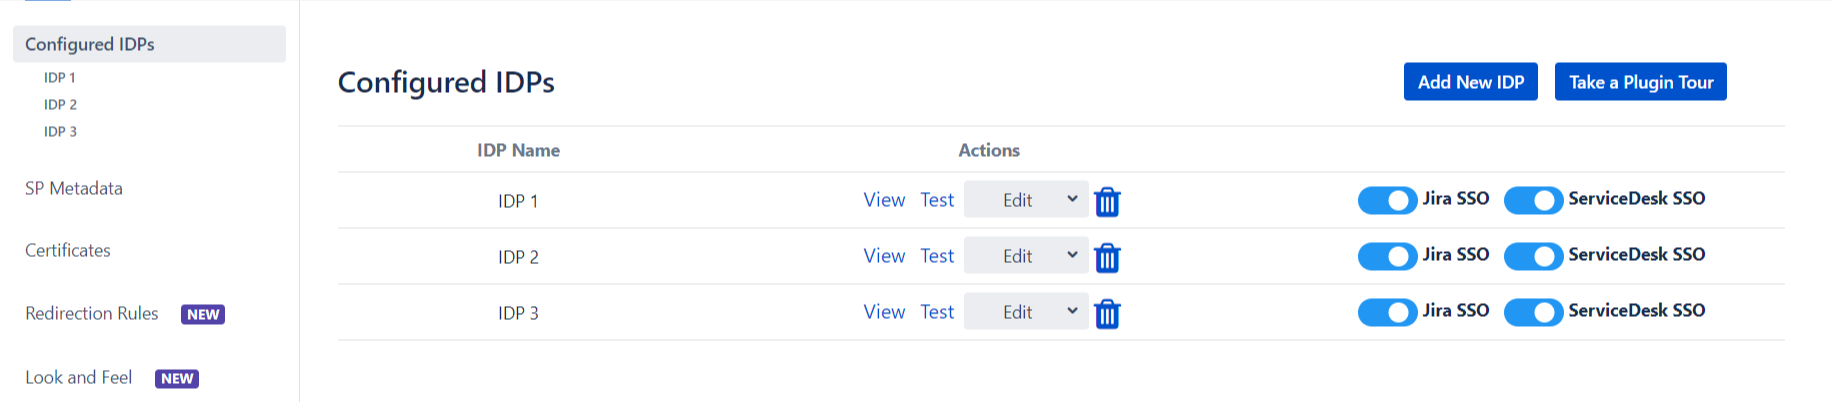
Configure multiple IDPs

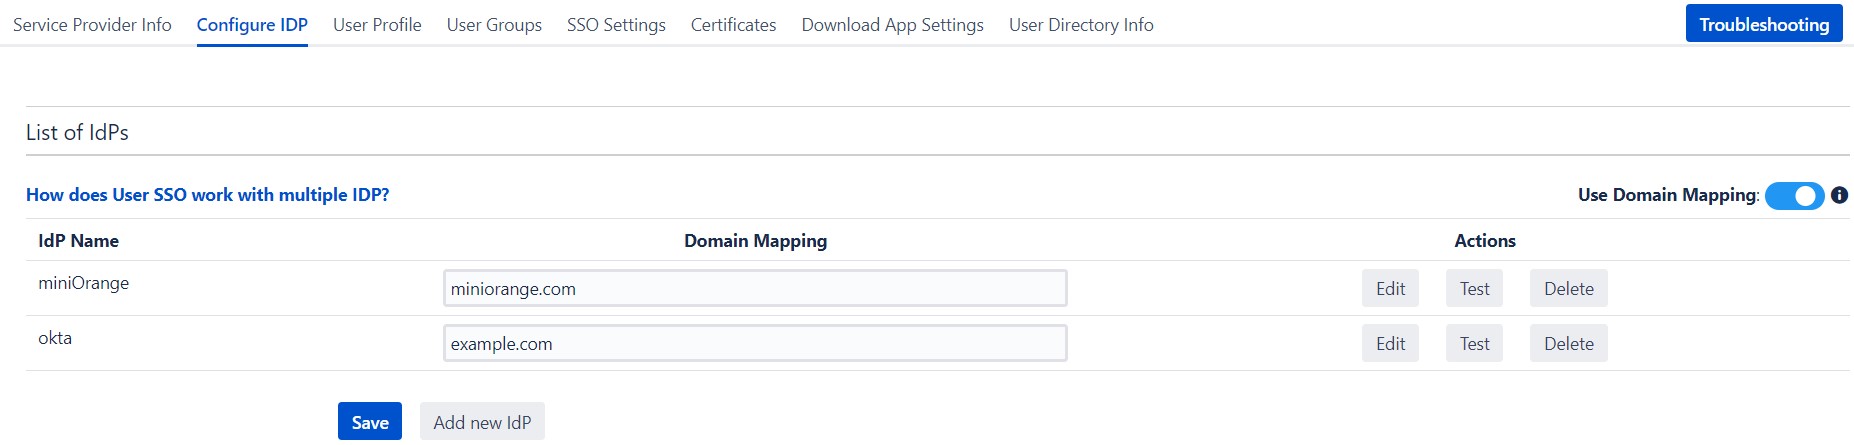
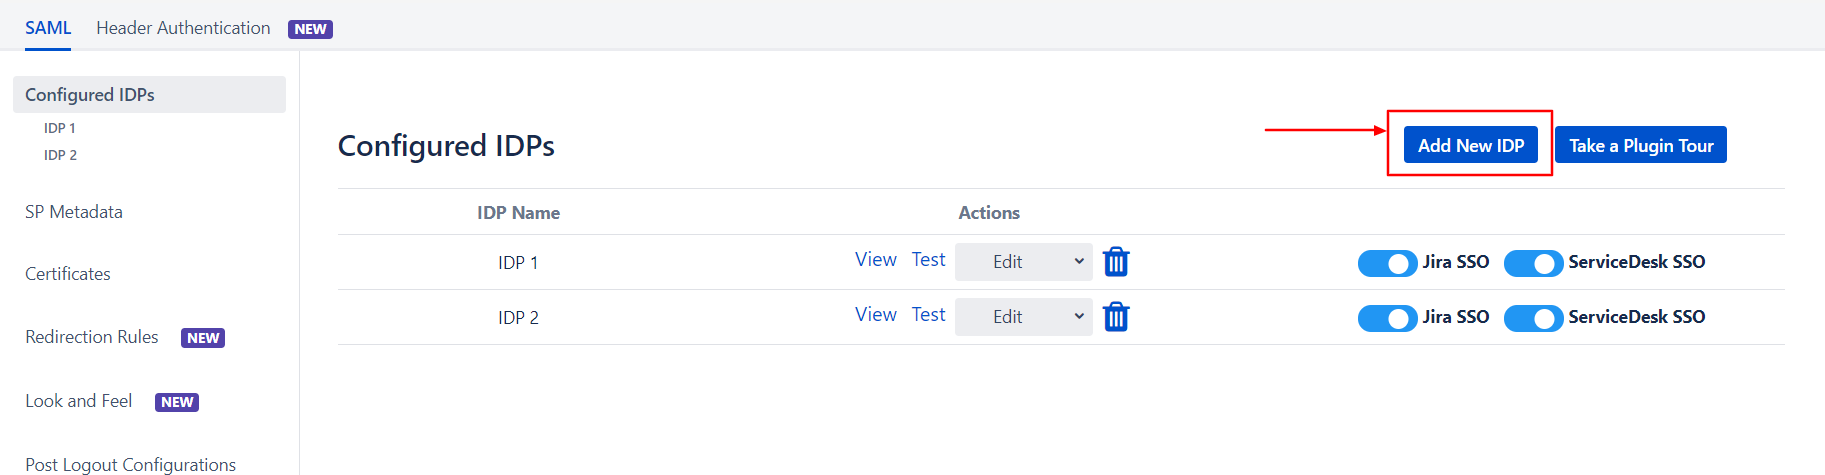
If you have configured more than two IDPs then it will show you the list of IDP that you have configured with Jira.

Click on Add new IdP button for adding new IDP on Jira. The steps for adding new IDP will remain the same.

SAML Single Sign On (SSO) into Jira, Add multiple IDP into Jira
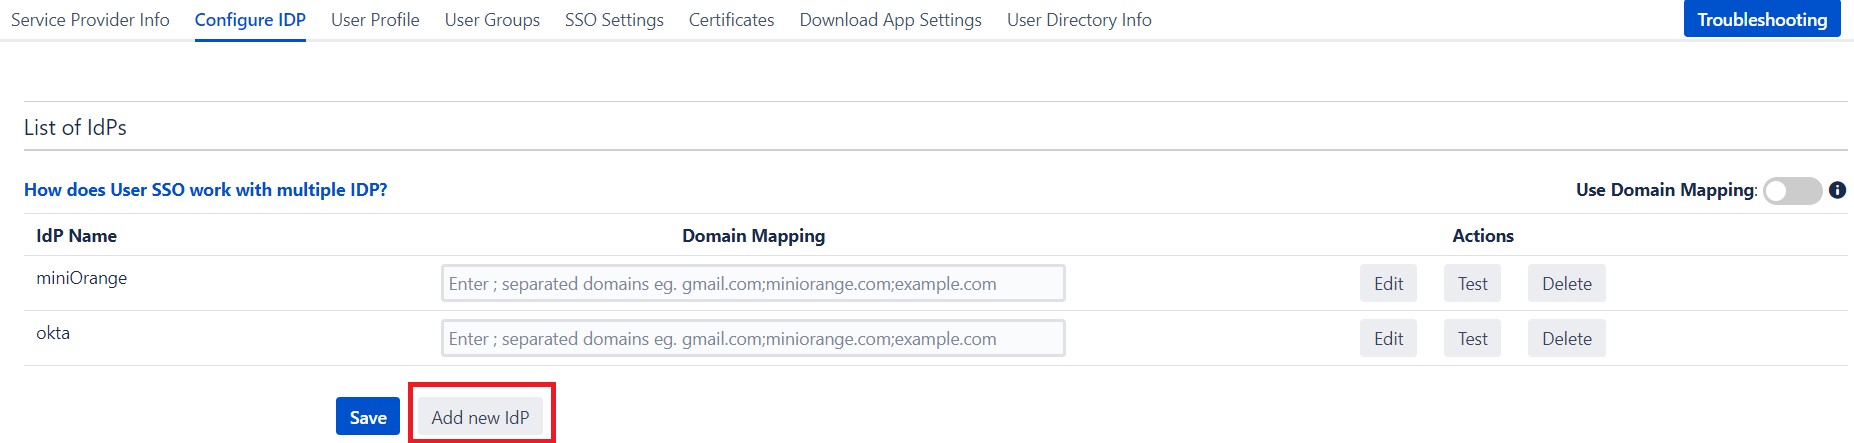
An operation that you can perform with List of IdPs page.

  • Add / delete Identity Provider.
  • Test Connection between Jira & IdP by click on Test button for respective IDP.
  • Edit the IdP configuration by clicking on the Edit button.
  • You can allow an only specific set of users to access Jira by using Domain Mapping.

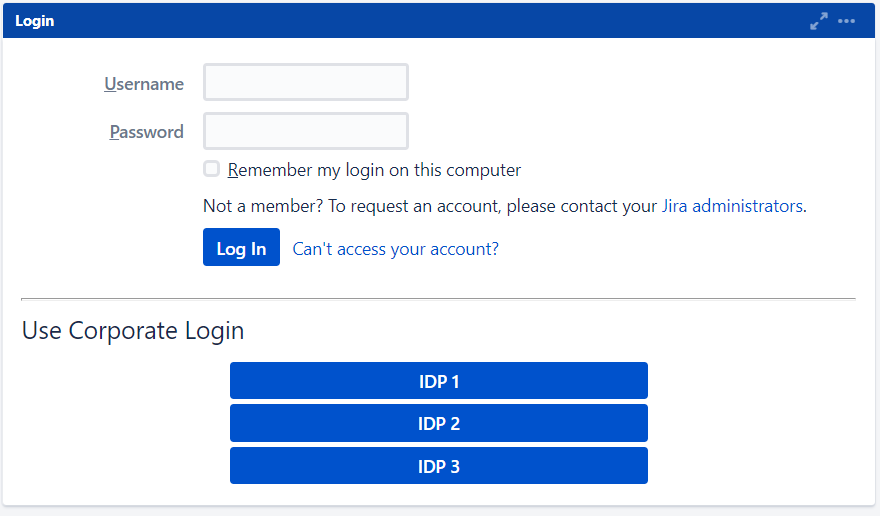
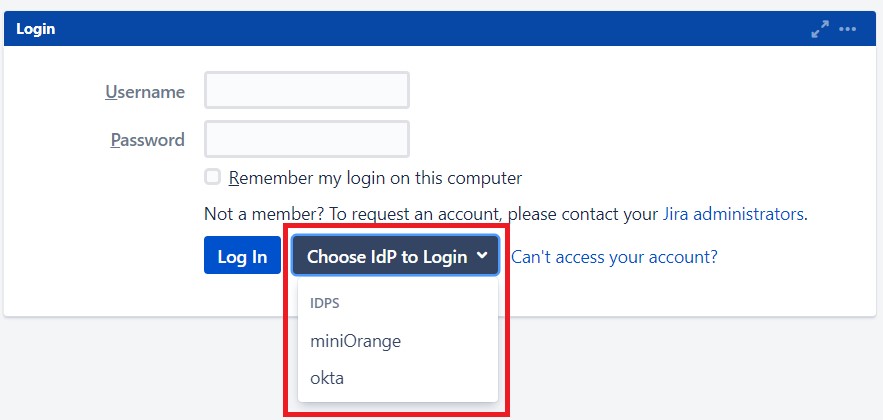
Single Sign-On with Multiple Identity Provider(IDP)

Select your IdP from the list. It will redirect you to selected IdP login page.

SAML Single Sign On (SSO) into Jira, Dropdown list on login page for multiple IDP
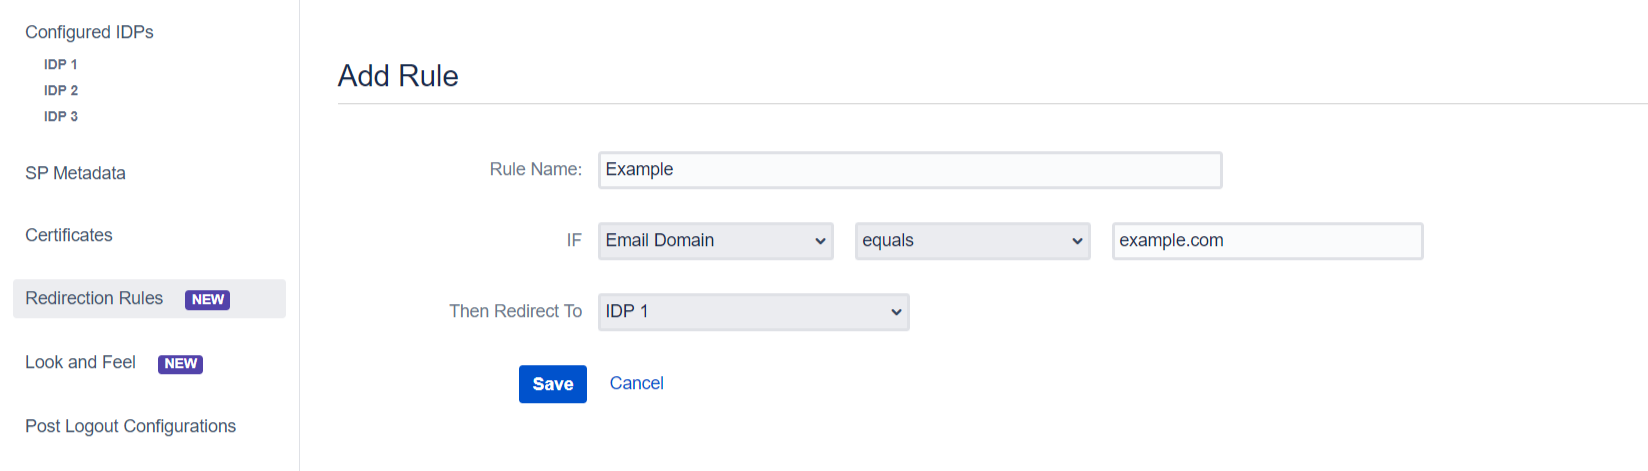
Configure Domain Mapping

You can enable domain mapping using Use Domain Mapping option.
Once enable it, you need add domain name against each IDP.
After enabling Domain Mapping it allows SSO only for those users whose domain matches with the specified one.

SAML Single Sign On (SSO) into Jira, Domain mapping configuration

Single Sign-On using Domain mapping

Enter the user email address. It will check your domain name with the configured domain if it matches then it will redirect you to the respective Identity Provider Login page.

SAML Single Sign On (SSO) into Jira, Domain mapping form
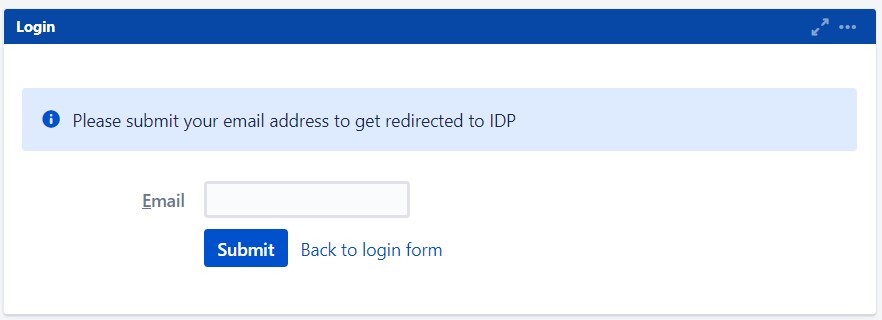
This is how the login screen would appear after enabling domain mapping.
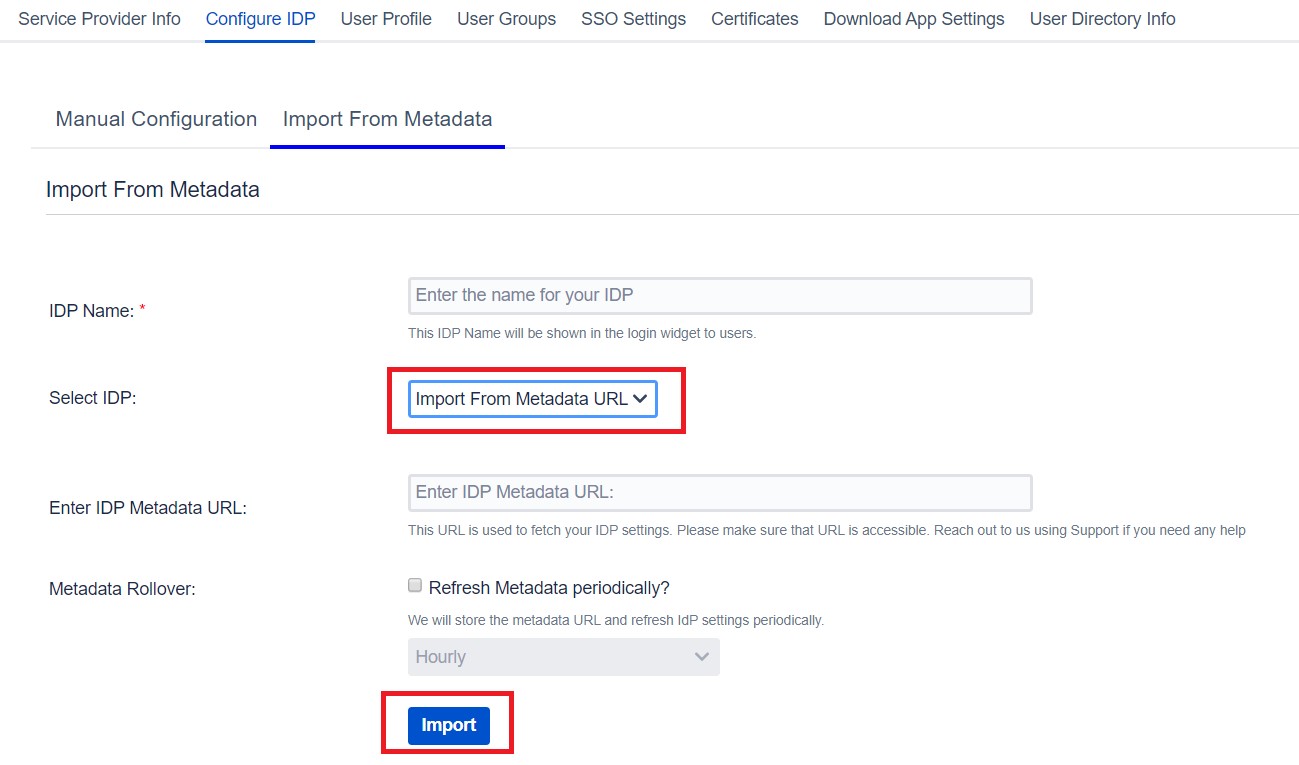
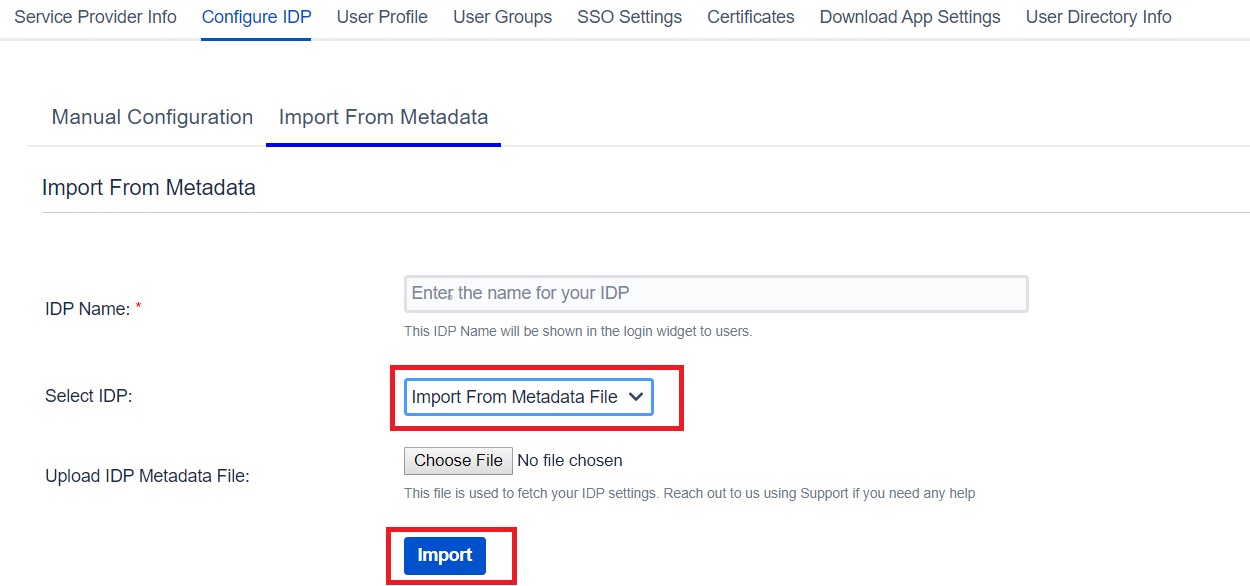
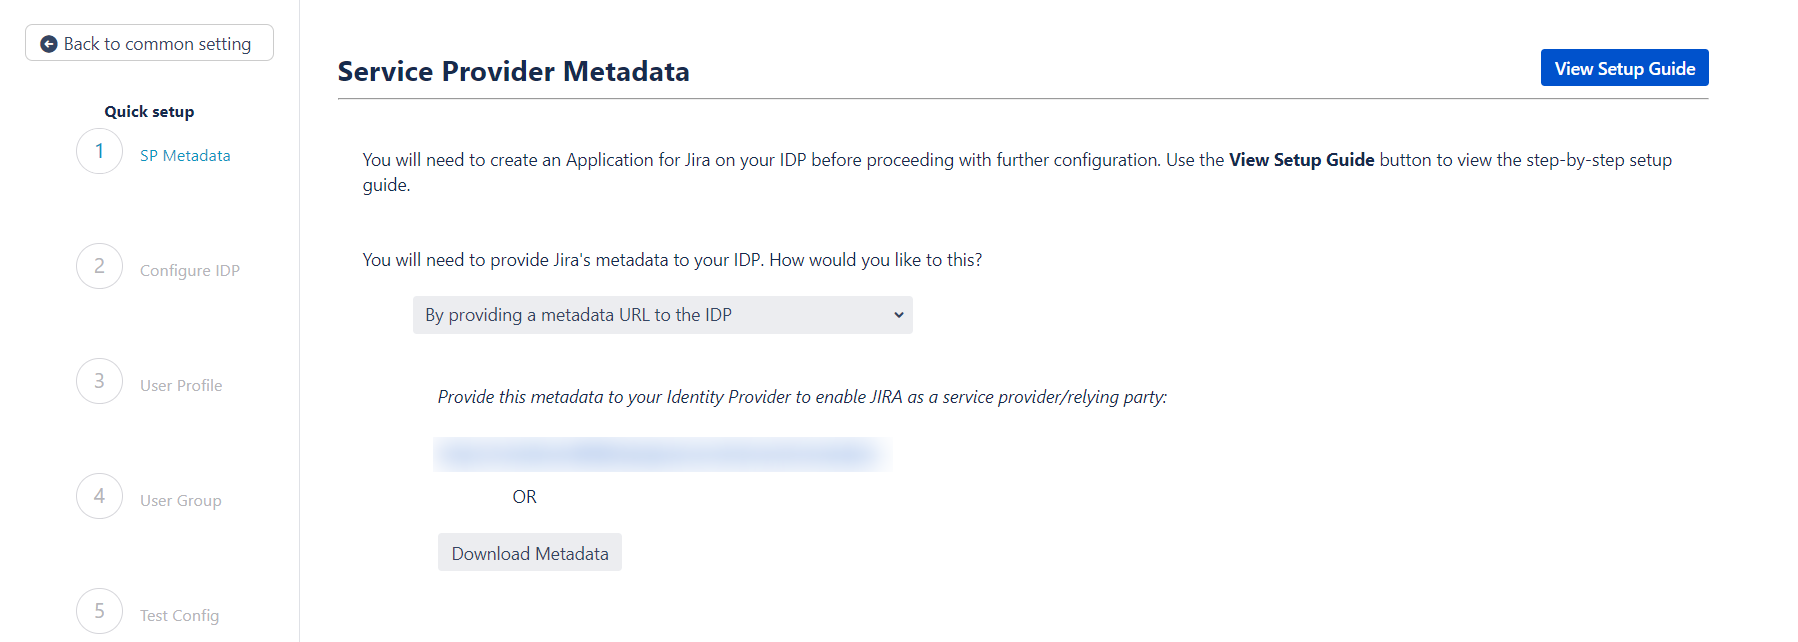
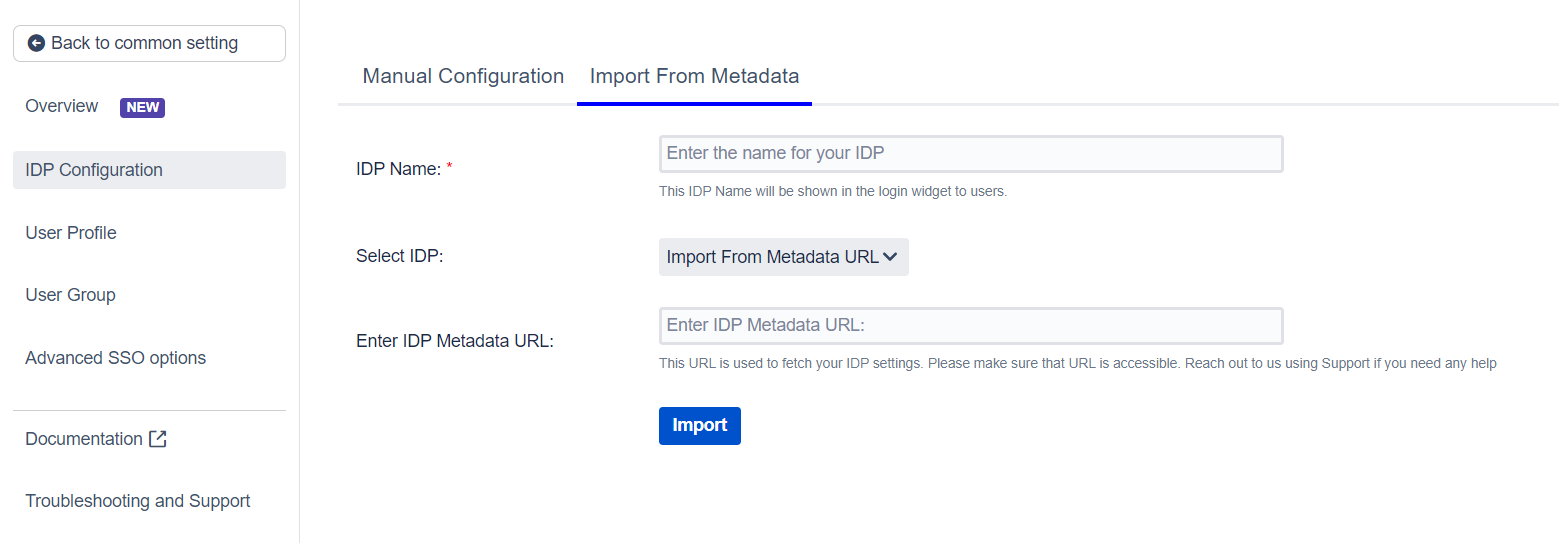
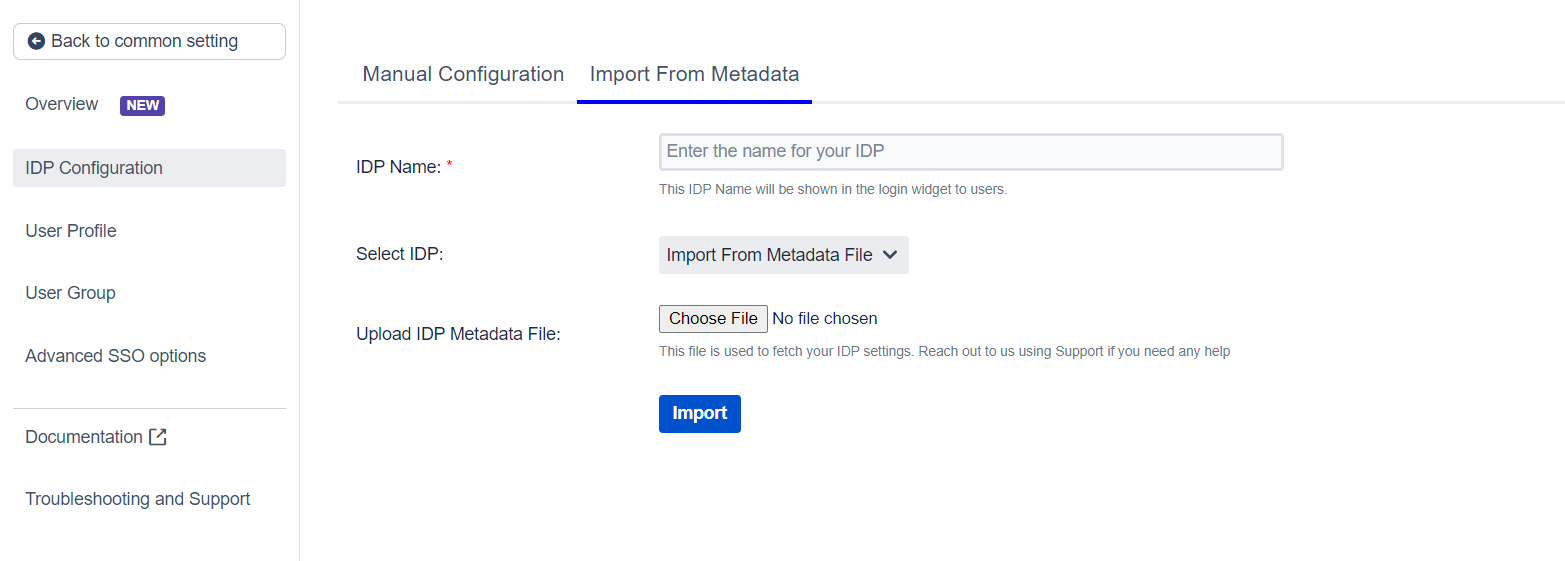
Step 3: Setting up Jira user profile attributes

    We will be setting up user profile attributes for Jira. If your users are stored in a directory that is Read Only, please check Disable Attribute Mapping in User Profile tab and follow steps given in Matching a User.

    SAML Single Sign On (SSO) into Jira, User profile Settings

    a. Finding correct attributes

  • Go to Configure IDP tab. Scroll down and click on Test Configuration.
  • You will see all the values returned by your IDP to Jira in a table. If you don't see value for First Name, Last Name, Email or Username, make the required settings in your IDP to return this information.
  • Once you see all the values in Test Configuration, keep the window open and go to User Profile tab.

  • b. Setting profile attributes

  • In this tab, fill the values by matching the name of the attribute. For instance, if the Attribute Name in the Test Configuration window is NameID, enter NameID against Username
  • Setting up both Username and Email is required if you want to let users register. If you want existing users to only login, configure the attribute using which you will match the user in Jira.

  • c. Matching a User

    When the user logs into Jira, one of the user's data/attribute coming in from the IDP is used to search the user in Jira. This is used to detect the user in Jira and log in the user to the same account.
    You can configure it using steps given below:
  • Go to User Profile tab
  • Select Username or Email for Login/Search Jira user account by
  • Enter the attribute name from IDP which corresponds to Username or Email using Finding Correct Attributes

Step 4: Assigning groups to users

    We will be setting up user group attributes for Jira. If your users are stored in a directory that is Read Only, please check Disable Group Mapping in User Groups tab and skip to Setting default group.

    a. Setting default group

  • Select the users' Default Group in the tab User Groups. If no group is mapped, users are added by default to this group.
  • You can enable default groups for All Users or New Users using the option.Select None if you don't want to assign any default group to SSO users. Using the option Enable Default Groups for.
  • SAML Single Sign On (SSO) into Jira, Default groups in group mapping

    b. Finding Group Attribute

  • Just like we found Attribute Name for User Profile attributes, we find group attribute.
  • Go to Configure IDP tab. Scroll down and click on Test Configuration.
  • You will see all the values returned by your IDP to Jira in a table. If you don't see value with groups, make the required settings in your IDP to return group names.
  • Once you see all the values in Test Configuration, keep the window open and go to User Groups tab.
  • Enter the Attribute Name of group against Group Attribute.
  • Check Disable Group Mapping option if you don't want to update groups of existing users.

  • c. Group Mapping

    Group Mapping can be done in two ways:
  • Manual group mapping: If the names of groups in Jira are different than the corresponding groups in IDP, then you should use Manual group mapping.
  • On-The-Fly group mapping: If the names of groups in Jira and IDP are same, you should use On-The-Fly group mapping.

  • I. Manual Group Mapping

    • Check Restrict User Creation Based on Group Mapping option if you want new users to be created only if at least one of the user's IDP groups is mapped to a group in the application.
    • For mapping, first select a Jira group from the dropdown which lists all groups present in Jira and then enter the name of the IDP group to be mapped in the textbox beside
    • For example, if you want all users in 'dev' group in IDP to be added to jira-software-users, you will need to select jira-software-users from the dropdown and enter 'dev' against jira-software-users.
    • Use '+1' and '+10' buttons to add extra mapping fields.
    • Use '-' button next to each mapping to delete that mapping.
    SAML Single Sign On (SSO) into Jira, Manual group mapping
  • II. On-The Fly Group Mapping

    • Check Create New Groups option if you want new groups from IDP to be created if not found in Jira.
    • If the user is part of some group in Jira and that group is not present in the SAML response returned by IDP, then the user will be removed from that group in Jira.
    • If you don't want On-The-Fly group mapping to affect Jira groups which are managed locally then add those groups in Exclude Groups field.
    SAML Single Sign On (SSO) into Jira, On the fly group mapping

Step 5: SSO Settings

    The settings in SSO Settings tab define the user experience for Single Sign On.

    a. Sign In Settings

  • Set Enable SSO for Jira Software to allow SSO for Jira Software users.
  • Set button text for button on login page using Login Button Text
  • Set redirect URL after login using Relay State. Keep this empty for coming back to the same page user started from
  • Enable Auto-redirect to IDP if you want to allow users to login only using IDP. Enable backdoor for emergency
  • Select Secure Admin Login Options to control admin access.
  • SAML Single Sign On (SSO) into Jira, Sign In Seetings

    b. Service Desk SSO Settings

  • Set Enable SSO For ServiceDesk Customer Portal to allow SSO for Service Desk user.
  • Set Enable SSO Only For Agents to allow SSO only for specific set of users
  • SAML Single Sign On (SSO) into Jira, Service Desk settings

    c. Custom Login Template

  • Design your own login template that will be used to intitate SSO.
  • SAML Single Sign On (SSO) into Jira, Custom login Settings

    d. Sign Out Settings

  • Set Logout URL or Logout Template to redirect users after logout action.
  • SAML Single Sign On (SSO) into Jira, Custom logout settings

    e. SSO Error Settings

  • Set error template to redirect users to a custom error page instead of login page. Use this if you have Auto-redirect to IDP enabled.
  • SAML Single Sign On (SSO) into Jira, Custom error settings

    f. Advanced settings

  • Remember Me-cookie: If enabled, user stays logged in until user explicitly logs out.
  • You can extend Jira default session timeout. By default it is set to 300 mins.
  • Validate IDP's SAML Response: Configure time difference(in minute) here In case Jira server time is not in sync with your IDP's time.
  • SAML Single Sign On (SSO) into Jira, Advance SSO Settings

With the Quick Setup method, you can get the SP metadata from the first step of adding an IDP. The steps to initiate Quick Setup are given below :


  • Click on the Add New IDP button in the Configured IDPs section
  • SAML Single Sign On (SSO) into Jira, Add an IDP
  • Select the Quick Setup option in the pop-up that opens
  • SAML Single Sign On (SSO) into Jira, Add IDP pop-up
  • Select your IDP from the list of IDPs displayed

After completing the above steps, you will see the first step of the Quick Setup process. This step deals with setting up your IDP.


Step 2.1: Service Provider Metadata

    Here you will find your SP's metadata. You will need to provide this metadata to your IDP. There are two ways to add this metadata to your IDP.


     Import the metadata

    • If your IDP supports importing the metadata, then you can choose By providing a metadata URL to the IDP.
    • Depending on how your IDP accepts the metadata, you can either provide the metadata URL or you can use the Download Metadata button to download an XML file for the same.
    • SAML Single Sign On (SSO) into Jira, Quick Setup sp metadata url

    Manually add the metadata

      If you wish to add the metadata manually, then you can choose By manually configuring the metadata on your IDP You will find the following information. These details will need to be provided to your IDP


    • SP Entity ID
    • ACS URL
    • SP Certificate
    • SAML Single Sign On (SSO) into Jira, Quick Setup sp metadata manual

The next step of the Quick Setup flow deals with setting up IDP metadata on SP. We will pick this up in the next section of the setup guide.

If you have chosen to add your IDP using the Quick Setup flow then you have already completed the first step, which is to add SP metadata to your IDP. Now you can proceed with the second step of the Quick Setup method

Step 2.2: Configuring your Identity Provider

    This step is where you will be adding your IDP metadata.


     Custom IDP name

    • You can enter a name for your IDP int the Custom IDP Name field. In-case your use-case requires multiple IDPs, the SSO button for this IDP on the login page will display the custom name. If you do not wish to add a custom name, simply click on the corresponding drop-down and select no.
    • SAML Single Sign On (SSO) into Jira, Quick Setup custom name for IDP

     Adding the IDP metadata

    There are 3 ways in which you can add your IDP metadata. Use the drop-down to select any of the following methods :

    •   I have the metadata URL for my IDP

      Add your metadata URL in the Enter Metadata URL field.

      SAML Single Sign On (SSO) into Jira, Quick Setup metadata url
    •   I have a file which contains the metadata

      Use the Choose File button to browse for your metadata file.

      SAML Single Sign On (SSO) into Jira, Quick Setup metadata file
    •   I want to manually configure the IDP

      To configure the IDP manually, you will need to have the following details from your IDP's metadata.

      • Single Sign On URL
      • IDP Entity ID
      • IDP Signing Certificate
      • SAML Single Sign On (SSO) into Jira, Quick Setup metadata manual
    •   Testing the configuration

        Once you have added the IDP metadata, click on Save. If the IDP has been added successfully, then you will see a Test and Get Attributes button. Click on this button to test if the IDP was added successfully.

Step 2.3: User Profile

In this step you will be setting up basic user profile attributes for your SP

     Matching a user

    • When the user logs into Jira, one of the user's data/attribute coming in from the IDP is used to search the user in Jira. This is used to detect the user in Jira and log in the user to the same account. You can choose which attribute will be used for this purpose using the drop-down provided.
    • SAML Single Sign On (SSO) into Jira, Quick Setup login attribute

     Setting profile attributes

    • Setting up both Username and Email is required if you want to let users register. If the Test Configuration performed in the previous step was successful, then the inputs for the username and email attributes will be drop-downs. These drop-downs will contain all of the user's attribute names sent from the IDP. You will need to select the appropriate options containing the user's username and email.
    • SAML Single Sign On (SSO) into Jira, Quick Setup login attribute

step 2.4: User Groups - Default groups

  • Select the users's default groups in this step. You can use the Default Groups to do this. Multiple groups can be set as default groups. The user will be assigned to these groups by default after successfully logging in via SSO.
  • SAML Single Sign On (SSO) into Jira, Quick Setup default groups
  • You can enable default groups for All Users or New Users using the Enable Default Groups for drop-down. Select None if you don't want to assign any default group to SSO users.
  • SAML Single Sign On (SSO) into Jira, Quick Setup enable default groups

Step 2.5: Troubleshooting and Support

  • This step marks the end of the Quick Setup flow. In case you faced any issues or encountered any errors while setting up your IDP you can use the steps given in the Troubleshooting section to get in touch with us.
  • You will also be able to see the results of a successful test configuration on this page. This includes the attributes received from your IDP, the SAML request sent and the SAML response received.
  • Adding your IDP via this method will setup basic SSO for your end-users. You can always customise your setup further using the full set of features that we provide. To do this use the Edit drop-down for your IDP in the Configured IDPspage. From here you will be able to access your SP Metadata and customise your User Profile and User Groups settings. You can read more about these settings in the Custom Setup section of this guide.

Step 2.1: Service Provider Metadata

    If you plan on customizing your IDP setup from the get go, you can find the metadata in the SP Metadata. Here you will find your SP's metadata. You will need to provide this metadata to your IDP. There are multiple ways to add this metadata to your IDP :


    miniOrange logo  Import the metadata

      Depending on how your IDP accepts the metadata, you can either provide the metadata URL or you can use the Download Metadata button to download an XML file for the same.


    miniOrange logo  Manually add the metadata

      If you wish to add the metadata manually,you will find the following information in this section. These details will need to be provided to your IDP.

      • SP Entity ID
      • ACS URL
      • SP Certificate
      SAML Single Sign On (SSO) into Jira, Custom Setup sp metadata url

Step 2.2: Configuring your Identity Provider

    The custom setup flow allows you to dive into the complete set of configurations that we provide to add a SAML Identity Provider. The steps to configure an IDP using the Custom Setup option are :


     Adding IDP Metadata

    With the information you have been given by Your IDP team, you can configure IDP settings in 3 ways:


    miniOrange logo By Metadata URL

    • Click on the Import from Metadata tab.
    • Select IDP: Import From Metadata URL.
    • Enter IDP metadata URL: Enter your metadata URL.
    • If your IDP changes certificates at intervals (Eg. Azure AD), you can refresh your IDP metadata accordingly :
      • Navigate to the Advanced SSO options from the menu on the left-hand side of the page.
      • Enter your metadata URL in the Certificate Rollover field.
      • Select the Refresh Certificate periodically option.
      • Use the drop-down provided to set the interval for a periodic refresh.Select 5 minutes for the best results.
    • Click Import.
    • SAML Single Sign On (SSO) into Jira, Import IDP through Metadata URL

    miniOrange logo By Uploading Metadata XML File

    • Click on the Import from Metadata tab.
    • Select IDP: Import from Metadata File.
    • Upload metadata file.
    • Click Import.
    • SAML Single Sign On (SSO) into Jira, Import IDP through Metadata File

    miniOrange logo Manual Configuration

    Go to Manual Configuration tab and enter the following details:

    • IDP Entity ID
    • Single Sign On URL
    • Single Logout URL
    • X.509 Certificate
    • SAML Single Sign ON (SSO) into Jira, Configure IDP Manually

Step 2.3: User Profile

    Next we will be setting up user profile attributes for Jira. The settings for this can be found in the User Profile section.

    SAML Single Sign On (SSO) into Jira, User profile Settings

    a. Finding correct attributes
    • Go to IDP Configuration section. Scroll down and click on Test Configuration.
    • You will see all the values returned by your IDP to Jira in a table. If you don't see value for First Name,Last Name, Email or Username, make the required settings in your IDP to return this information.
    • Once you see all the values in Test Configuration, keep the window open and go back to theUser Profile section.
    b. Setting profile attributes
    • In this tab, fill the values by matching the name of the attribute. For instance, if the Attribute Name in the Test Configuration window is NameID, enter NameID against Username
    • Setting up both Username and Email is required if you want to let users register. If you want existing users to only login, configure the attribute using which you will match the user in Jira.
    c. Matching a User

      When the user logs into Jira, one of the user's data/attribute coming in from the IDP is used to search the user in Jira. This is used to detect the user in Jira and log in the user to the same account.
      You can configure it using steps given below:

    • Select Username or Email for Login user account by
    • Enter the attribute name from IDP which corresponds to Username or Email using Finding Correct Attributes

Step 2.4: User Groups

    Now we will be setting up user group attributes for Jira. You can replicate your user's groups present on IDP in your SP. There are multiple ways of doing this.

    a. Setting default group
    • Select the users' Default Group in the tab User Groups. If no group is mapped, users are added by default to this group.
    • You can enable default groups for All Users or New Users using the option.Select None if you don't want to assign any default group to SSO users. Using the option Enable Default Groups for.
    • SAML Single Sign On (SSO) into Jira, Default groups in group mapping
    b. Finding Group Attribute
    • Just like we found Attribute Name for User Profile attributes, we find the group attribute.
    • Go to IDP Configuration section. Scroll down and click on Test Configuration.
    • You will see all the values returned by your IDP to Jira in a table. If you don't see value with groups, make the required settings in your IDP to return group names.
    • Once you see all the values in Test Configuration, keep the window open and go to User Groups tab.
    • Enter the Attribute Name of group against Group Attribute.
    • Check Disable Group Mapping option if you don't want to update groups of existing users.
    c. Group Mapping
      Group Mapping can be done in two ways:

    • Manual group mapping: If the names of groups in Jira are different than the corresponding groups in IDP, then you should use Manual group mapping.
    • On-The-Fly group mapping: If the names of groups in Jira and IDP are same, you should use On-The-Fly group mapping.

    I. Manual Group Mapping
    • Check Restrict User Creation Based on Group Mapping option if you want new users to be created only if at least one of the user's IDP groups is mapped to a group in the application.
    • For mapping, first select a Jira group from the dropdown which lists all groups present in Jira and then enter the name of the IDP group to be mapped in the textbox beside.
    • For example, if you want all users in 'dev' group in IDP to be added to jira-software-users, you will need to select jira-software-users from the dropdown and enter 'dev' against jira-software-users.
    • Use '+1' and '+10' buttons to add extra mapping fields.
    • Use '-' button next to each mapping to delete that mapping.
    • SAML Single Sign On (SSO) into Jira, Manual group mapping
    II. On-The Fly Group Mapping
    • Check Create New Groups option if you want new groups from IDP to be created if not found in Jira.
    • If the user is part of some group in Jira and that group is not present in the SAML response returned by IDP, then the user will be removed from that group in Jira.
    • If you don't want On-The-Fly group mapping to affect Jira groups which are managed locally then add those groups in Exclude Groups field.
    • SAML Single Sign On (SSO) into Jira, On the fly group mapping

Step 2.5: Troubleshooting and Support

  • You can verify if your SAML SSO configuration is correct by clicking the Test Configuration button on the IDP configuration tab of the plugin.
  • After the successful test configuration, you will also be able to see the results on the Troubleshooting and Support page. This includes the attributes received from your IDP, the SAML request sent and the SAML response received.
  • In case you faced any issues or encountered any errors while setting up your IDP you can use the steps given in the Troubleshooting section to get in touch with us.

Step 3: Redirection on Login Page

  • If you have only one IDP configured, then you can use the features provided on the SSO Settings tab and Redirection tab of the plugin to manage the redirection on the login page.
  • Enable the Auto Redirect to IDP option on the SSO Settings tab if you want to allow users to log in only using IDP.
  • Use the Emergency/Backdoor Login URL to allow all admins to access the Jira's/Confluence's default login page and log in using Jira local credentials. You can also Restrict the access of this URL to some specific set of users (i.e users of particular groups).
  • Use the settings given on Redirection Rules tab to redirect the users on login page based on their email domains, groups and directories. This feature is more useful in case you have multiple IDPs configured. Please refer to the next section.

Step 4: Multiple IDPs

      Step 4.1: Configuring Multiple IDPs

      • If your use case requires Multiple IDPs to be configured on your SP, the plugin supports that as well. You can add another IDP by going to the Configured IDPs section and using the Add New IDP button.
      • SAML Single Sign On (SSO) into Jira, add a new IDP

      Step 4.2: Managing SSO with Multiple IDPs

      • If you have multiple IDPs configured, you can choose how you want your end users to use these IDPs to perform SSO. IDPs to perform SSO.
      • For example you can show the buttons for the different IDPs configured on the login page nad let the users decide which IDP to use for SSO.
      • Or you could force certain users to user a specific IDP based on the domain of their username/email.
      • You will be able to configure these rules in the Redirection Rules section, under the Redirection Rules tab.
      • By default one rule is always configured that will be applicable to all the users, irrespective of their user domains.
      • For instance, if you want to display the login page with SSO buttons for each of the IDPs then your Default Rule will be as follows :
      • SAML Single Sign On (SSO) into Jira, default redirection rule
      • Based on the default rule mentioned above, the login form will contain buttons for each IDP. The users will be free to choose whichever IDP they want to use to initiate SSO.
      • SAML Single Sign On (SSO) into Jira, default redirection rule login page
      • You can also configure a rule so that your users will automatically be redirected to an IDP based on their email domains.
      • For example, if you want users with example.com as domain to be redirected to IDP 1 you can add a rule by :

        1. Click on the Add Rule button in the Redirection Rules tab
        2. Enter a name for your rule in Rule Name
        3. In the IF statement select Email Domain in the first drop-down
        4. For the same statement select equals in the second drop-down.
        5. In the last field of the IF statement, enter the email domain(example.com for the purpose of this example)
        6. In the Then Redirect To drop-down, select the IDP you want the users with example.com to be redirected to(IDP 1 in this case)
        7. Click on Save
        8. SAML Single Sign On (SSO) into Jira, example rule
      • When a rule such as an example given above is configured, a login form will be displayed to the users where they will have to input their email address.
      • SAML Single Sign On (SSO) into Jira, Domain mapping form
      • In this section you will also configure SSO for admin users, access to anonymous pages and an emergency URL to by-pass SSO. These settings can be found under the Settings tab of this section.
      • SAML Single Sign On (SSO) into Jira, sso settings

      Configure SCIM with SAML

        Configure SCIM with SAML for your choosen IDP by following the step by step guide linked here.


miniorange img  Hi! Do you need help with this guide?


 Thank you for your response. We will get back to you soon.

Something went wrong. Please submit your query again

Sync product to woocommerce store from Amrod


Recommended Add-Ons


Free Trial

If you don't find what you are looking for, please contact us at support-atlassian@miniorange.atlassian.net or raise a support ticket here.