Azure B2C as IdP for Atlassian SAML SSO
Step 1: Setup Azure AD B2C as Identity Provider
Follow the steps below to configure Azure AD B2C as an Identity Provider
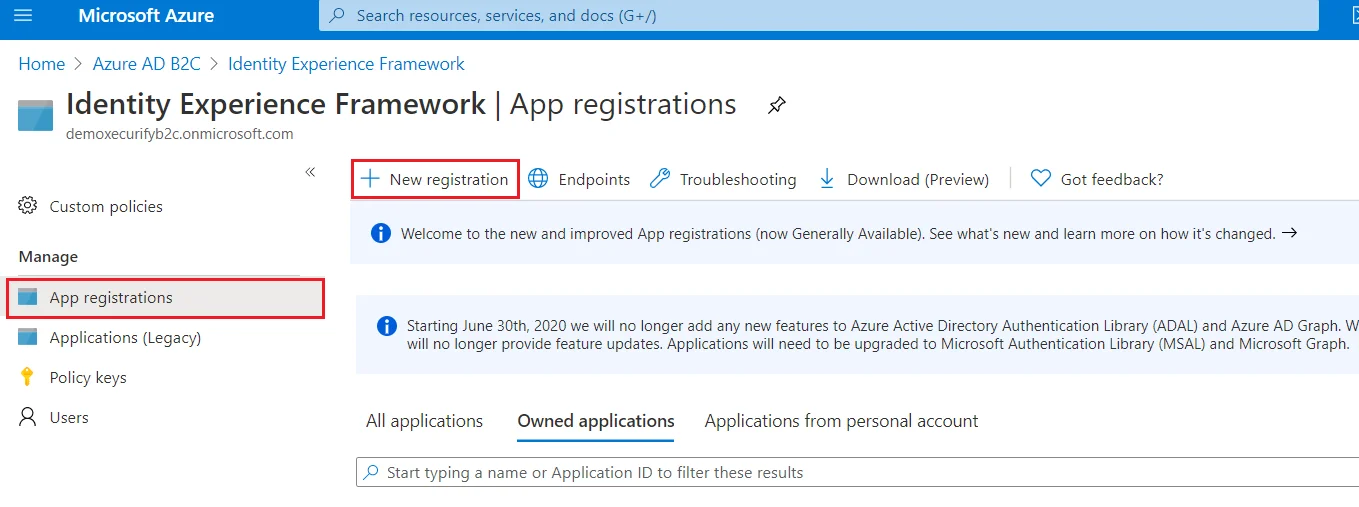
 Register the IdentityExperienceFramework application
- From the Azure AD B2C tenant, select App registrations, and then select New registration.
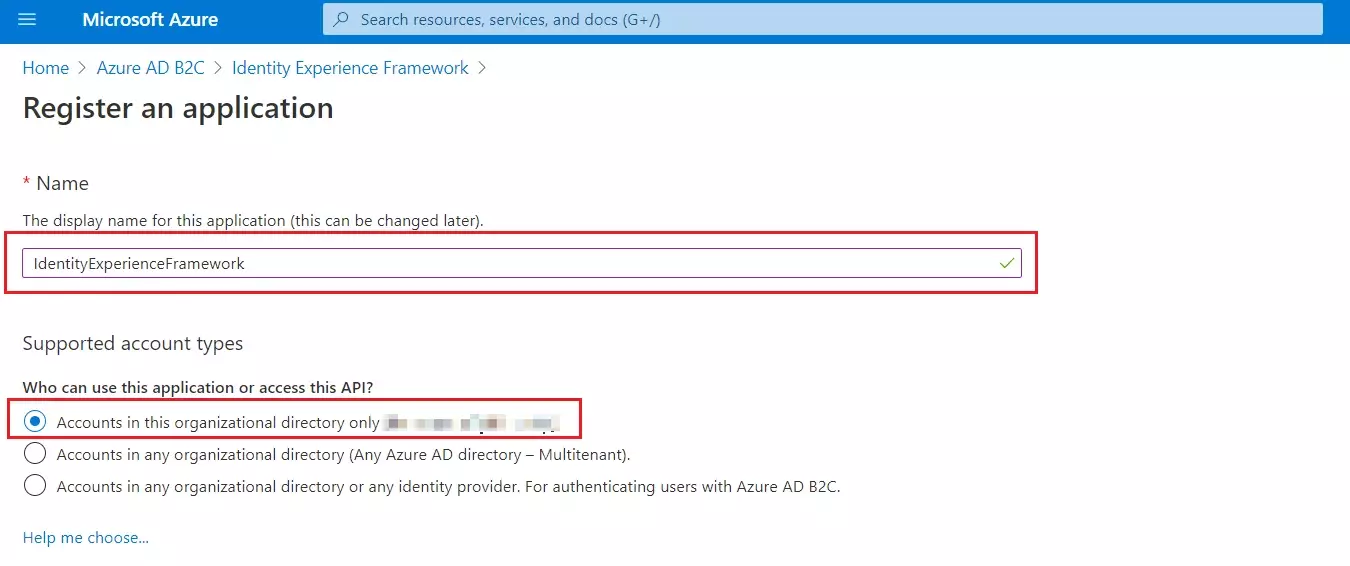
- For Name, enter IdentityExperienceFramework.
- Under Supported account types, select Accounts in this organizational directory only.
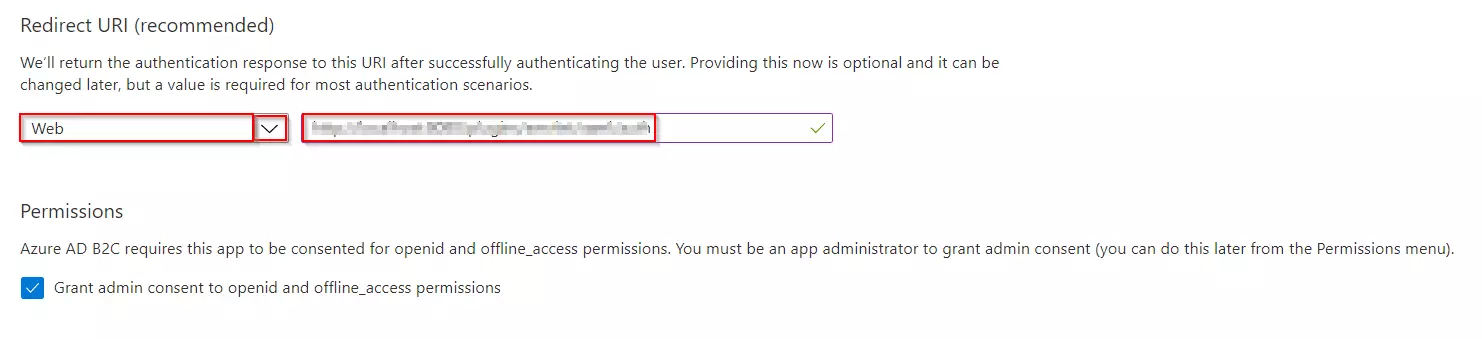
- Under Redirect URI, select Web, and then enter https://your-tenant-name.b2clogin.com/your-tenant-name.onmicrosoft.com where your-tenant-name is your Azure AD B2C tenant domain name.
- Under Permissions, select the Grant admin consent to openid and offline_access permissions check box. Now, Select Register.
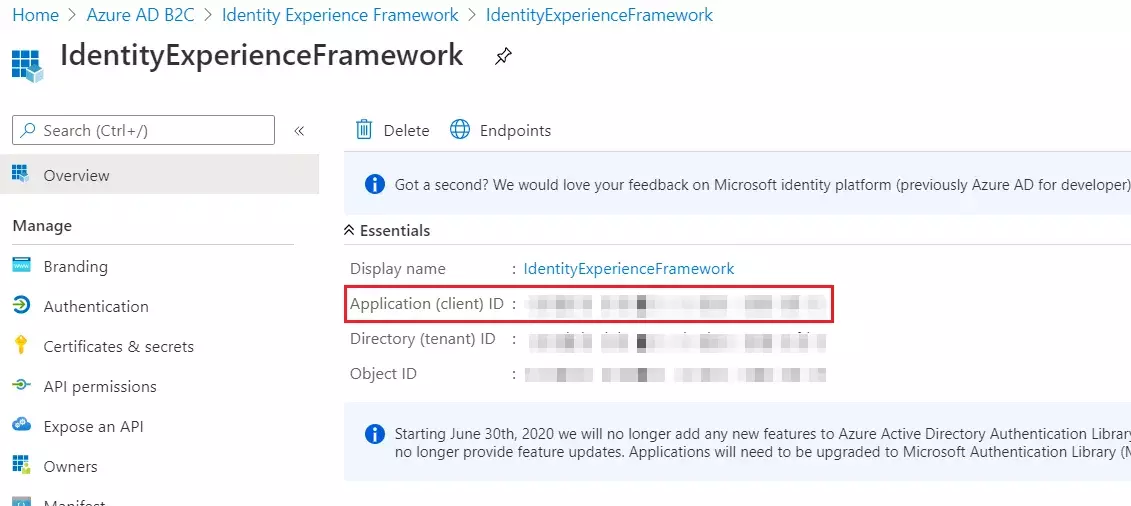
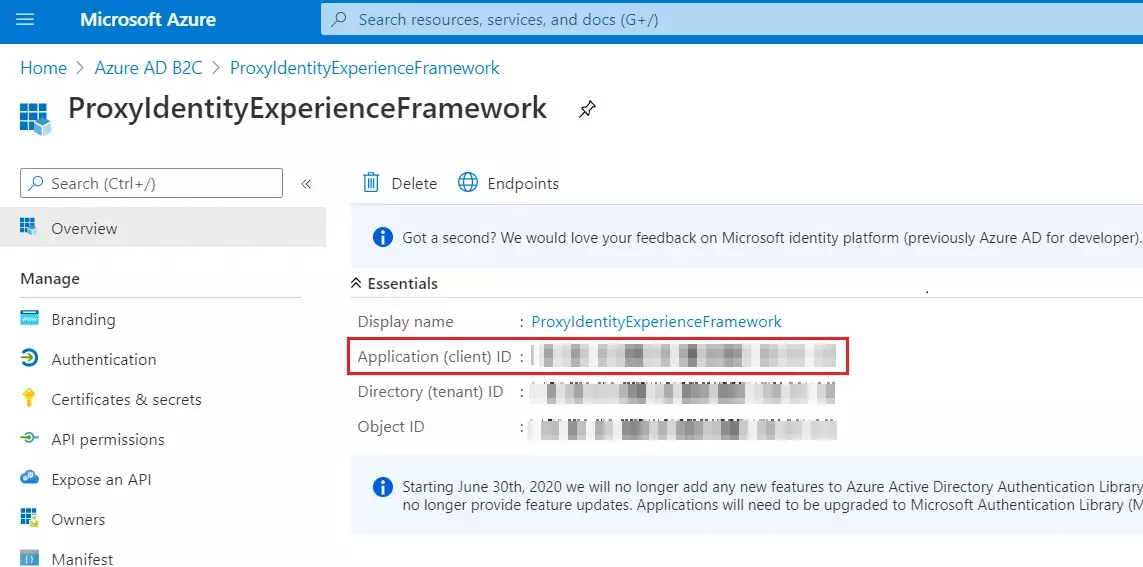
- Record the Application (client) ID for use in a later step.
- To Expose the API add a scope under Manage, select Expose an API.
- Select Add a scope, then select Save and continue to accept the default application ID URI.
- Enter the following values to create a scope that allows custom policy execution in your Azure AD B2C tenant:
- Select Add scope and State:Enabled
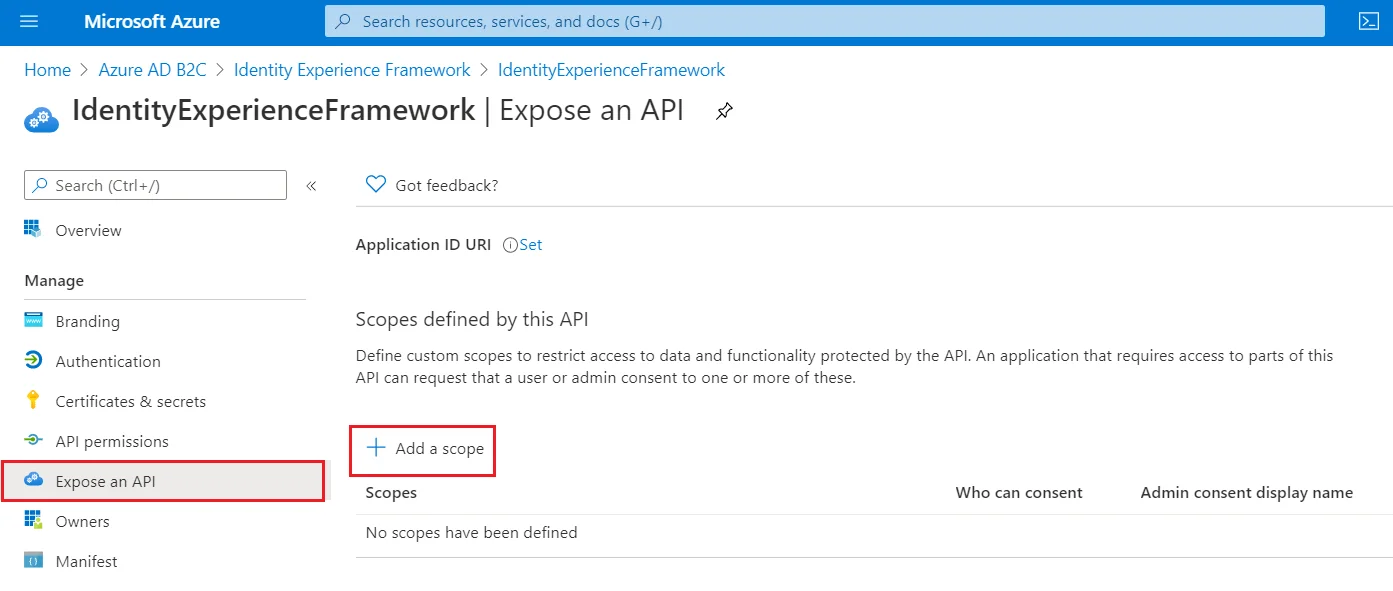
| Scope name | user_impersonation |
| Admin consent display name | Access IdentityExperienceFramework |
| Admin consent description | Allow the application to access IdentityExperienceFramework on behalf of the signed-in user |
Register the ProxyIdentityExperienceFramework application
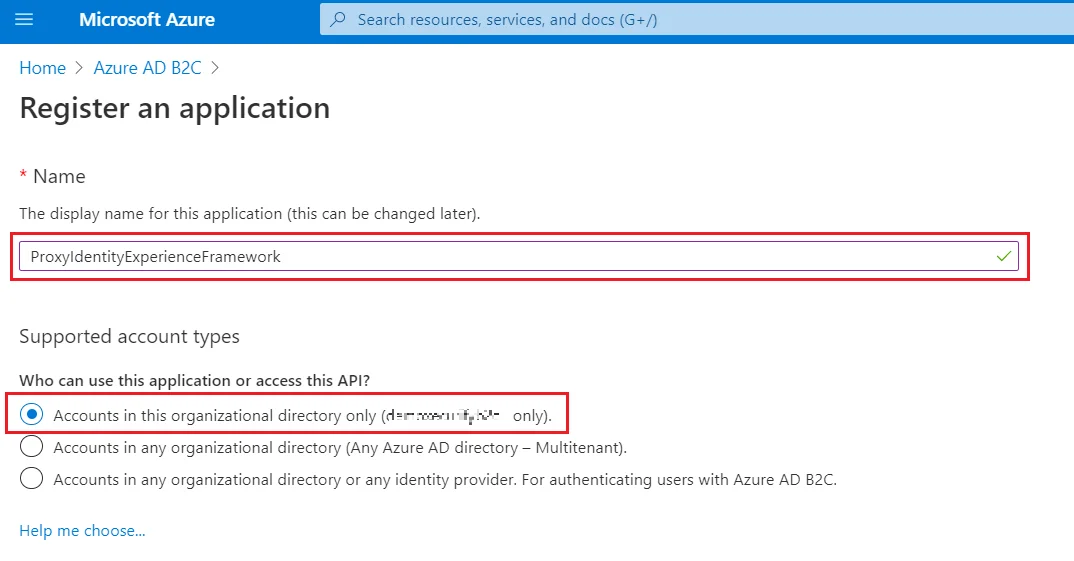
- Select App registrations, and then select New registration.
- For Name, enter ProxyIdentityExperienceFramework.
- Under Supported account types, select Accounts in this organizational directory only.
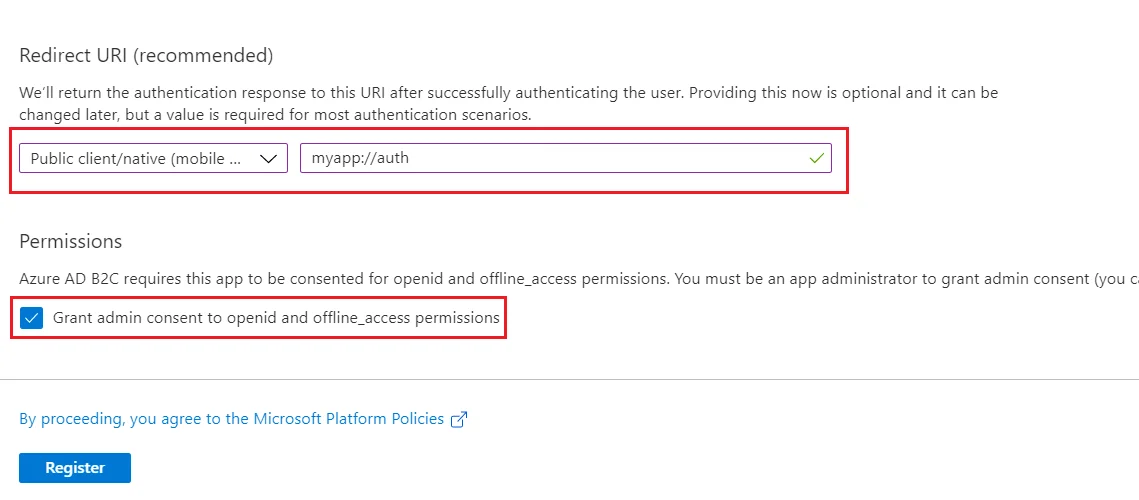
- Under Redirect URI, use the drop-down to select Public client/native (mobile & desktop).
- For Redirect URI, enter myapp://auth.
- Under Permissions, select the Grant admin consent to openid and offline_access permissions check box and select Register.
- Record the Application (client) ID for use in a later step.
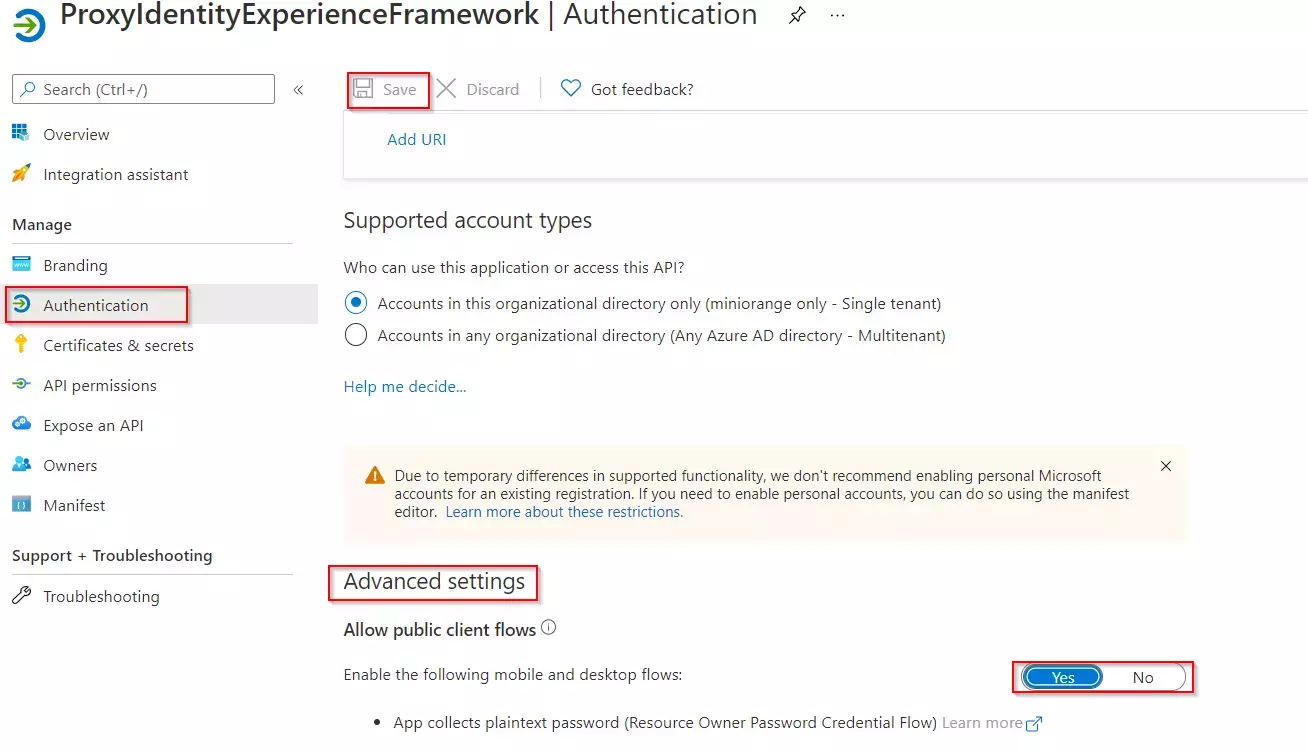
- Next, specify that the application should be treated as a public client. Under Manage, select Authentication.
- Under Advanced settings, enable Allow public client flows (select Yes).Select Save.
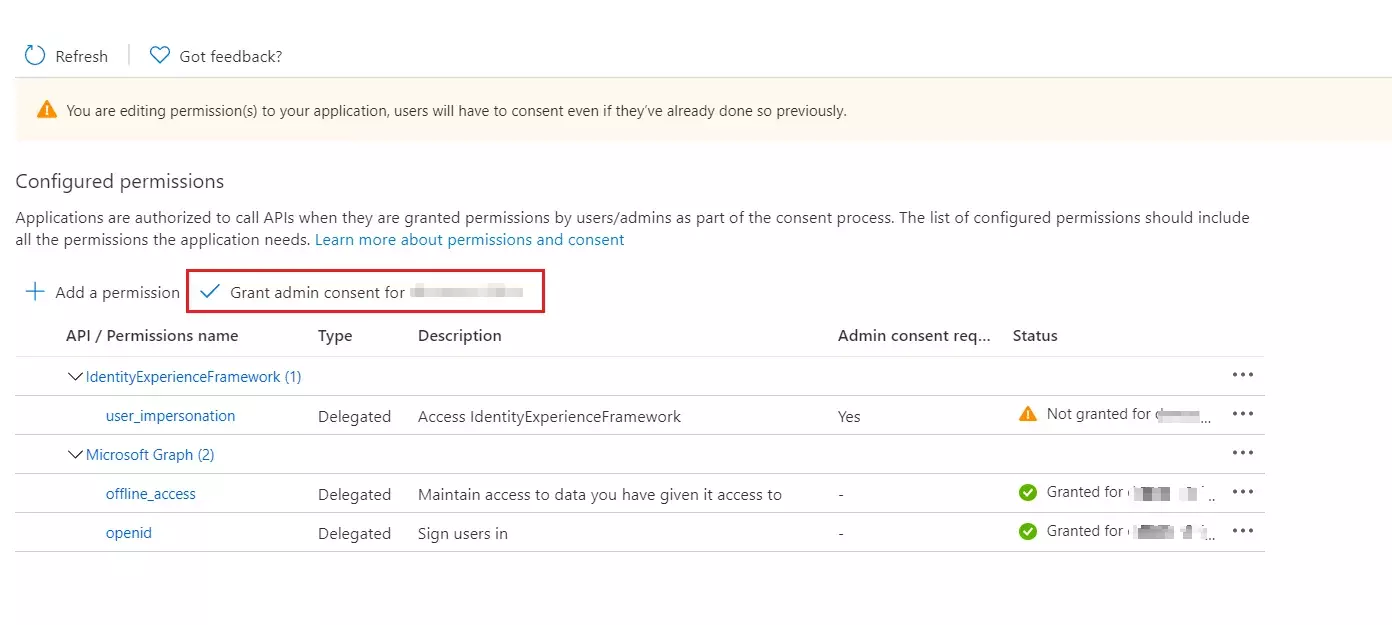
- Now, grant permissions to the API scope you exposed earlier in the IdentityExperienceFramework registration. Under Manage, select API permissions.
- Under Configured permissions, select Add a permission.
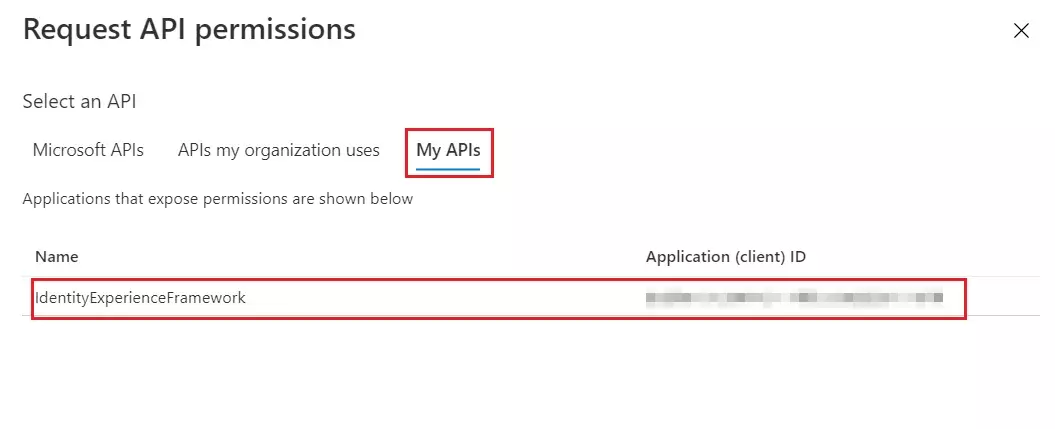
- Select the My APIs tab, then select the IdentityExperienceFramework application.
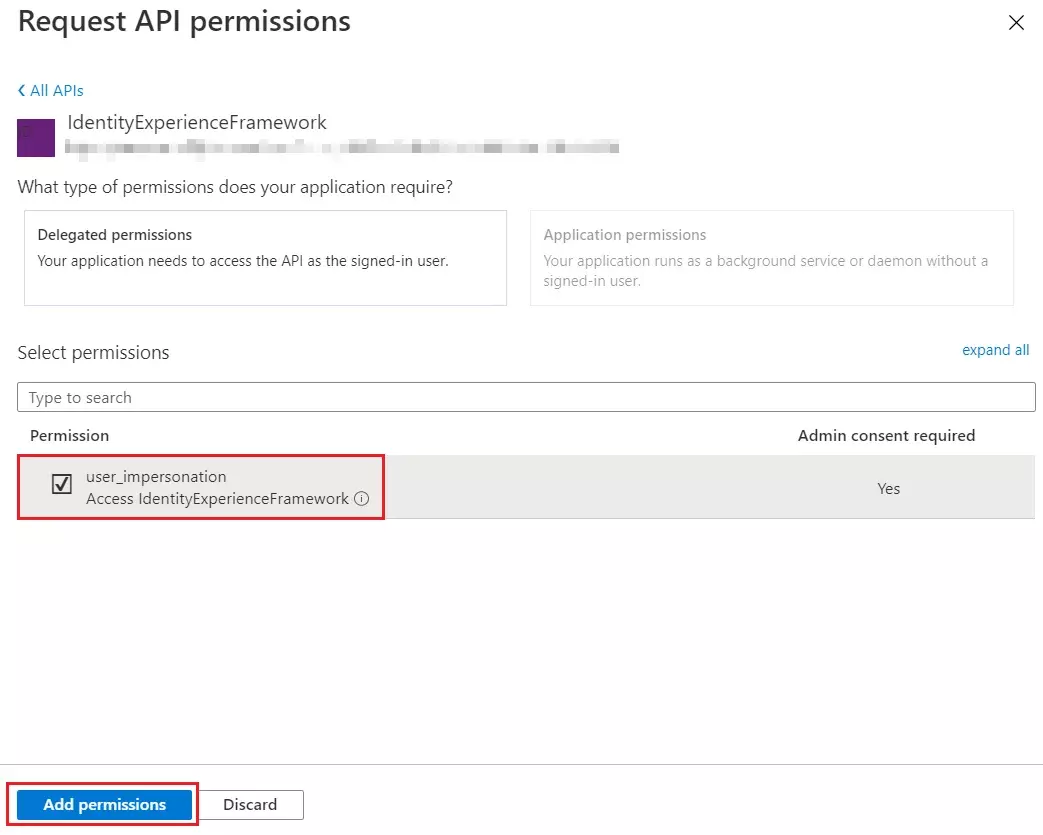
- Under Permission, select the user_impersonation scope that you defined earlier.
- Select Add permissions. As directed, wait a few minutes before proceeding to the next step.
- Select Grant admin consent for (your tenant name).
- Select your currently signed-in administrator account, or sign in with an account in your Azure AD B2C tenant that's been assigned at least the Cloud application administrator role. Select Accept.
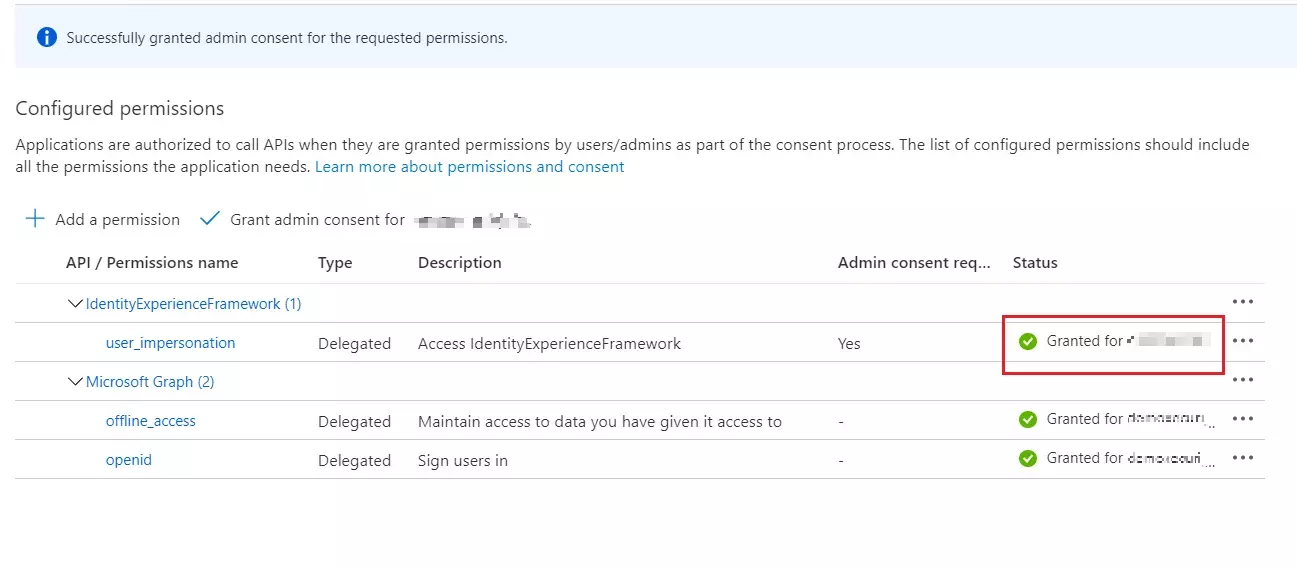
- Now Refresh, and then verify that "Granted for ..." appears under Status for the scopes: offline_access, openid and user_impersonation. It might take a few minutes for the permissions to propagate.

Register the SAML Application
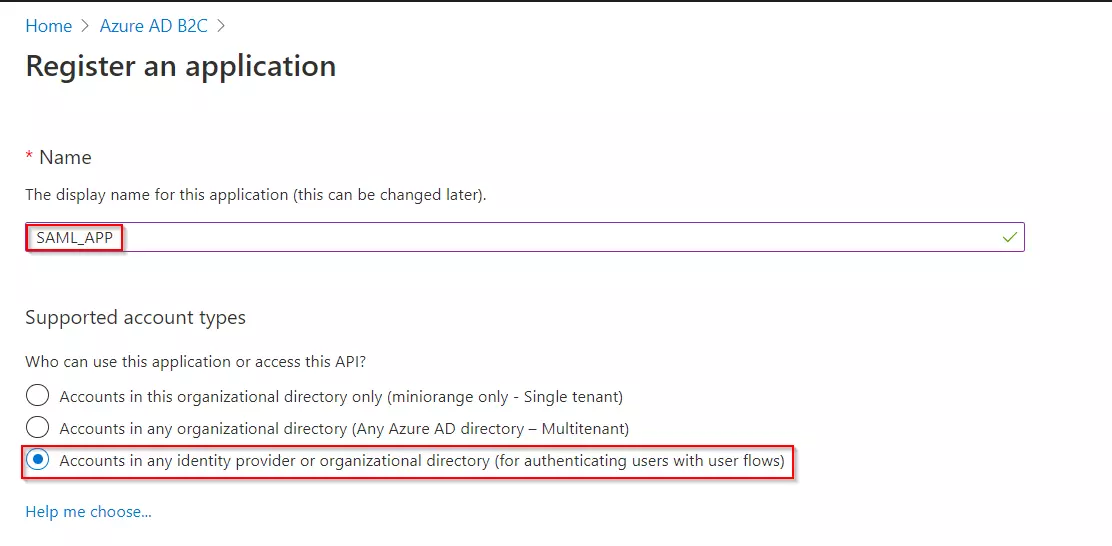
- Select App registrations, and then select New registration.
- Enter a Name for the application Eg:SAML_APP.
- Under Supported account types, select Accounts in any identity provider or organizational directory (for authenticating users with user flows).
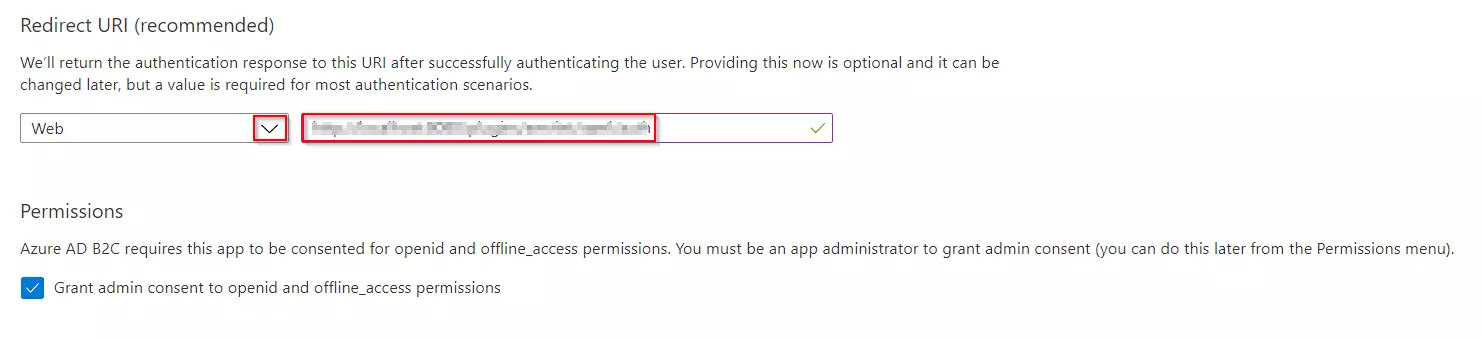
- Under Redirect URI, select Web, and then enter the ACS URL as {application_base_url}/plugins/servlet/saml/auth from the Service Provider Information tab of the miniOrange SAML SSO plugin. Select Register.
- Under Manage, click on Expose an API.
- Click on Set for the Application ID URI and then click on Save, accepting the default value.
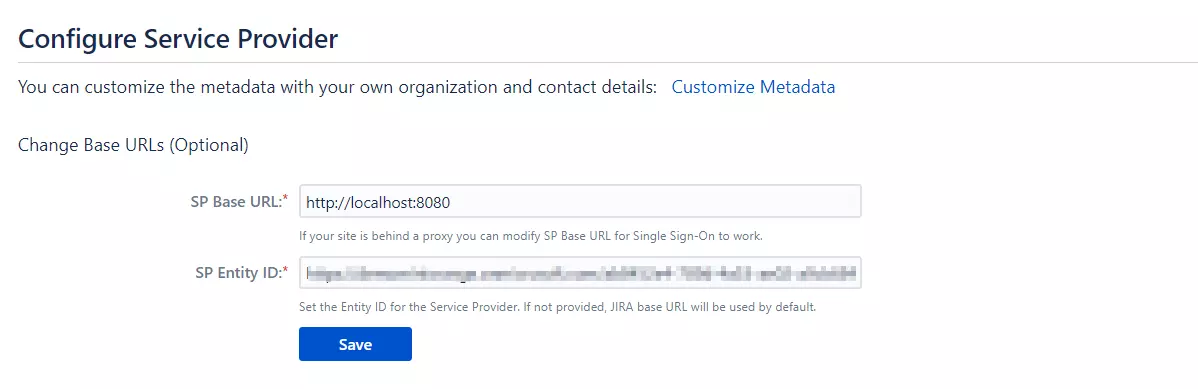
- Once saved, copy the Application ID URI and navigate to the Service Provider Information tab of the plugin.Paste the copied value under the SP Entity ID field provided in this tab. Click on Save.

Generate SSO Policies
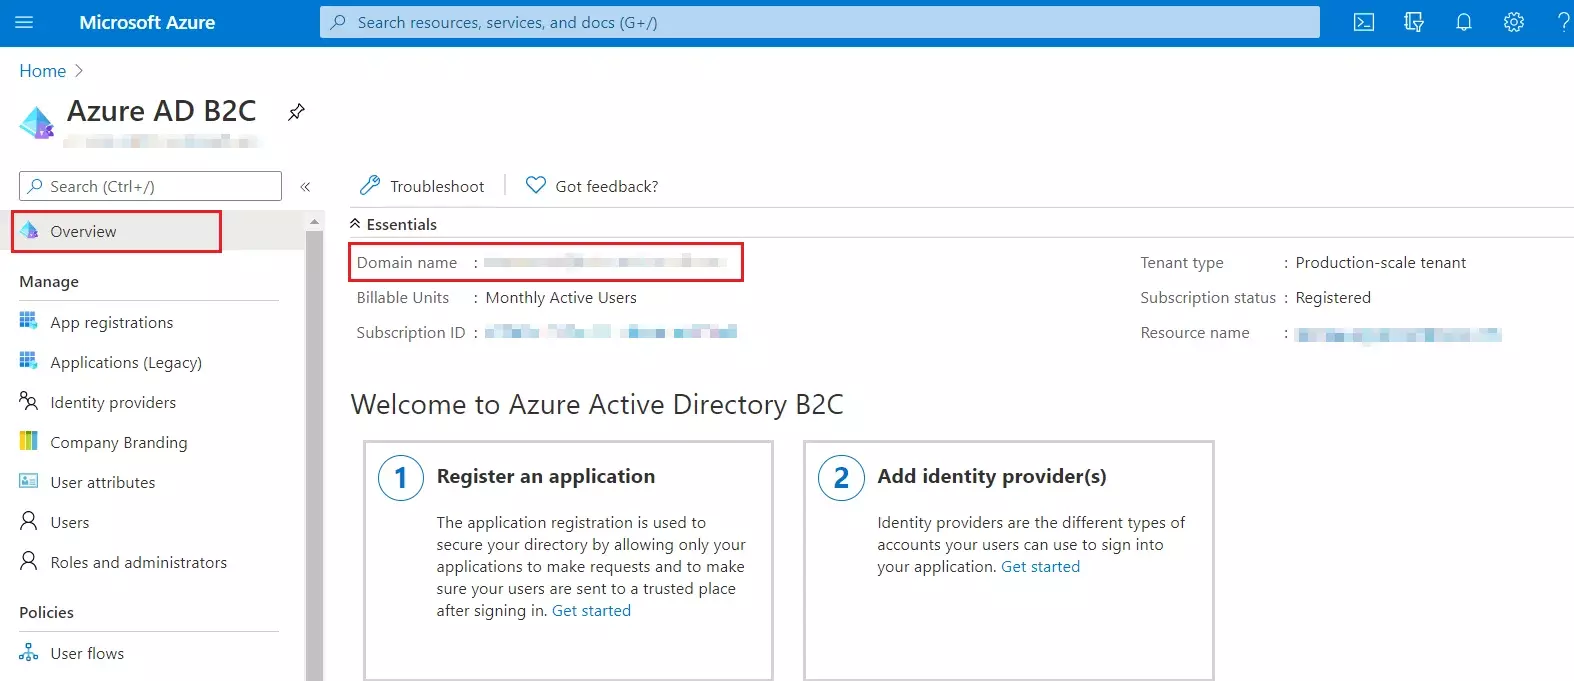
- From our Azure AD B2C portal, navigate to the Overview section of your B2C tenant and record your tenant name.
NOTE: If your B2C domain is demo.onmicrosoft.com, then your tenant name is demo. - Enter your Azure B2C tenant name below, along with the application ID for IdentityExperienceFramework and ProxyIdentityExperienceFramework apps as registered in the above steps.
Upload the Certificate
- Sign in to the Azure portal and browse to your Azure AD B2C tenant.
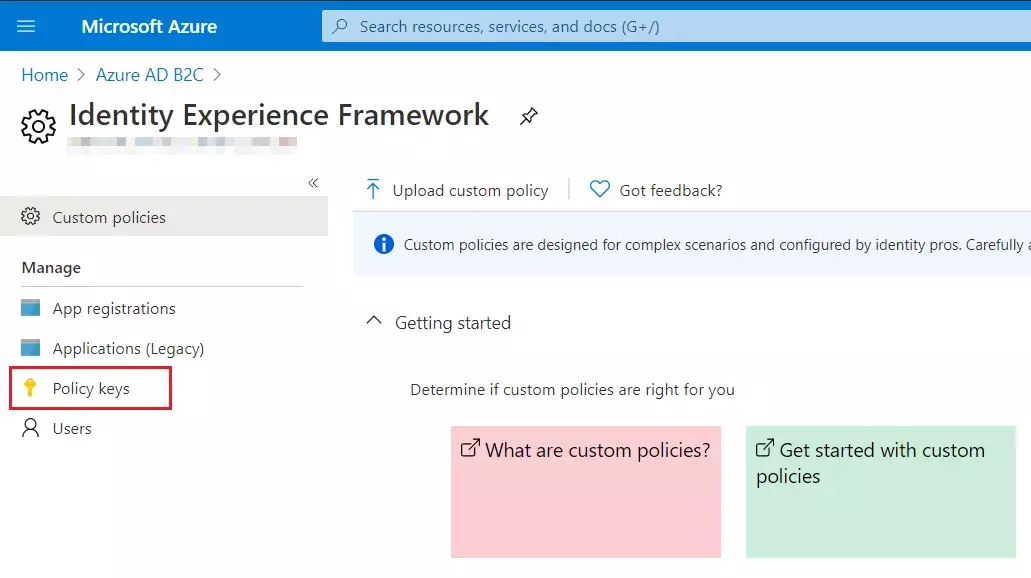
- Under Policies, select Identity Experience Framework and then Policy keys.
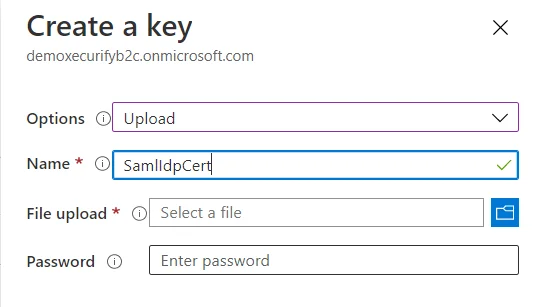
- Select Add, and then select Options > Upload
- Enter the Name as SamlIdpCert. The prefix B2C_1A_ is automatically added to the name of your key.
- Using the upload file control, upload your certificate that was generated in the above steps along with the SSO policies (tenantname-cert.pfx).
- Enter the certificate's password as your tenant name and click on Create.
For example, if your tenant name is demo.onmicrosoft.com, enter the password as demo. - You should be able to see a new policy key with the name B2C_1A_SamlIdpCert.
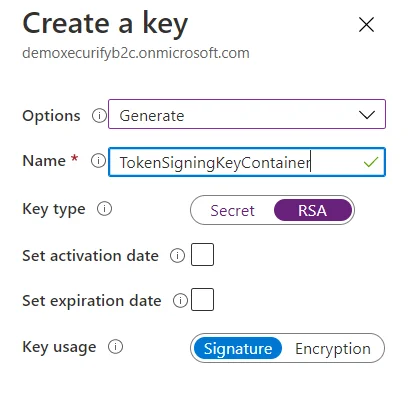
Create the signing key
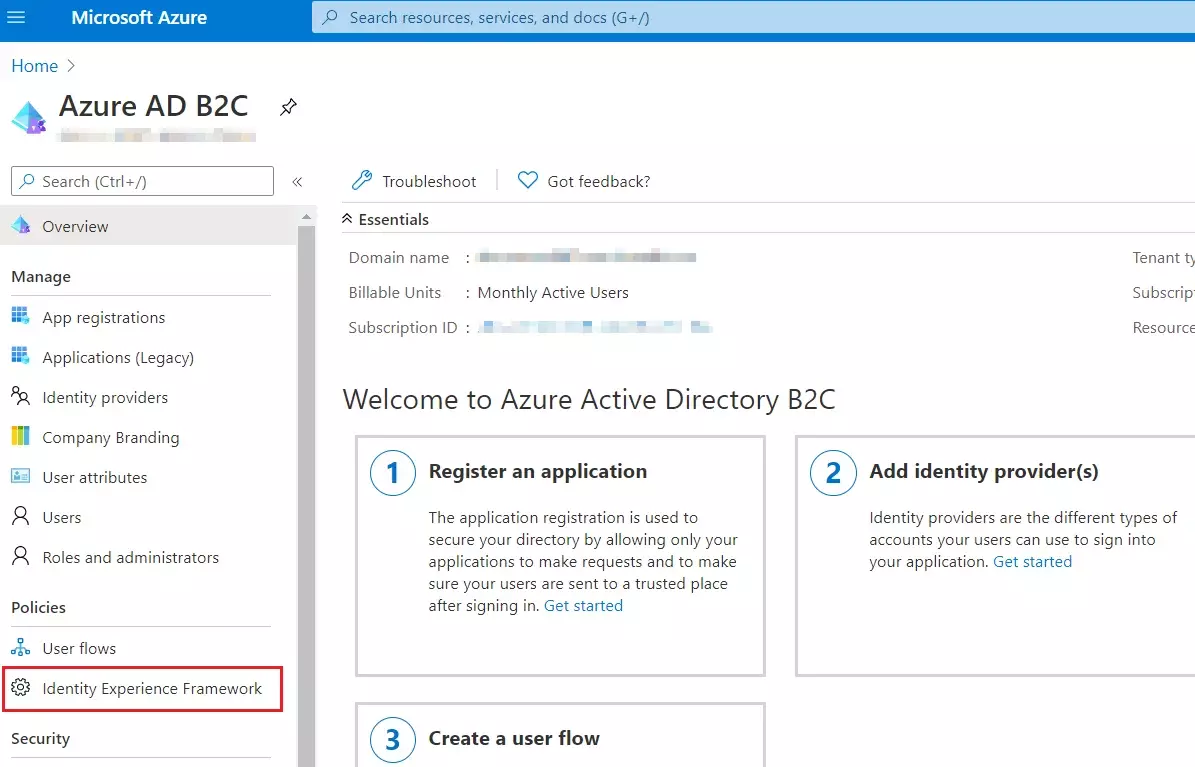
- On the overview page of your Azure AD B2C tenant, under Policies, select Identity Experience Framework.
- Select Policy Keys and then select Add.
- For Options, choose Generate.
- In Name, enter TokenSigningKeyContainer. For Key type, select RSA.
- For Key usage, select Signature. Now, Select Create.
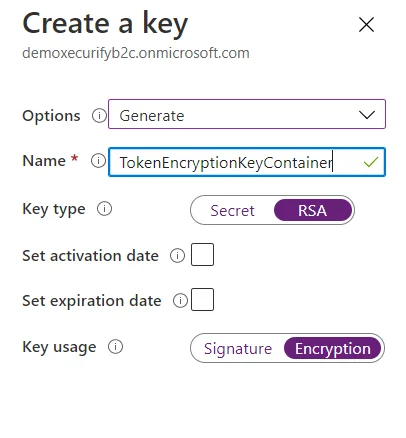
Create the encryption key
- Follow the first three steps, used to create signing key.
- For Name, enter TokenEncryptionKeyContainer. For Key type, select RSA.
- For Key usage, select Encryption. Now, Select Create.
Upload the Policies
- Select the Identity Experience Framework menu item in your B2C tenant in the Azure portal.
- Select Upload custom policy.
- As per the following order, upload the policy files downloaded in the above steps:
- As you upload the files, Azure adds the prefix B2C_1A_ to each.
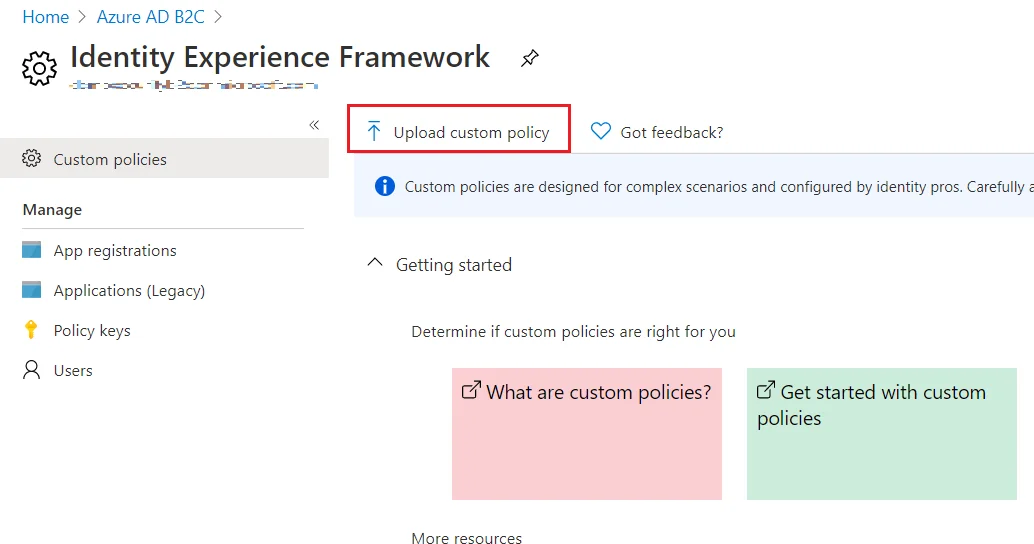
| 1 | TrustFrameworkBase.xml |
| 2 | TrustFrameworkExtensions.xml |
| 3 | SignUpOrSignin.xml |
| 4 | ProfileEdit.xml |
| 5 | PasswordReset.xml | 6 | SignUpOrSigninSAML.xml |
Note: For next step, Use IDP Metadata URL as:
https://tenant-name.b2clogin.com/tenant-name.onmicrosoft.com/B2C_1A_signup_signin_saml/Samlp/metadata.
×
![]()
Trending searches:
Hello there!
Need Help? We are right here!
