Search Results :

×

REST API Authentication On JIRA using ADFS as OAuth/OpenID Provider

JIRA provides REST APIs to perform a number of operations such as Create Issue, Delete Issue, Add Comment, Create Space, etc. However, it supports only two authentication methods for REST APIs:

  1. Basic Authentication
  2. Using JIRA as OAuth 1.0 Provider

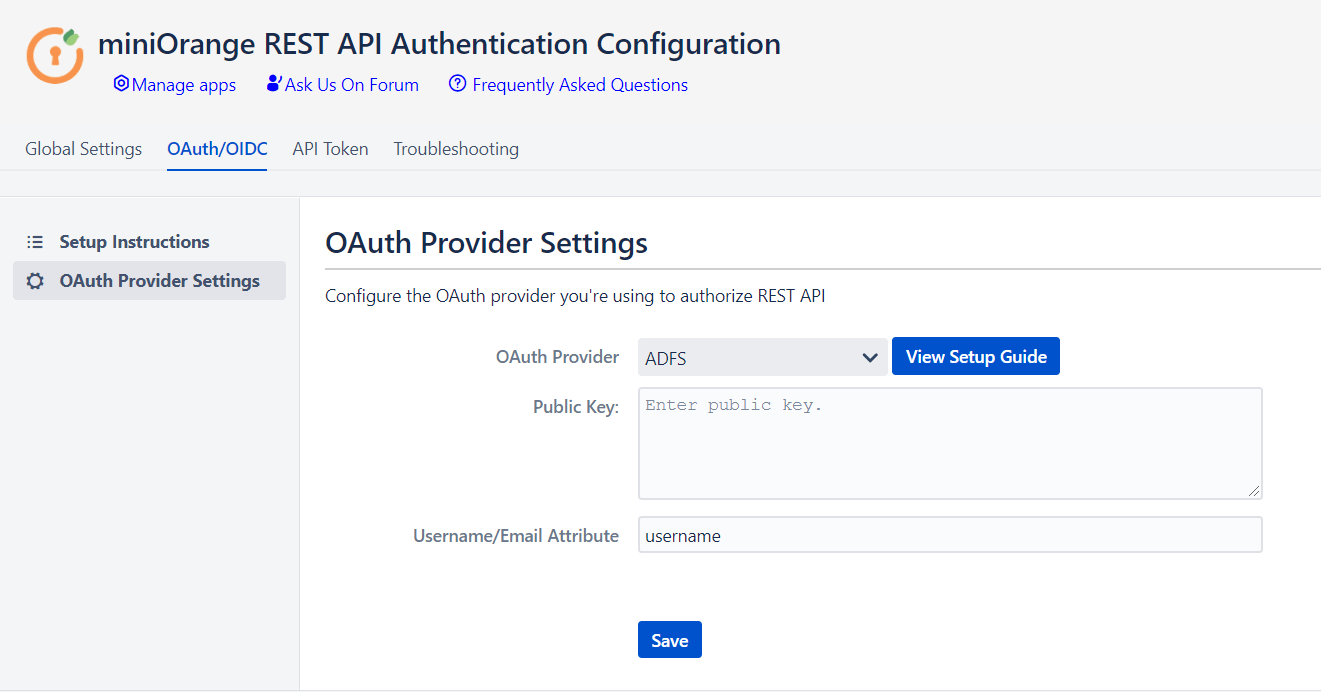
The REST API Authentication plugin for JIRA allows you to use any third party OAuth 2.0 provider/ OpenID connect to authenticate REST APIs. Here we will go through a guide to configure ADFS as Provider.

Step 1: Setup ADFS as OAuth Provider

  • To perform SSO with ADFS as Provider, your application must be https enabled.
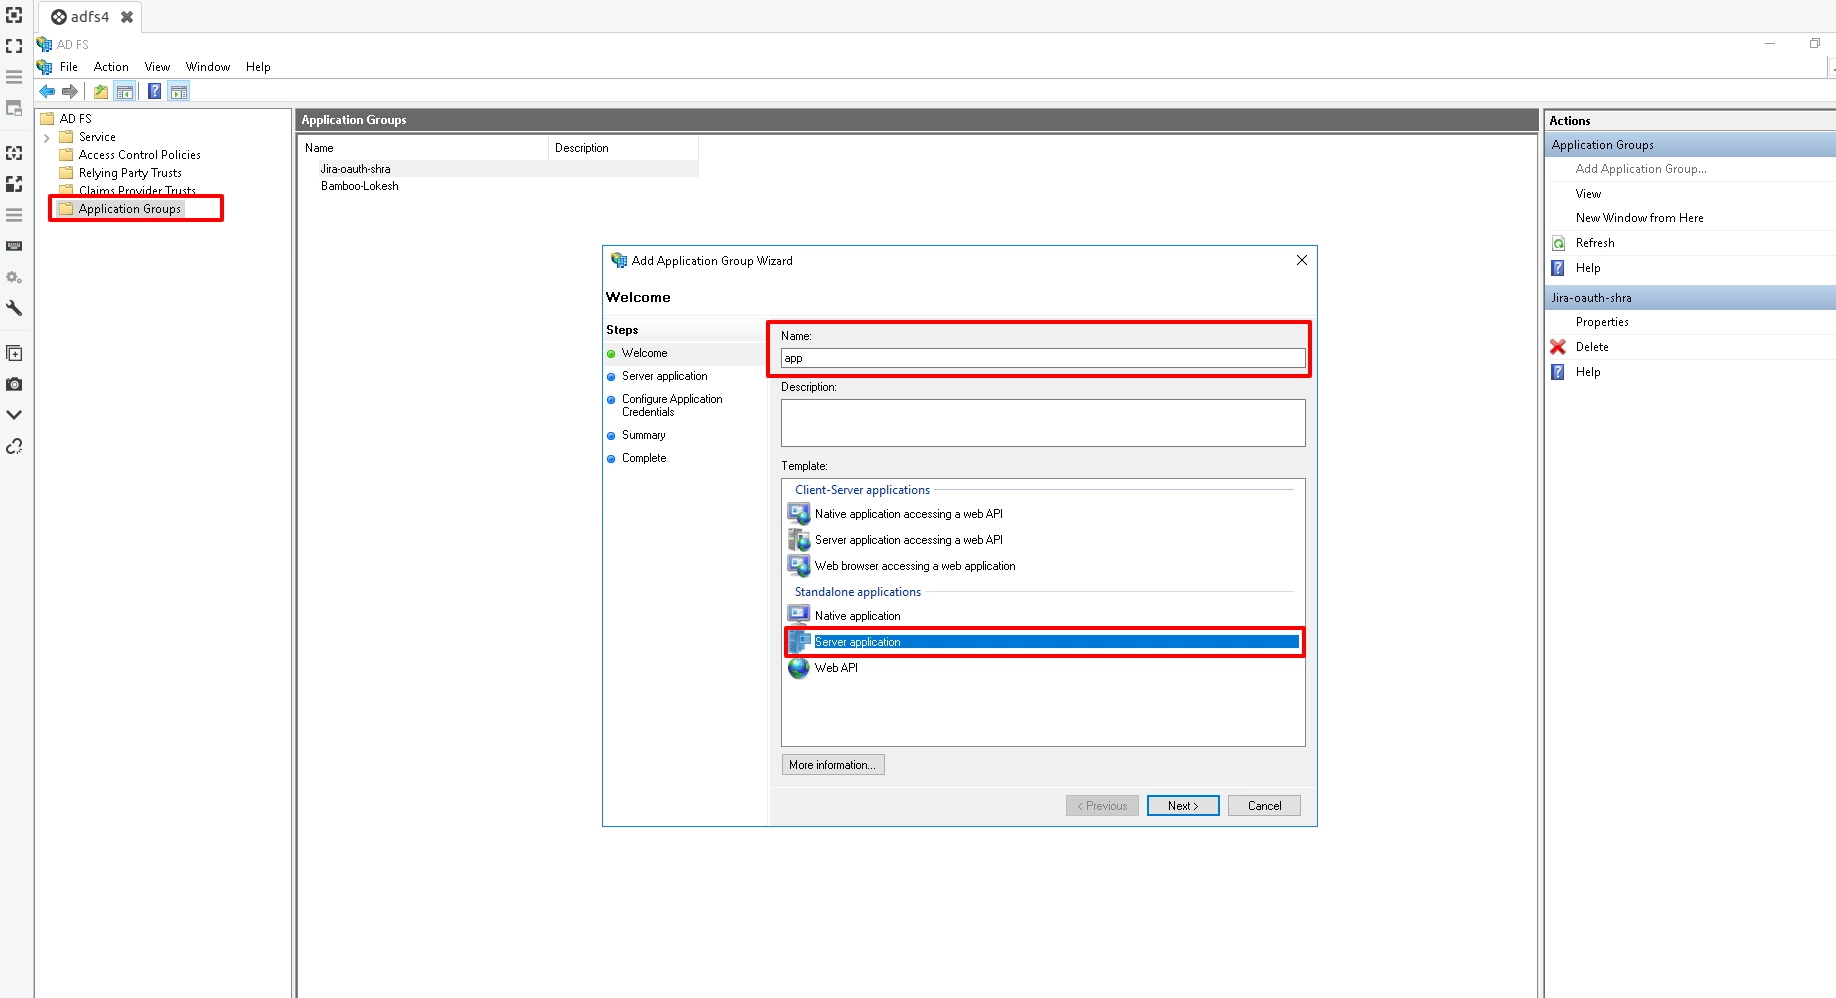
  • Navigate to Server Manager Dashboard->Tools->ADFS Management.
  • OAuth / OPenID Single Sign On (SSO) using ADFS, ADFS Management
  • Navigate to ADFS->Application Groups. Right click on Application Groups & click on Add Application group then enter Application Name. Select Server Application & click on next.
  • OAuth / OPenID Single Sign On (SSO) using ADFS, Application Group
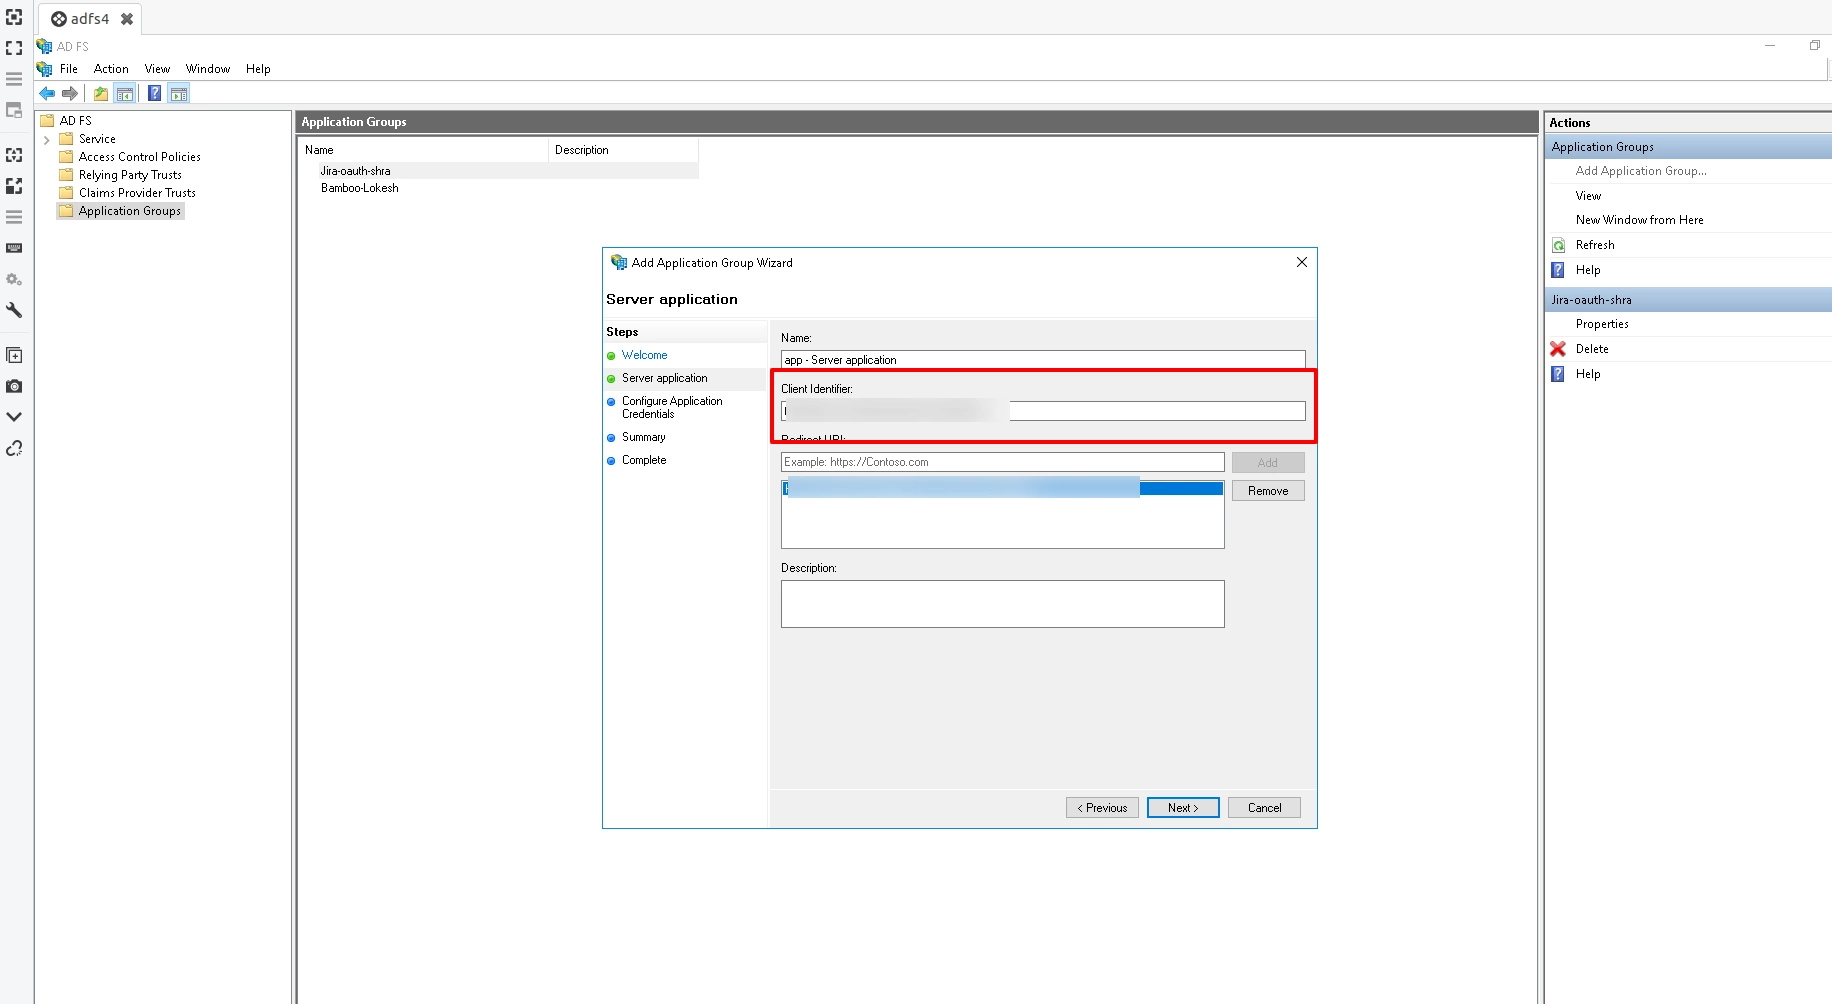
  • Copy Client Identifier. This is your Client ID. Add Callback URL in Redirect URL. You can get this callback URL from plugin. Click on next.
  • OAuth / OPenID Single Sign On (SSO) using ADFS, Client Identifier
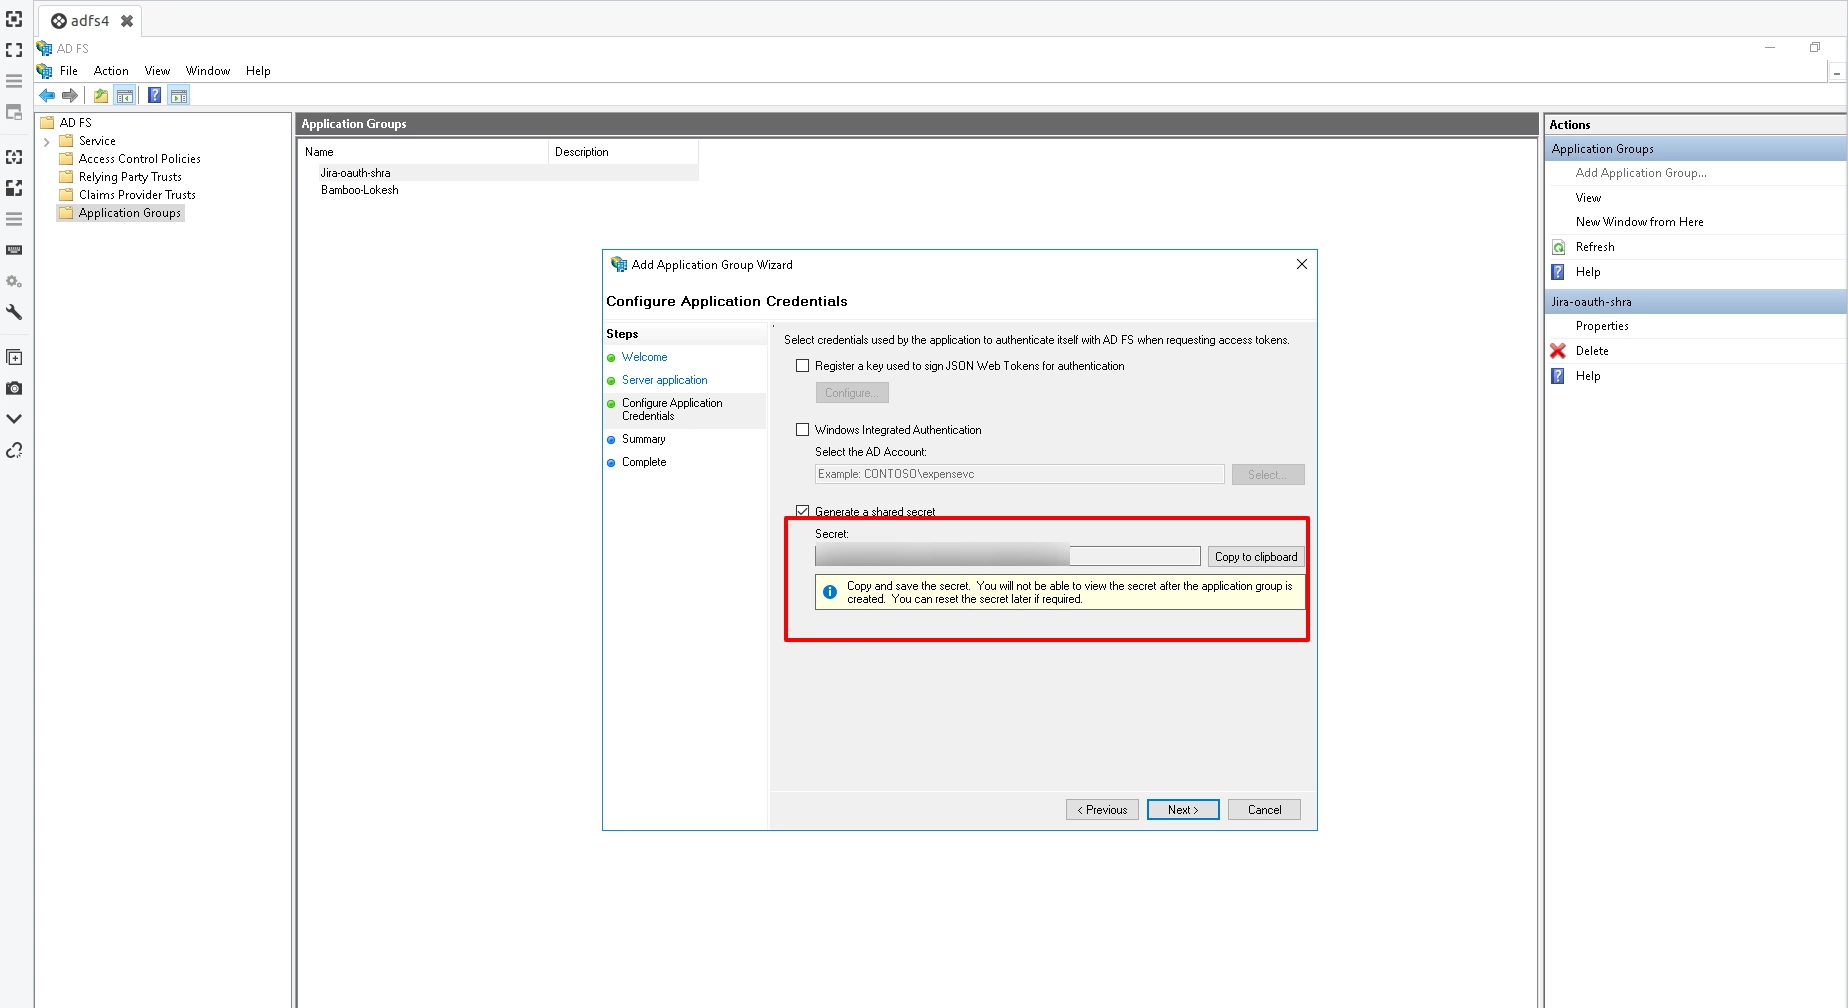
  • Click on Generate shared secret. Copy the Secret value. This is your Client Secret. Click on Next.
  • OAuth / OPenID Single Sign On (SSO) using ADFS, Generate Client Secret
  • On the Summary screen, click Next. On the Complete screen, click Close.
  • Now, right-click on the newly added Application Group and select Properties.
  • Click on Add application from App Properties.
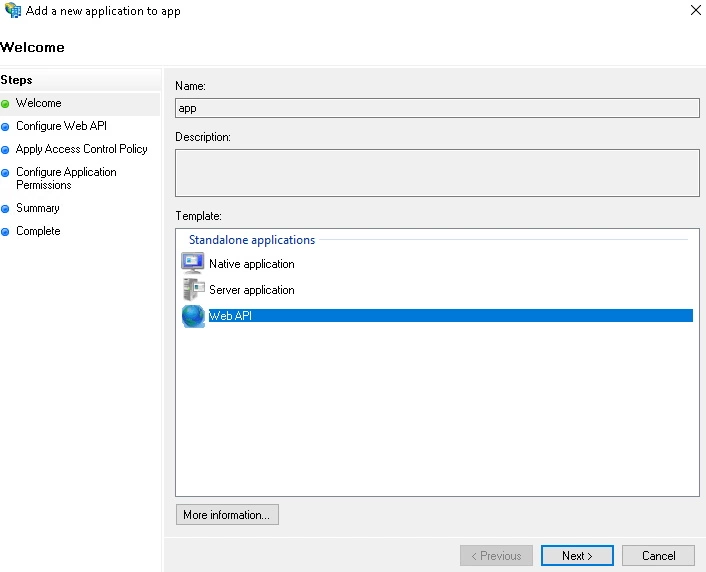
  • Click on the Add application. Then select Web API and click Next.
  • OAuth / OPenID Single Sign On (SSO) using ADFS, Add application
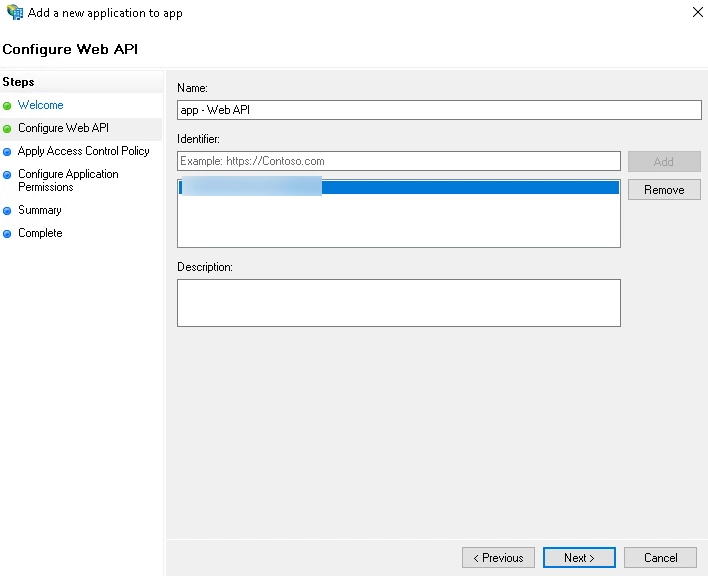
  • On the Configure Web API screen, enter the domain name address into the Identifier section. Click Add. Click Next.
  • OAuth / OPenID Single Sign On (SSO) using ADFS, SSO Login Configure
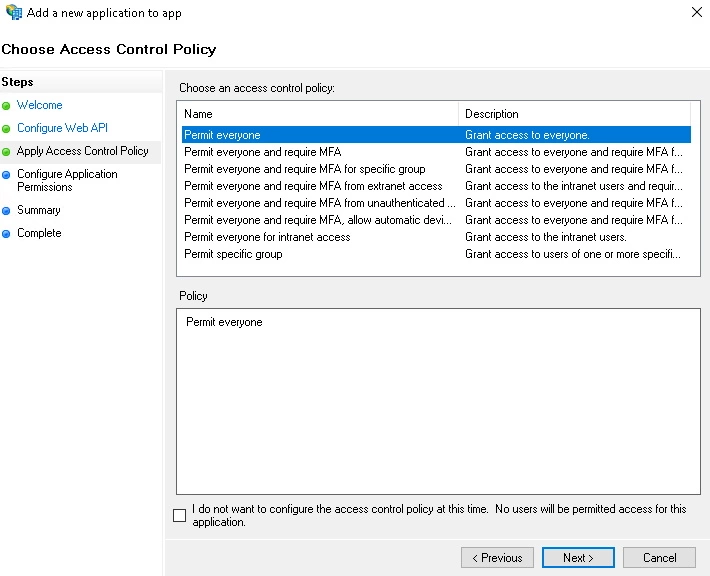
  • On the Choose Access Control Policy screen, select Permit everyone and click Next.
  • OAuth / OPenID Single Sign On (SSO) using ADFS, Access Control Policy
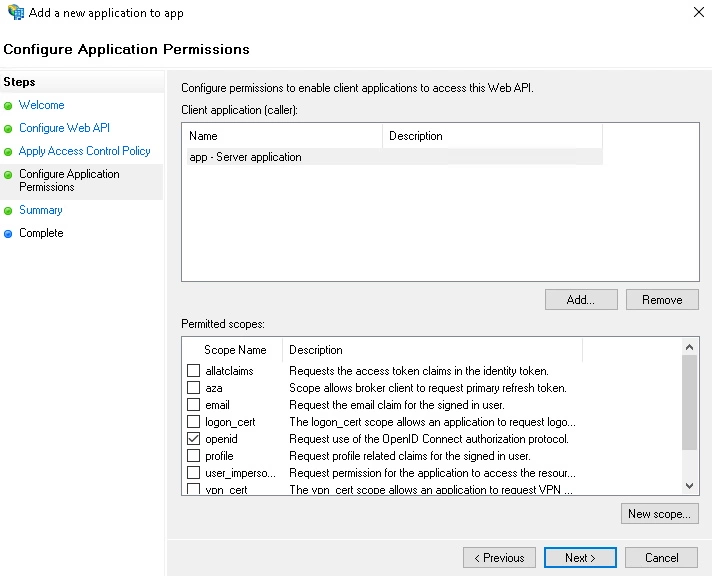
  • On the Configure Application Permission, by default openid is selected as a scope & click on next.
  • OAuth / OPenID Single Sign On (SSO) using ADFS, Configure Application
  • On the Summary screen, click Next. On the Complete screen, click Close.
  • On the Sample Application Properties click OK.

Step 2: Fetch Access token through POSTMAN:

  • Open the Postman Application (Here is the link to download Postman Application).
  • Go to Authorization tab.
  • From the dropdown select type as OAuth 2.0 and  click on Get access token.
  • Add the following information from the table below.
  • Postman starts the authentication flow and prompts you to use the access token.
  • Select Add token to the header.
Field Value
Grant type Authorization Code
Callback URL Enter your application's base URL if you dont have a callback URL
Auth URL [adfs-domain-name]/adfs/oauth2/authorize
Access token URL [adfs-domain-name]/adfs/oauth2/token
Client ID Enter the ADFS Client ID
Client secret Enter the ADFS Client secret
Scope OpenID
Client Authentication Send as Basic Auth Header
  • Copy the Access Token or click on Use Token.
A sample access token from ADFS Provider looks like this.
e8ec210628306b1df26ff61e6b9b3195814a2d79d38a2c7c1dc5836f6ddd7143

Step 3: Configure the Rest API plugin:

Step 1: Enable Rest API Authentication:
  • After installing the app, click on Configure to configure plugin.
  • Navigate to OAuth/OpenID tab.
  • From the drop down select ADFS as OAuth Provider.
  • Enter Public Key for signature validation.
  • Enter the attribute value against which will receive the username from ADFS.
  • Save the settings.
  • Now navigate to the Global Settings tab.
  • Here you will have to Enable the Authentication through Enable REST API Authentication and click on Save.

Rest API OAuth, API token, API Key authentication for Jira and Confluence ADFS

Step 2: Disable Basic Authentication:
  • Disabling this will restrict all the REST API call made using Basic Authentication.

Step 4: Test REST API using access token:

  • Call any REST API. Include the access token in the Authorization header. Here’s an example of fetching content from Jira.
  • Go to the Postman application select method type as GET and enter the Request URL. For eg. http://{Jira_Base_URL}/rest/api/2/project
  • In the Authorization tab select type as Bearer Token.
Rest API OAuth, API token, API Key authentication for Jira and Confluence Confluence-Rest-API-AzureAD B2C  
  • In the Header tab add the header “content-type: application/json and send the request.
Rest API OAuth, API token, API Key authentication for Jira and Confluence Confluence-Rest-API-AzureAD B2C
Request:
     curl 
     -X GET  
     -H "Authorization: Bearer <Access Token>" 
     -H "Content-type: application/json" 
     http://{jira_base_url}/rest/api/2/project
  • This will return all projects which are visible for the current userstatus 200.
  • If the token is invalid or missing, the call will return a 401 Unauthorized response


Our Other Apps: SAML SSO Apps | OAuth Apps | 2FA Apps | Crowd Apps | REST API Apps | Kerberos/NTLM Apps | User Sync Apps |
                             Bitbucket Git Authentication App | Jenkins SSO | SonarQube SSO

If you are looking for anything which you cannot find, please drop us an email on info@xecurify.com

Hello there!

Need Help? We are right here!

support
Contact miniOrange Support
success

Thanks for your inquiry.

If you dont hear from us within 24 hours, please feel free to send a follow up email to info@xecurify.com