SimpleSAMLphp as IDP for WordPress
SimpleSAML Single Sign-On(SSO) login for WordPress can be achieved by using our WordPress SAML Single Sign-On(SSO) plugin. Our plugin is compatible with all the SAML compliant Identity providers. Here we will go through a step-by-step guide to configure SSO login between Wordpress site and SimpleSAML by considering SimpleSAML as IdP(Identity provider) and WordPress as SP(Service provider).
 Pre-requisites : Download And Installation
To configure SimpleSAMLphp as SAML IdP with WordPress, you will need to install the miniOrange WP SAML SP SSO plugin:
Steps to configure SimpleSAML Single Sign-On (SSO) Login into WordPress(WP):
Step 1: Setup SimpleSAML as IdP (Identity Provider)
Follow the steps below to configure SimpleSAML as IdP
Configure SimpleSAML as IdP
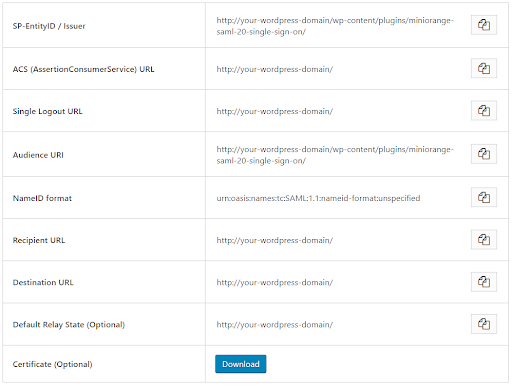
- In the miniOrange SAML SP SSO plugin, navigate to Service Provider Metadata tab. Here, you can find the SP metadata such as SP Entity ID and ACS (AssertionConsumerService) URL which are required to configure the Identity Provider.
- In config/config.php, make sure that 'enable.saml20-idp' is true. Example: ‘enable.saml20-idp’ => true
- In metadata/saml20-idp-hosted.php, configure SimpleSAML as Identity Provider like this:
$metadata['__DYNAMIC:1__'] = [

    'host' => '__DEFAULT__',

    /* X.509 key and certificate. Relative to the cert directory.*/

    'privatekey' => '<YOUR_PRIVATE_KEY_FILE_NAME>',    //eg. RSA_Private_Key.pem

    'certificate' => '<YOUR_PUBLIC_KEY_FILE_NAME>',    //eg. RSA_Public_Key.cer

    /* Authentication source to use. Configured in 'config/authsources.php'. */

    'auth' => '<YOUR_AUTH_SOURCE_NAME>'

]; - In metadata/saml20-sp-remote.php, register your Servider Provider like this:
/* Replace example.com with your wordpress domain name. */
$metadata['https://example.com/miniorange-saml-20-single-sign-on/'] = [

    'AssertionConsumerService' => 'https://example.com/',

    'SingleLogoutService'      => 'https://example.com/',

    'NameIDFormat' => 'urn:oasis:names:tc:SAML:1.1:nameid-format:emailAddress',

    'simplesaml.nameidattribute' => 'mail',

    'simplesaml.attributes'      => true,

    'attributes' => array('mail', 'givenname', 'sn', 'memberOf'),

]; - Here, you can also add user attributes you want to send from SimpleSAML to your Service Provider i.e WordPress.
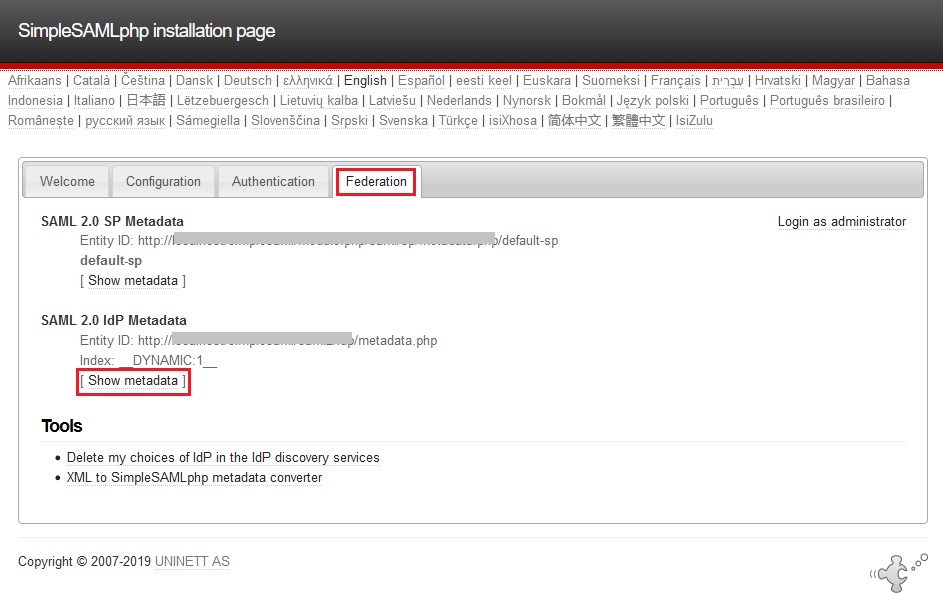
- Go to SimpleSAMLphp homepage of installation.
The URL of an installation can be e.g.: https://service.example.com/simplesaml/ where service.example.com has to be replaced by your SimpleSAMLphp path. (Note: The installation page URL may differ depending on how SimpleSAML installation has been done) - Now go to Federation Tab and click on Show Metadata for SAML 2.0 IdP Metadata.
- You can get the IdP metadata from here which will be required to configure the plugin.
×
![]()
Trending searches:
Hello there!
Need Help? We are right here!
