Search Results :

×

Step By Step Guide To Setup REST API Authentication On Confluence

Confluence provides REST APIs to perform a number of operations such as Create Page, Delete Page, Add Comment, Create Space, etc. However, it supports only two authentication methods for REST APIs:

  1. Basic Authentication
  2. Using Confluence as OAuth 1.0 Provider

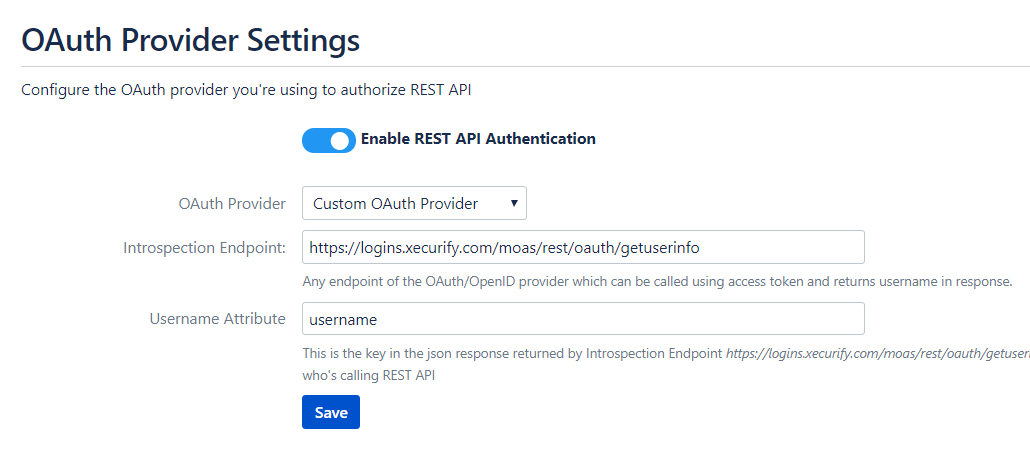
The REST API Authentication plugin for Confluence allows you to use any third party OAuth 2.0 provider/ OpenID connect to authenticate REST APIs.


Benefits of using REST API Authentication add-on:

  1. Secure: This is more secure than Basic Authentication as the user’s credentials are not passed with every API request. The add-on only requires access token generated by the third party OAuth 2.0 Provider/ OpenID Connect.
  2. Flexible:  It allows you to use any third party OAuth 2.0 provider/ OpenID Connect for authentication and not just Confluence.
  3. Overall Protection: The plugin can also block basic authentication requests such that no one without a valid access token can use any REST API.
  4. SSO Compatible: If you’re using Single Sign-On for Confluence, you can configure your Identity Provider to provide authentication for REST APIs as well.


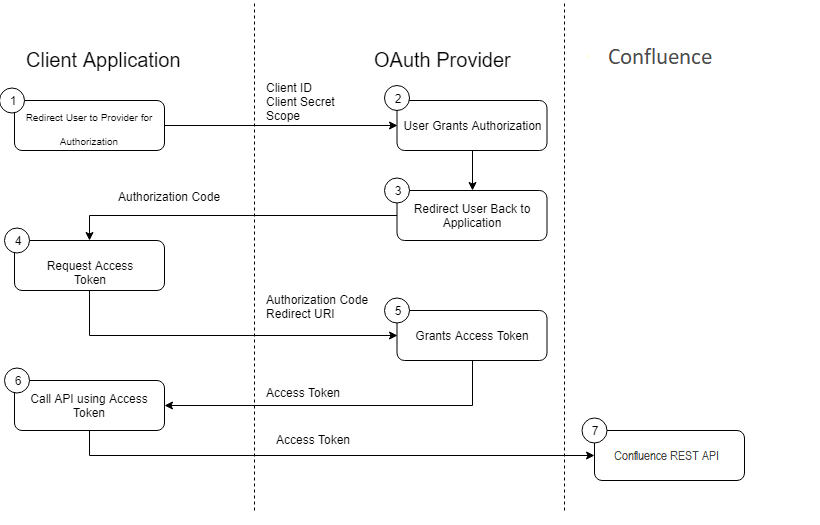
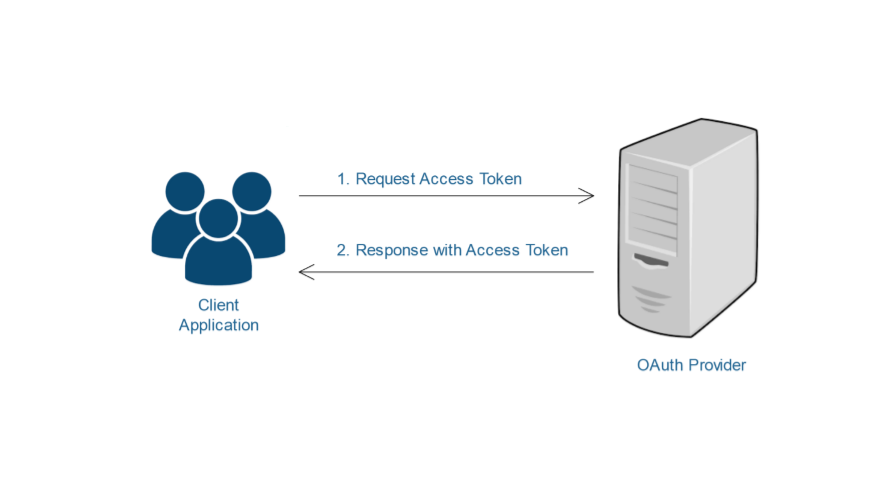
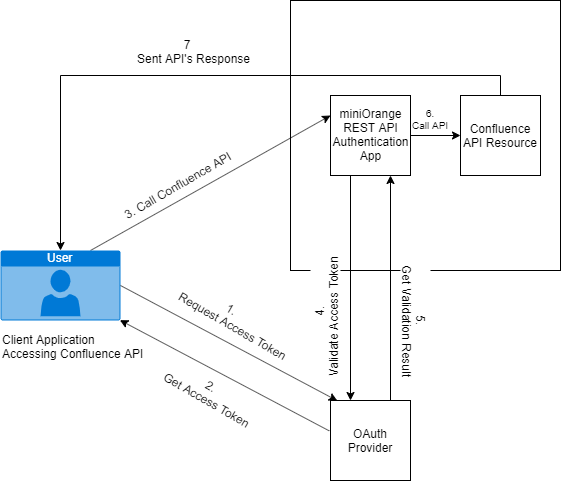
The REST API Authentication flow involves these two simple steps:

  1. Request Access Token from OAuth 2.0/OIDC Provider
  2. Call Confluence REST API using this access token

Steps to set up OAuth 2.0/OpenID Connect authentication using miniOrange REST API Authentication add-on for Confluence:

Note: I’ve used miniOrange OAuth Provider as an example here. The add-on supports any custom OAuth 2.0/OpenID connect provider such as Azure AD, Keycloak, Okta, Gsuite (Google apps), AWS Cognito, Github, Gitlab, etc.

Step 1: Setup OAuth flow between your Client Application and OAuth 2.0/OpenID Connect provider:

    1. Client Application: It’s a service or user who wants to access Confluence REST API.
    2. You will need to set up an OAuth flow between miniOrange and your client application. The client application is any service or user calling Confluence REST API.
    3. It will be used to authorize the user and get access token.  Note: This flow will be set up between your client application and miniOrange OAuth provider. The REST API Authentication add-on is not involved in this process. If your application doesn’t support OAuth 2.0, just drop us an email at info@xecurify.com.
    4. Set up miniOrange as OpenID provider using step by step guide on this link: Setup miniOrange as OpenID Connect Provider.
    5. After setting up miniOrange as OAuth provider, go to Apps Manage Apps. Click on the Edit link beside your the app you created in miniOrange.
    6. Copy the Userinfo Endpoint.

Step 2: Configure Introspection Endpoint in the REST API Authentication add-on:

    1. Introspection Endpoint: An introspection endpoint is an endpoint of the OAuth/OpenID provider which can be called using access token and returns username in response.
    2. Select Custom OAuth Provider in the OAuth Provider Setting tab
    3. Enter the Userinfo endpoint copied in step 1 in Introspection endpoint field. It looks like this.
      https://login.xecurify.com/moas/rest/oauth/getuserinfo
    4. The user info endpoint of miniOrange returns a response like this:
      {
      "sub": "demouser",
      "firstname": "Demo", 
      "email": "demo@example.com",
      "username": "demouser",
      "lastname": "User"
      }
    5. Username Attribute: This key in introspection endpoint response tells plugin which user is making the API call.
    6. In the above response, username attribute contains the Confluence username of person making the API call. Hence username is entered as username attribute. So the plugin will know that Confluence user “demouser” is making an API call.

Step 3: Fetch Access Token from miniOrange OAuth Provider:

    1. Initiate OAuth flow with miniOrange. This OAuth Flow looks like this.

2. At the end of this flow, an access token will be returned to your applications redirect URI configured in miniOrange.

3. A sample access token from miniOrange OAuth provider looks like this.

  A834c0606ba71336423013699db8e971

Step 4: Use Confluence REST API using access token:

    1. Call Confluence any REST API. Include the access token in the Authorization header. Here’s an example of creating Page API.

Request:

     curl \
     -X POST \ 
     -H "Authorization: Bearer <Access Token>" \
     -H "Content-type: application/json" \
     --data {see below} \
     http://localhost:8090/confluence/rest/api/content/|phython-mjson.tool \


Input Data:

     {
         "type":"page",
         "title":"new page",
         "space":{
             "key":"TST"
         },
         "body":{
             "storage":{
                 "value":"<p>This is <br/> a new page</p>",
                 "representation":"storage"
             }
         }
     }

2. The add-on will validate the access token.
3. The issue will be created if the access token invalid.
4. If the token is invalid or missing, the call will return a 401 Unauthorized response.

Here’s the flow diagram of REST API Authentication using miniOrange plugin.

Hello there!

Need Help? We are right here!

support
Contact miniOrange Support
success

Thanks for your inquiry.

If you dont hear from us within 24 hours, please feel free to send a follow up email to info@xecurify.com